
The Crochet Bow Pattern is one of the most charming and versatile projects you can make with yarn and a crochet hook. These adorable handmade bows are perfect for decorating hair accessories, clothing, handbags, baby outfits, blankets, Christmas gifts, and countless other creative projects. With their delicate appearance and simple construction, crochet bows bring a beautiful handmade touch to almost anything.
One of the greatest advantages of this Easy Crochet Bow Tutorial is that it requires only a small amount of yarn and a few basic crochet stitches. Even beginners can create beautiful bows by following a straightforward process. The classic design features two softly rounded loops, a neatly wrapped center, and optional decorative tails. Depending on the yarn and hook size, you can make tiny bows for baby headbands, medium bows for hair clips, or oversized statement bows for home decorations.
Another wonderful feature of the Handmade Crochet Bow Pattern is the opportunity to experiment with colors and textures. Soft pink and ivory create a romantic appearance, while red and white are perfect for Christmas decorations. Navy blue, beige, sage green, lavender, and burgundy offer elegant alternatives for everyday accessories. You can also use velvet yarn for luxurious bows, cotton yarn for crisp stitch definition, or lightweight yarn for delicate embellishments.
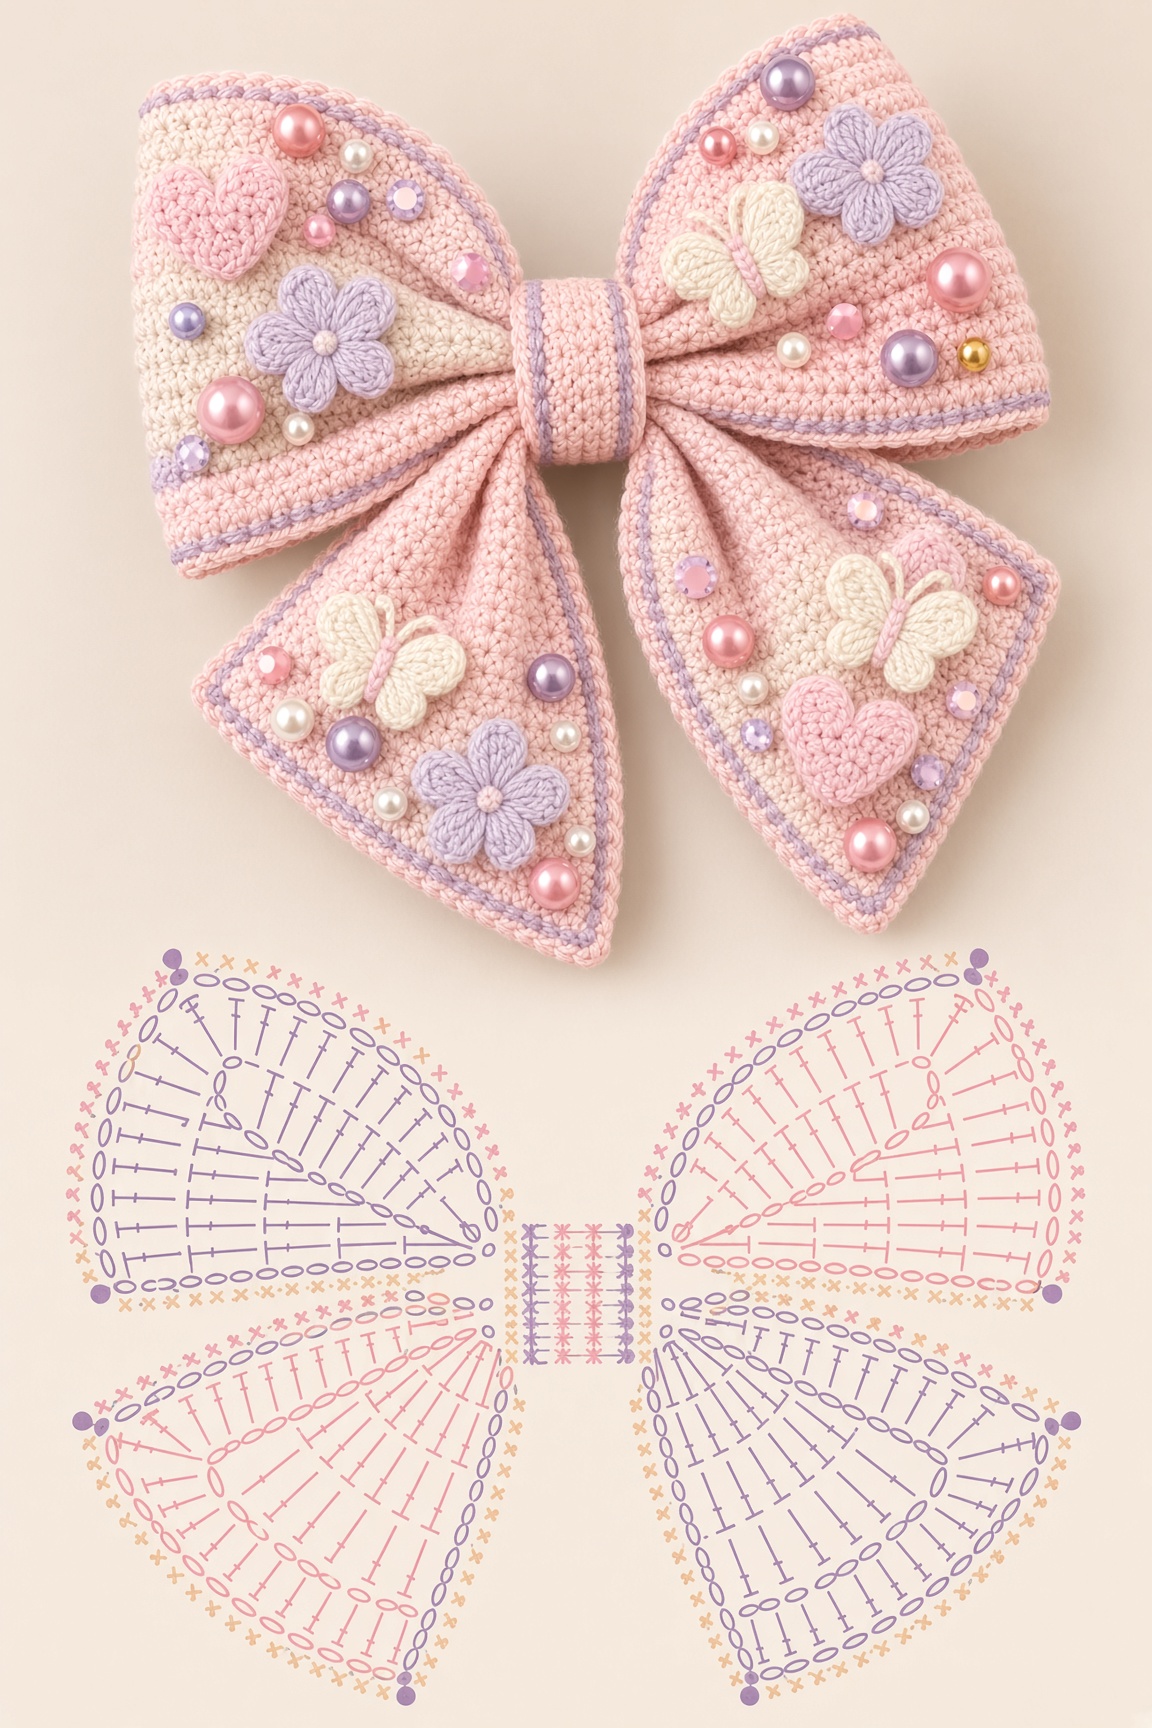
In this complete tutorial, you will learn how to crochet a beautiful classic bow, shape the loops, create a secure center wrap, add optional ribbon-style tails, and attach the finished decoration to different accessories. The instructions use US crochet terminology and include recommended materials, measurements, stitch explanations, customization ideas, and helpful finishing techniques.
DISCOVER MORE FREE PATTERNS HERE!
Materials, Crochet Stitches, and Measurements for the Crochet Bow Pattern
Before starting your Crochet Bow Pattern, choose the yarn that best suits your project. Yarn thickness determines the size, texture, and flexibility of the finished bow. Medium-weight cotton yarn is an excellent choice for beginners because it produces neat stitches and helps the bow maintain its shape.
Acrylic yarn is another practical option, especially when making colorful bows for hair accessories or decorations. It is lightweight, affordable, and available in many beautiful shades. For more delicate projects, lightweight cotton yarn creates smaller bows with a refined appearance.
The crochet hook should be slightly smaller than the size normally recommended for your yarn if you want a firm, structured bow. This helps prevent the loops from becoming too floppy. However, avoid working so tightly that the fabric becomes difficult to shape.
Materials needed
- Medium-weight yarn (Category 4) in your preferred color.
- 3.5 mm or 4.0 mm crochet hook.
- Yarn needle.
- Sharp scissors.
- Measuring tape.
- Stitch markers, optional.
- Hair clips, elastic bands, or headbands, optional.
- Small buttons or decorative pearls, optional.
- Fabric-safe glue, optional for non-wearable decorations.
- Matching sewing thread for attaching accessories.
Suggested finished measurements
| Bow Size | Approximate Width | Approximate Height |
|---|---|---|
| Mini bow | 2 in (5 cm) | 1 in (2.5 cm) |
| Small bow | 3 in (7.5 cm) | 1½ in (4 cm) |
| Medium bow | 4 in (10 cm) | 2 in (5 cm) |
| Large bow | 5–6 in (12.5–15 cm) | 2½–3 in (6.5–7.5 cm) |
| Oversized decorative bow | 7–9 in (18–23 cm) | 3½–4½ in (9–11.5 cm) |
The measurements are approximate because the final size depends on your yarn, crochet tension, and shaping.
Crochet abbreviations – US terms
| Abbreviation | Meaning |
|---|---|
| ch | Chain |
| sc | Single crochet |
| hdc | Half double crochet |
| dc | Double crochet |
| sl st | Slip stitch |
| st | Stitch |
| BLO | Back loop only |
| rep | Repeat |
| FO | Fasten off |
Basic stitches used
Chain Stitch (ch): Creates the foundation of the crochet project.
Single Crochet (sc): Produces a firm, compact fabric.
Half Double Crochet (hdc): Creates a slightly taller stitch with a soft texture.
Double Crochet (dc): Useful for decorative variations and more flexible bows.
Slip Stitch (sl st): Used for joining pieces and finishing edges.
Back Loop Only (BLO): Creates a subtle ribbed texture when desired.
Recommended yarn colors
Blush Pink: Romantic and delicate.
Cream White: Elegant and timeless.
Baby Blue: Soft and charming.
Lavender: Feminine and sophisticated.
Burgundy: Rich and luxurious.
Sage Green: Natural and modern.
Classic Red: Perfect for Christmas bows.
Navy Blue: Beautiful for everyday accessories.
Mustard Yellow: Warm and vintage-inspired.
Emerald Green: Bright and eye-catching.
For a coordinated collection, choose three or four colors that complement each other.
Step-by-Step Crochet Bow Pattern: Creating the Classic Bow
The easiest way to make a Classic Crochet Bow is to crochet a small rectangular piece, fold it into a bow shape, and secure the center with a separate yarn wrap. This technique produces a symmetrical design and allows you to control the size and fullness of the loops.
The following instructions create a medium-sized bow suitable for hair clips, headbands, handbags, and decorative accessories. The finished bow will measure approximately 4 inches (10 cm) wide, depending on your gauge.
Step 1: Make the foundation chain
Using your chosen yarn, make a slip knot.
Chain 31.
Keep the foundation chain relaxed and even.
Avoid pulling the yarn too tightly.
Step 2: Crochet the first row
Insert the hook into the second chain from the hook.
Work 1 single crochet.
Continue working 1 single crochet into each remaining chain.
You should have 30 single crochet stitches.
Chain 1 and turn.
Step 3: Crochet the second row
Work 1 single crochet into each stitch across.
You should still have 30 stitches.
Chain 1 and turn.
This creates a neat rectangular fabric.
Step 4: Continue the rectangle
Repeat the previous row until you have completed 10 rows.
Keep the stitch count consistent.
The rectangle should be approximately 8 inches (20 cm) long before folding, depending on your gauge.
Step 5: Check the shape
Lay the crocheted rectangle flat.
Make sure the edges are straight.
Check that both ends have the same width.
If the rectangle is uneven, correct any missed stitches before continuing.
Step 6: Finish the rectangle
Fasten off.
Leave a long yarn tail for sewing.
Use your fingers to gently smooth the fabric.
Do not stretch the stitches excessively.
Step 7: Form the bow loops
Place the rectangle horizontally.
Bring the two short ends together.
Overlap the ends slightly.
Sew the ends together to create a continuous loop.
Turn the loop so the seam is positioned at the back center.
Step 8: Flatten the loop
Lay the loop flat with the seam facing down.
The folded ends will form the left and right sides of the bow.
Adjust the fabric until both sides appear symmetrical.
The piece should now resemble a flat double-layered rectangle.
Step 9: Pinch the center
Using your fingers, pinch the middle of the rectangle.
Fold the fabric into small accordion-style pleats.
Try to create three evenly spaced folds.
Hold the center securely.
The left and right sides will begin to form rounded bow loops.
Step 10: Secure the bow shape
Thread a yarn needle with matching yarn.
Wrap the yarn around the pinched center several times.
Pull gently until the center is firm.
Tie a secure knot on the back.
Do not cut the yarn too close to the knot.
Step 11: Adjust the loops
Gently pull the left loop outward.
Repeat on the right side.
Adjust the top and bottom edges.
Make sure both loops have a balanced appearance.
The basic Crochet Bow Pattern is now formed.
Step 12: Prepare the center wrap
The center wrap hides the gathering stitches and gives the bow a professional finish.
Using matching yarn, chain 7.
Work 1 single crochet into the second chain from the hook.
Continue across. (6)
Chain 1 and turn.
Step 13: Crochet the center band
Work 1 single crochet into each stitch.
Repeat until the band is long enough to wrap around the gathered center.
For most medium bows, approximately 5–7 rows will be sufficient.
Fasten off, leaving a sewing tail.
Step 14: Attach the center band
Wrap the band around the center of the bow.
Position the ends at the back.
Sew the ends together.
Make sure the band is snug but not overly tight.
Adjust the bow loops one final time.
Step 15: Finish the classic bow
Weave in all loose yarn tails.
Trim excess yarn.
Shape the loops with your fingers.
Your Easy Handmade Crochet Bow is complete.
How to Make Crochet Bow Tails, Decorative Borders, and Different Bow Styles
Once you understand the classic Crochet Bow Pattern, you can create many beautiful variations. Adding ribbon-style tails transforms a simple bow into an elegant accessory suitable for gift wrapping, clothing, handbags, and seasonal decorations.
Decorative borders also provide an opportunity to experiment with different crochet stitches. A contrasting single crochet border creates a neat outline, while a scalloped edge gives the bow a more romantic appearance.
You can also modify the shape by using wider rectangles, textured stitches, or different yarn weights. These small changes produce noticeably different results while maintaining the same basic construction method.
Step 1: Crochet the first bow tail
Using matching yarn, chain 26.
Work 1 single crochet into the second chain from the hook.
Continue across. (25)
Chain 1 and turn.
Step 2: Add width to the tail
Work 1 single crochet into each stitch across.
Repeat for 3–4 rows.
The finished strip should be approximately 6 inches (15 cm) long, depending on your gauge.
Fasten off.
Step 3: Make the second tail
Repeat the same instructions.
Try to match the length and width of the first tail.
Lay both pieces side by side.
Adjust them if necessary.
Step 4: Create angled tail ends
For a ribbon-inspired appearance, fold the bottom of each tail into a shallow V shape.
Secure the folds with small sewing stitches.
Alternatively, leave the tails straight for a simpler design.
Step 5: Attach the tails
Position both tails behind the bow.
Allow them to extend downward.
Angle them slightly outward.
Sew the upper ends to the back center of the bow.
Cover the attachment with the center band.
Step 6: Add a contrasting border
Choose a second yarn color.
Insert your hook along the outer edge of the bow.
Work single crochet stitches evenly around the visible edges.
At corners, add extra stitches only as needed to prevent curling.
Join with a slip stitch.
Step 7: Make a scalloped border
For a decorative variation, work a shell of 5 double crochet stitches into one edge stitch.
Skip 1 stitch.
Work 1 single crochet into the next stitch.
Skip 1 stitch.
Repeat along the edge where the stitch spacing allows.
This creates a soft, rounded border.
Step 8: Create a textured bow
For a ribbed appearance, crochet the rectangle using single crochet stitches worked in the back loop only.
Repeat until the desired length is reached.
The ribbed texture adds dimension.
This variation works beautifully with solid-colored yarn.
Step 9: Make a double-layered bow
Crochet one large rectangle.
Make a second rectangle approximately 25% smaller.
Shape both rectangles into bows.
Place the smaller bow over the larger one.
Secure them together at the center.
Wrap a single band around both layers.
Step 10: Add decorative details
Sew a small pearl-style bead to the center of a bow intended for adult use or display.
Add a tiny crocheted flower.
Use metallic embroidery thread for a festive touch.
Avoid small detachable decorations on accessories intended for babies or young children.
Beautiful crochet bow variations
Classic Crochet Hair Bow: A simple rectangular bow with a neat center wrap.
Crochet Ribbon Bow: A bow with long decorative tails.
Double-Layer Crochet Bow: Two stacked bows for extra volume.
Ribbed Crochet Bow: A textured bow made with back-loop stitches.
Scalloped Crochet Bow: A romantic bow with decorative edging.
Mini Crochet Bow: A small embellishment for cards, ornaments, or adult accessories.
Christmas Crochet Bow: A festive design made with red, green, or white yarn.
Vintage Crochet Bow: A soft cream or dusty rose bow with delicate texture.
Creative Uses, Finishing Tips, and Frequently Asked Questions
The Crochet Bow Pattern is incredibly versatile because the finished bows can be attached to many different handmade items. A small bow can decorate a crochet hat, while a larger version can become the centerpiece of a handbag or decorative pillow.
Crochet bows are also excellent projects for using leftover yarn. Instead of discarding small yarn scraps, you can transform them into colorful accessories and embellishments. This makes the project both economical and enjoyable.
For a coordinated handmade collection, consider creating matching bows in several sizes. A large bow can decorate a bag, a medium bow can embellish a headband, and a smaller bow can be used as a decorative accent on a gift.
How to attach a crochet bow to a hair clip
Choose a sturdy hair clip.
Position the bow over the clip.
Use matching thread to sew the bow securely to the clip’s attachment points.
If the clip has no suitable sewing holes, use a compatible accessory base designed for fabric attachment.
Check that the bow does not interfere with the clip mechanism.
How to attach a bow to a headband
Place the bow in your preferred position.
Use a yarn needle and matching yarn to stitch the center band around the headband.
Secure the attachment firmly.
Avoid leaving loose loops.
Check that the headband remains comfortable.
How to decorate a handbag
Choose a bow that complements the bag’s fabric or yarn color.
Position the bow near the upper corner or center.
Sew through the bow’s center band.
Use several secure stitches.
Avoid attaching the bow where it could interfere with zippers or handles.
How to make Christmas crochet bows
Use red, forest green, ivory, or burgundy yarn.
Create the classic bow shape.
Add a contrasting white border.
Attach a hanging loop if desired.
Use the finished bow to decorate wreaths, gift packages, or Christmas trees.
How to keep crochet bows looking beautiful
Maintain even tension. Consistent stitches create a smooth, professional appearance.
Use a firm center wrap. This prevents the bow from losing its shape.
Match both loops. Adjust the fabric before securing the center.
Choose the right yarn. Cotton provides structure, while acrylic creates a softer finish.
Avoid excessive stretching. Pulling too hard can distort the bow.
Weave in yarn tails carefully. Secure finishing helps the bow remain neat.
Use matching thread. Invisible attachments create a cleaner appearance.
Experiment with textures. Ribbed stitches, shell borders, and layered bows add variety.
Select colors thoughtfully. Coordinated palettes make handmade accessories look elegant.
Store bows carefully. Keep them flat or gently shaped to prevent crushing.
Frequently Asked Questions About the Crochet Bow Pattern
1. Is this Crochet Bow Pattern suitable for beginners?
Yes. The classic bow uses basic single crochet stitches and simple sewing techniques.
2. What is the best yarn for crochet bows?
Cotton yarn is excellent for structured bows, while acrylic yarn works well for softer accessories.
3. What crochet hook should I use?
A 3.5 mm or 4.0 mm hook is suitable for many medium-weight yarns.
4. How long does it take to crochet a bow?
A simple bow may take approximately 20–45 minutes, depending on your experience.
5. Can I make a crochet bow without sewing?
Yes. You can use a long yarn strand to gather and secure the center, although some sewing is useful for a durable finish.
6. How can I make the bow larger?
Increase the foundation chain length and the number of rows.
7. How can I make a smaller bow?
Use fewer foundation chains and fewer rows, or choose thinner yarn.
8. Can I use velvet yarn?
Yes. Velvet yarn creates soft, luxurious bows, although it may be more difficult for beginners to work with.
9. Can I attach crochet bows to baby clothing?
Yes, but the bows must be securely attached and free from detachable beads, buttons, or other choking hazards.
10. Can I use crochet bows for Christmas decorations?
Absolutely. Red, green, cream, and gold combinations are especially beautiful.
11. Can I make crochet bows with leftover yarn?
Yes. Small bows are excellent scrap-yarn projects.
12. Can I add decorative tails?
Yes. Crochet two narrow strips and attach them behind the center of the bow.
13. How do I prevent the bow from curling?
Use consistent tension, avoid an overly tight foundation chain, and gently shape the finished piece.
14. Can I wash crochet bows?
Most cotton and acrylic bows can be washed according to the yarn manufacturer’s instructions. Reshape them while damp and allow them to dry flat.
15. Can I sell handmade crochet bows?
Generally, you can sell bows you make yourself, subject to any applicable pattern rights and local regulations.
Conclusion
The Crochet Bow Pattern is a beautiful and practical project that demonstrates how a few simple crochet stitches can create an elegant handmade accessory. With its rounded loops, neatly wrapped center, and endless color possibilities, this classic design is perfect for both beginners and experienced crocheters.
One of the most enjoyable aspects of making crochet bows is the freedom to customize each piece. You can create soft pastel bows for delicate accessories, bold colorful bows for handbags, elegant neutral bows for everyday use, or festive red and green bows for Christmas decorations.
The project is also a wonderful way to practice basic crochet techniques, improve stitch consistency, and experiment with decorative finishes. By learning the rectangular construction method, you can easily adjust the size, texture, and style of your bows.
Whether you are creating hair accessories, decorating handmade gifts, embellishing clothing, or adding charming details to home décor, these Easy Crochet Bows offer countless creative possibilities.
With just a little yarn, a crochet hook, and a few simple steps, you can create a collection of beautiful handmade bows that bring color, personality, and timeless crochet charm to your favorite projects.