
The Crochet Pet Clothing Pattern is a wonderful project for anyone who loves handmade accessories and wants to create something comfortable, practical, and beautiful for their four-legged companion. Inspired by the adorable teal-blue dog coat shown in the reference image, this design combines a textured crochet body, a comfortable neckline, a gently curved back, and adjustable fastening straps. The result is an attractive handmade garment that helps keep your dog cozy during cooler weather.
One of the most appealing features of this Crochet Dog Coat Pattern is its elegant simplicity. The rich teal color creates a sophisticated appearance, while the neat rows of crochet stitches give the garment a professional handmade finish. The coat covers the dog’s back without restricting the legs, and the front closure allows the garment to be adjusted for a comfortable fit. This combination makes it especially suitable for small and medium-sized dogs that need a lightweight extra layer during walks or relaxing outdoors.
Another advantage of this Easy Crochet Pet Sweater Tutorial is that it can be customized to suit different breeds, body shapes, and personal preferences. You can use emerald green for a luxurious appearance, navy blue for a classic style, burgundy for winter, or bright red for Christmas. By adjusting the foundation chain, body length, neckline, and fastening straps, you can create a coat that fits your pet more comfortably than a generic one-size-fits-all design.
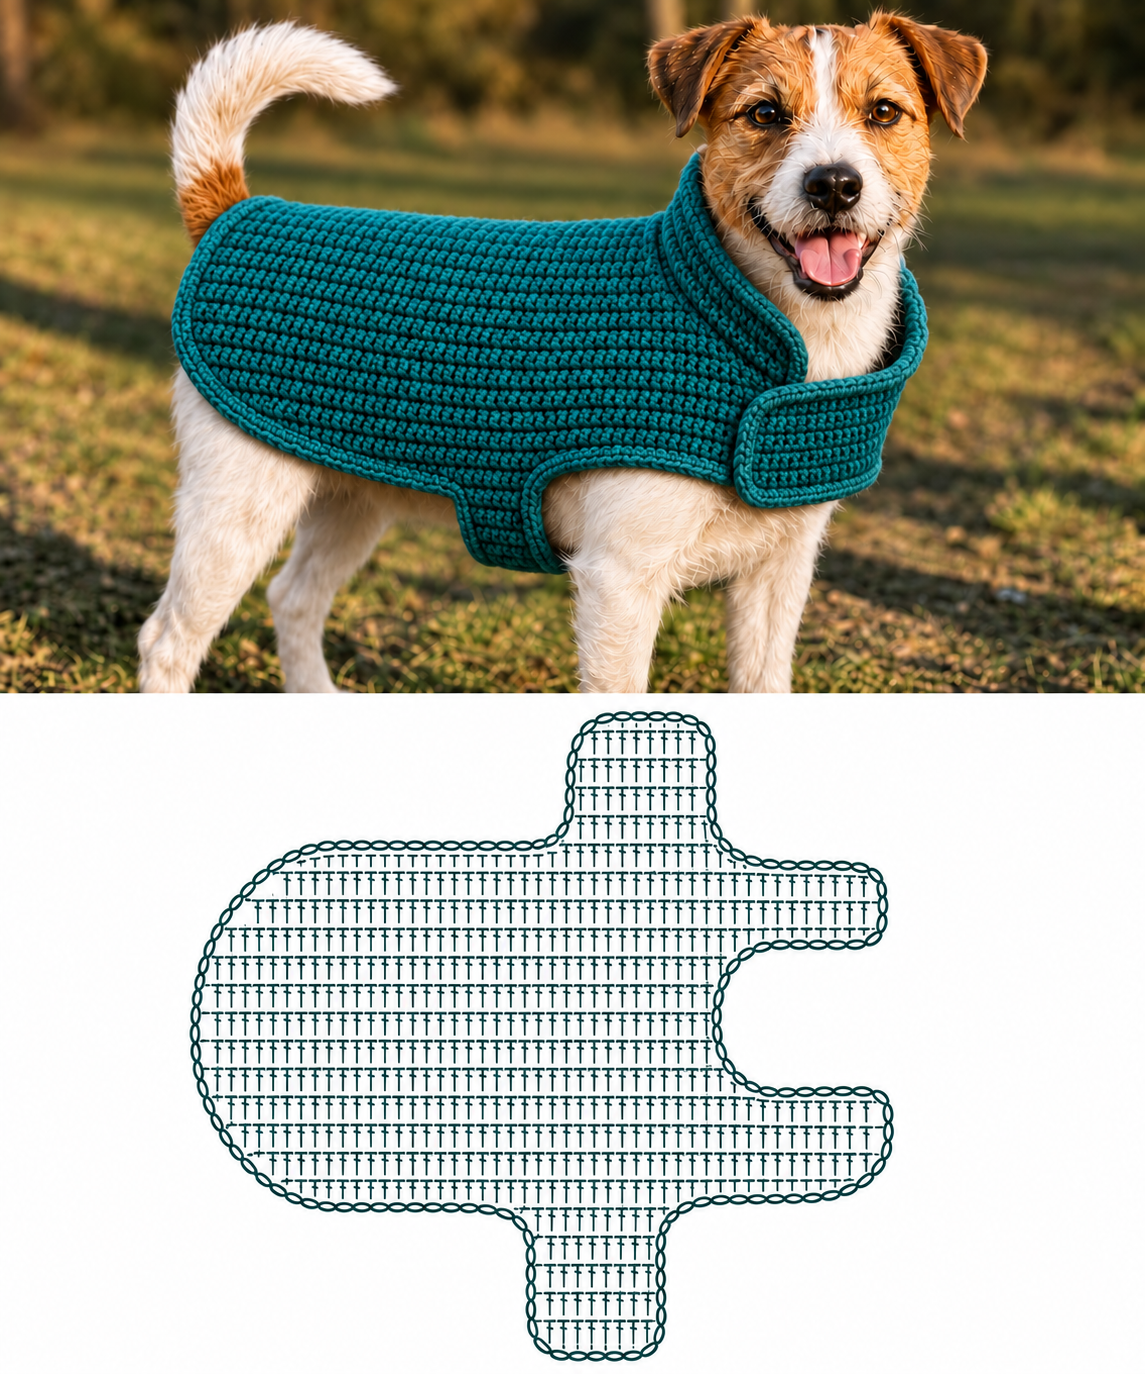
In this detailed tutorial, you will learn how to measure your dog, select the right yarn, crochet the main body panel, shape the back, create the chest and neck fastening straps, and add a neat decorative border. All crochet instructions use US terminology, with measurements in inches and centimeters. The construction is inspired by the photograph and provides an adaptable original pattern rather than claiming to reproduce every stitch of the pictured diagram exactly.
DISCOVER MORE FREE PATTERNS HERE!
Materials, Measurements, and Crochet Stitches for the Pet Clothing Pattern
Choosing suitable yarn is the first step in making a successful Handmade Crochet Dog Coat. Pet clothing should feel soft against the animal’s body, maintain its shape during movement, and be easy to clean. A smooth, machine-washable acrylic yarn or soft cotton-acrylic blend is often a practical choice for everyday pet garments.
The teal coat in the reference image features a compact, textured crochet surface. To achieve a similar appearance, this tutorial uses half double crochet stitches for the main body and single crochet stitches for the borders. These stitches create a flexible but relatively dense fabric, helping the coat hold its shape without becoming excessively stiff.
Before beginning, measure your dog carefully. Dogs of the same breed can have different body proportions, so chest circumference, neck circumference, and back length are more important than relying on breed labels alone. Always allow enough room for comfortable breathing, walking, sitting, and lying down.
Materials needed
- 200–350 yards (185–320 m) of medium-weight yarn, depending on the dog’s size.
- 4.5 mm or 5.0 mm crochet hook.
- Yarn needle.
- Scissors.
- Flexible measuring tape.
- Stitch markers.
- Two or three pieces of sew-on hook-and-loop fastening tape.
- Matching sewing thread and needle.
- Optional contrasting yarn for decorative borders.
Choose a yarn without loose fibers or dangling embellishments that your pet might chew or swallow.
Recommended dog measurements
| Measurement | Small Dog Example | Medium Dog Example |
|---|---|---|
| Back length | 12 in (30.5 cm) | 16 in (40.5 cm) |
| Chest circumference | 16 in (40.5 cm) | 22 in (56 cm) |
| Neck circumference | 11 in (28 cm) | 15 in (38 cm) |
| Main back-panel width | 10 in (25.5 cm) | 14 in (35.5 cm) |
| Main back-panel length | 11 in (28 cm) | 15 in (38 cm) |
| Chest strap width | 2½ in (6.5 cm) | 3 in (7.5 cm) |
These are starting examples, not universal sizes. Adjust every measurement to your own dog.
How to measure your dog correctly
Back Length: Measure from the base of the neck to just before the tail.
Chest Circumference: Measure around the widest part of the chest, usually just behind the front legs.
Neck Circumference: Measure around the base of the neck where the collar normally sits.
Chest Strap Position: Measure the distance from the base of the neck to the area just behind the front legs.
Belly Clearance: Check how much of the underside can be covered without interfering with movement or bathroom needs.
A flexible fit should allow approximately two fingers to slide comfortably beneath the fastened garment. The coat must not press against the throat or restrict the shoulders.
Crochet abbreviations – US terms
| Abbreviation | Meaning |
|---|---|
| ch | Chain |
| sc | Single crochet |
| hdc | Half double crochet |
| dc | Double crochet |
| sl st | Slip stitch |
| st | Stitch |
| inc | Increase |
| dec | Decrease |
| BLO | Back loop only |
| rep | Repeat |
| FO | Fasten off |
Recommended crochet gauge
For the example, aim for approximately:
- 14 half double crochet stitches = 4 inches (10 cm).
- 11 half double crochet rows = 4 inches (10 cm).
Make a gauge swatch before beginning. If your stitches are larger or smaller, adjust the hook size or calculate your stitch count from your own gauge.
Choosing beautiful colors
Teal Blue: Elegant and similar to the reference image.
Emerald Green: Rich and eye-catching.
Navy Blue: Classic and sophisticated.
Burgundy: Warm and perfect for autumn.
Mustard Yellow: Vintage-inspired and cheerful.
Forest Green: Natural and beautiful for winter.
Royal Blue: Bright and modern.
Red and White: Festive for Christmas.
Step-by-Step Crochet Pet Clothing Pattern: Making the Main Body
The main body is the largest component of the Crochet Dog Clothing Pattern. It should follow the natural shape of the dog’s back, providing coverage without extending too far over the tail or interfering with the front legs.
This tutorial uses a flat rectangular panel with a gently rounded rear edge. The panel is worked in rows of half double crochet stitches, which create a textured surface similar to the garment shown in the reference image.
The example below is intended for a small dog with a back length of approximately 12 inches (30.5 cm). The finished main panel measures about 10 inches (25.5 cm) wide and 11 inches (28 cm) long before the border.
Step 1: Make the foundation chain
Using teal yarn and a 5.0 mm crochet hook, make a slip knot.
Chain 36.
Keep the foundation chain relaxed.
Avoid pulling the stitches too tightly.
Step 2: Crochet the first row
Work 1 half double crochet into the third chain from the hook.
Continue working 1 half double crochet into each remaining chain.
You should have 34 half double crochet stitches.
Chain 2 and turn.
Step 3: Crochet the second row
Work 1 half double crochet into each stitch across.
Maintain 34 stitches.
Chain 2 and turn.
Keep the edges straight.
Step 4: Continue the body panel
Repeat the second row until the panel measures approximately 9 inches (23 cm) from the starting edge.
With the suggested gauge, this will take approximately 25 rows.
Measure the panel rather than relying only on the row count.
Step 5: Begin shaping the rear edge
The rear portion of the coat should curve gently toward the tail.
At the beginning of the next row, work 1 half double crochet decrease over the first 2 stitches.
Continue working half double crochet stitches across until 2 stitches remain.
Work another half double crochet decrease.
You should have 32 stitches.
Step 6: Continue decreasing
Chain 2 and turn.
Work 1 half double crochet into each stitch across.
On the following row, decrease once at each end.
Repeat this two-row sequence until you have completed 4 decrease rows in total.
The final shaped row should contain 26 stitches.
Step 7: Check the back length
Lay the panel flat.
Measure from the original foundation edge to the rounded rear edge.
The total length should be close to 11 inches (28 cm).
If the panel is too long, adjust the number of straight rows before shaping.
If it is too short, add more straight rows.
Step 8: Finish the main panel
Fasten off.
Leave a yarn tail long enough for weaving.
Gently smooth the fabric.
Check that the panel is symmetrical.
The main body of your Crochet Pet Coat is now complete.
How to Crochet the Neckline, Chest Straps, and Decorative Border
The neckline and fastening straps are essential for a comfortable Crochet Dog Jacket Pattern. Unlike a pullover sweater, the coat shown in the reference image has an open front with overlapping sections. This makes it easier to put on and remove, particularly for dogs that dislike clothing being pulled over their heads.
The neckline should sit around the base of the neck rather than tightly against the throat. The chest strap should secure the coat behind the front legs while leaving enough clearance for walking and sitting.
For the best fit, create the straps separately and check their placement on your dog before sewing them permanently to the main body.
Step 1: Prepare the neckline
Lay the main panel flat with the original foundation edge at the top.
This edge will sit near the base of the dog’s neck.
Mark the center.
Identify the points where the two neck tabs will attach.
Step 2: Crochet the first neck tab
Chain 11.
Work 1 single crochet into the second chain from the hook.
Continue across. (10)
Chain 1 and turn.
Work 1 single crochet into each stitch.
Repeat until the tab measures approximately 4 inches (10 cm) long.
Fasten off.
Step 3: Crochet the second neck tab
Repeat the same instructions.
Make the second tab slightly longer if your fastening design requires an overlap.
Position the two tabs at opposite ends of the neckline.
The tabs should overlap comfortably at the front of the dog’s chest.
Step 4: Attach the neck tabs
Place the first tab at one upper corner of the main body panel.
Sew securely using matching yarn.
Attach the second tab to the opposite corner.
Check that both tabs lie flat.
Do not twist the fabric.
Step 5: Measure the chest strap
Place the main panel gently over your dog’s back.
Mark the location just behind the front legs.
Measure the distance the strap must travel beneath the chest to reach the opposite side.
Allow for a comfortable overlap.
Remove the panel before continuing.
Step 6: Crochet the chest strap
Chain 13.
Work 1 single crochet into the second chain from the hook.
Continue across. (12)
Chain 1 and turn.
Work 1 single crochet into each stitch.
Repeat until the strap reaches the required length.
Fasten off.
Step 7: Attach the chest strap
Sew one end of the strap to the marked position on the side of the main panel.
Position the opposite end so it can fasten to the other side.
The strap should sit behind the front legs.
Check that it does not rub against the armpits.
Step 8: Add the fasteners
Sew a piece of hook-and-loop tape to the underside of the first neck tab.
Attach the matching piece to the opposite tab.
Repeat for the chest strap.
Use several secure stitches around each fastener.
Keep rough hook surfaces away from your dog’s fur and skin.
Step 9: Crochet the decorative border
Attach teal yarn to the edge of the main body.
Work single crochet stitches evenly around the perimeter.
At curved corners, add stitches as needed to keep the border flat.
At inward curves, avoid overcrowding the stitches.
Join with a slip stitch.
Step 10: Add a second border round
Work another round of single crochet.
Maintain even tension.
This creates a thicker, more defined edge.
The border helps the garment maintain its shape.
Step 11: Finish the neckline
Work a row of single crochet along the outer edges of the neck tabs.
This creates a neat finish.
If desired, use a slightly smaller hook to make the edge firmer.
Avoid tightening the neckline.
Step 12: Weave in the ends
Use a yarn needle to hide all loose yarn tails.
Secure the ends carefully.
Trim excess yarn.
Inspect every seam and fastening point.
Step 13: Test the fit
Place the finished coat on your dog.
Fasten the neck tabs gently.
Secure the chest strap.
Check the shoulder movement.
Make sure the front legs can move freely.
Confirm that the coat does not shift excessively when your dog walks.
The Handmade Crochet Dog Coat is now ready for final adjustments.
Customization Ideas, Pet Comfort Tips, and Frequently Asked Questions
One of the most enjoyable aspects of making a Crochet Pet Clothing Pattern is the ability to personalize the design. You can create a simple solid-colored coat for everyday use or add decorative borders and contrasting colors for a more fashionable appearance.
The teal-blue coat shown in the image is an excellent example of how a simple crochet texture can look elegant without complicated embellishments. The rich color, clean edges, and adjustable front closure create a beautiful handmade garment suitable for casual outings and cooler weather.
When customizing pet clothing, always prioritize comfort over decoration. Dogs need freedom of movement, proper ventilation, and easy access to their natural range of motion. Avoid tight necklines, heavy accessories, dangling cords, or decorations that could be chewed.
Creative design variations
Classic Teal Coat: Use teal yarn throughout for an elegant, coordinated appearance.
Two-Tone Coat: Crochet the body in navy blue and the borders in cream.
Christmas Dog Coat: Use red yarn with white edging.
Autumn Coat: Combine mustard yellow and burgundy.
Vintage Coat: Use dusty rose with beige borders.
Winter Coat: Choose forest green with a thick, softly textured neckline.
Sporty Coat: Use royal blue with gray trim.
Minimalist Coat: Create the entire garment in charcoal gray or oatmeal.
Adding decorative details
You can add a small crocheted heart to the back panel.
A simple contrasting stripe can be worked near the rear edge.
A decorative crochet flower can be sewn onto the outside of the coat if it is securely attached and inaccessible to chewing.
Avoid buttons, beads, bells, or other detachable decorations that may create choking hazards.
How to make the coat larger
Measure the dog’s back and chest.
Calculate the number of stitches required using your gauge.
Increase the foundation chain until the panel reaches the desired width.
Add rows until the body reaches the required length.
Adjust the neckline and chest strap measurements independently.
How to make the coat smaller
Use the same measuring method.
Reduce the foundation chain.
Work fewer rows.
Make shorter fastening straps.
Check the fit frequently.
Tips for a professional finish
Maintain even crochet tension. Consistent stitches create a smooth appearance.
Choose washable yarn. Pet clothing should be easy to clean.
Use a flexible stitch pattern. The coat should move naturally with your dog.
Measure before crocheting. Accurate measurements reduce fitting problems.
Check the neckline carefully. It must not restrict breathing.
Position the chest strap correctly. Keep it away from sensitive areas behind the front legs.
Secure all yarn tails. Loose strands can become tangled or chewed.
Avoid excessive thickness. A heavy coat may be uncomfortable in mild weather.
Check the garment regularly. Look for damaged stitches or loose fasteners.
Supervise initial wear. Make sure your dog is comfortable before using the coat for longer periods.
Frequently Asked Questions About the Crochet Pet Clothing Pattern
1. Is this Crochet Pet Clothing Pattern suitable for beginners?
Yes. The main body uses basic half double crochet stitches, although shaping and fitting require some attention.
2. What yarn is best for a crochet dog coat?
Soft, washable acrylic yarn or a cotton-acrylic blend is often a practical choice.
3. What crochet hook should I use?
A 4.5 mm or 5.0 mm hook works well with many medium-weight yarns.
4. Can I make this coat for a small dog?
Yes. Adjust the panel width, length, and straps to your dog’s measurements.
5. Can I make it for a large dog?
Yes, but larger garments require more yarn and careful fitting.
6. How much yarn do I need?
Approximately 200–350 yards (185–320 m) may be enough for a small or medium coat, depending on the yarn and stitch gauge.
7. Can I use different colors?
Absolutely. Teal, navy, emerald green, burgundy, and red are all beautiful choices.
8. Can I add a collar?
Yes. A soft, loose collar can be added around the neckline, provided it does not press against the throat.
9. Can I make the coat without buttons?
Yes. Sew-on hook-and-loop fasteners are a convenient alternative.
10. How do I prevent the coat from becoming too tight?
Measure your dog carefully and test the fit before completing the fastening straps.
11. Can my dog wear this coat indoors?
Only when the temperature and your dog’s comfort make an extra layer appropriate. Remove it if your dog becomes warm or uncomfortable.
12. Is this coat suitable for cold weather?
It may provide light warmth, but crochet fabric is not windproof or waterproof and should not replace appropriate cold-weather protection.
13. Can I wash the finished coat?
Yes, if the yarn and fasteners are washable. Follow the yarn care instructions and dry the coat completely.
14. Can I add decorative appliqués?
Yes, but avoid loose or detachable decorations that could be chewed or swallowed.
15. How long does it take to crochet a dog coat?
A small coat may take approximately four to eight hours, depending on your experience, stitch tension, and finishing details.
Conclusion
The Crochet Pet Clothing Pattern is a beautiful way to combine creativity, practical crochet techniques, and handmade comfort for your beloved pet. Inspired by the elegant teal-blue dog coat in the reference image, this design features a textured body, gently shaped back, comfortable neckline, and adjustable fastening straps.
One of the greatest advantages of this project is its versatility. By adjusting the measurements, yarn colors, and decorative details, you can create a unique coat suited to your dog’s size and personality.
The pattern also provides an excellent opportunity to practice foundation chains, half double crochet stitches, shaping techniques, decorative borders, and garment assembly.
Whether you choose classic teal, rich burgundy, emerald green, or festive Christmas colors, the finished Handmade Crochet Dog Coat can become a charming addition to your pet’s wardrobe.
With careful measurements, soft yarn, secure finishing, and attention to comfort, you can create a lovely crochet garment that combines handmade beauty with everyday practicality.