
The Quilted Armrest Organizer Pattern is a beautiful and practical sewing project that transforms an ordinary car center console into a stylish and functional storage space. Combining colorful floral fabric, soft quilting, and convenient storage pockets, this handmade accessory is ideal for keeping everyday essentials organized while adding a personalized touch to your vehicle’s interior.
The design shown in the reference image features a lovely floral print with bright pink, coral, and blue flowers, complemented by elegant turquoise binding. Its padded upper section rests over the car’s center armrest, while the front pocket provides convenient storage for a smartphone, pens, sunglasses, and other small accessories. The quilted texture creates a professional finish, making the organizer both attractive and comfortable.
One of the greatest advantages of this DIY Quilted Car Organizer is that it can be customized to fit different vehicle models. Since center consoles vary considerably in width, length, and shape, creating your own organizer allows you to select the correct measurements and adapt the pockets to your needs. You can also choose fabrics that complement your car’s interior, from sophisticated neutral colors to cheerful floral prints.
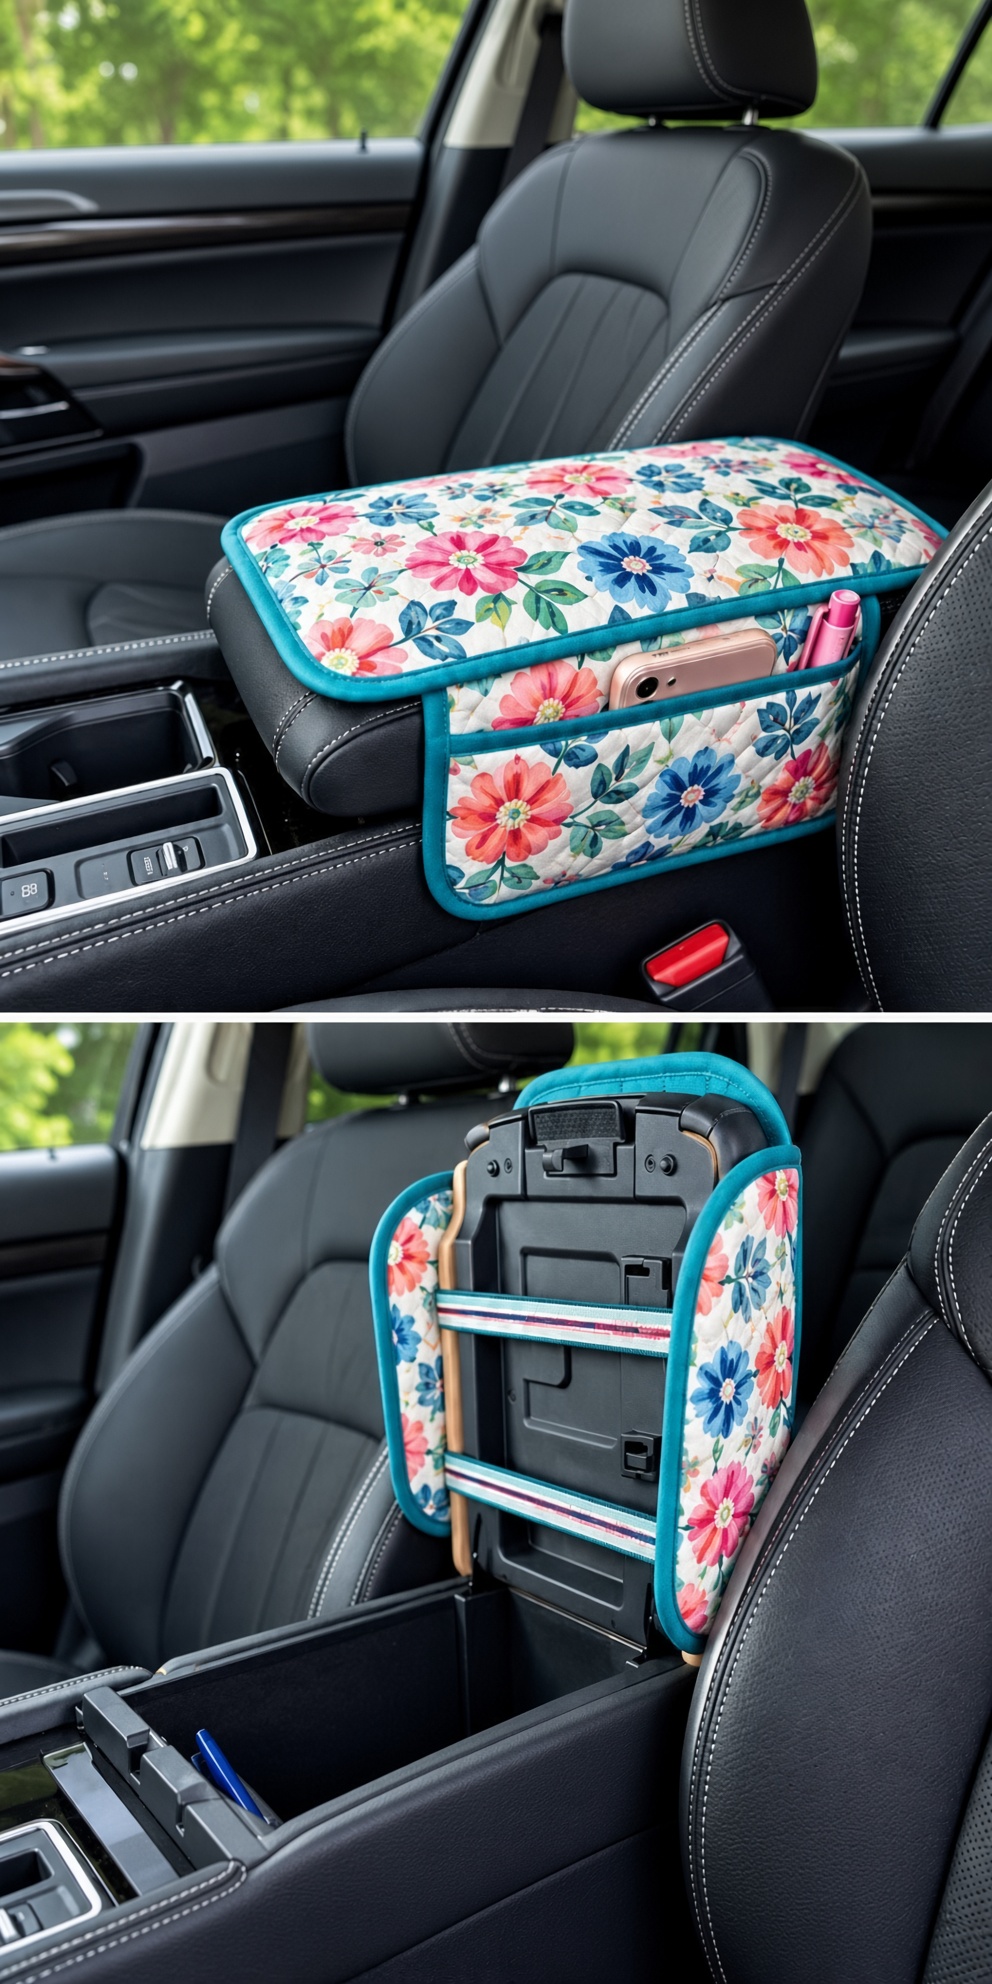
In this detailed Quilted Armrest Organizer Tutorial, you will learn how to measure your center console, prepare the fabric pieces, create the quilted panels, sew a practical front pocket, attach the binding, and assemble the organizer. The instructions use inches and centimeters, with clear explanations for beginners and experienced sewing enthusiasts. The project is inspired by the photograph and provides a practical adaptable construction method.
DISCOVER MORE FREE PATTERNS HERE!
Materials, Measurements, and Fabric Preparation
The first step in creating a successful Quilted Armrest Organizer Pattern is selecting suitable materials. Because this accessory will be used inside a vehicle, the fabric should be durable, washable, and resistant to everyday handling. Quilting cotton is an excellent option because it is easy to sew and available in a wide variety of attractive patterns.
For the main fabric, consider choosing a floral print similar to the reference image. The combination of white fabric with pink, coral, and blue flowers creates a fresh and elegant appearance. Turquoise binding provides a beautiful contrast and emphasizes the rounded edges of the organizer.
The batting should provide enough softness to create a padded surface without making the organizer excessively thick. Thin cotton batting or low-loft polyester batting works well. For additional structure, lightweight woven fusible interfacing can be added to the pocket and attachment panels.
Materials needed
- ½ yard (45 cm) of floral quilting cotton.
- ½ yard (45 cm) of coordinating lining fabric.
- ¼ yard (23 cm) of lightweight cotton batting.
- ¼ yard (23 cm) of lightweight fusible interfacing.
- Approximately 2½ yards (2.3 m) of double-fold bias binding.
- Two lengths of ¾-inch (2 cm) wide elastic or adjustable webbing.
- Matching polyester sewing thread.
- Sewing machine.
- Quilting needle or universal needle, size 80/12 or 90/14.
- Rotary cutter or fabric scissors.
- Quilting ruler.
- Cutting mat.
- Fabric marking pen.
- Sewing clips or pins.
- Iron and ironing board.
- Measuring tape.
Optional materials include contrasting fabric for decorative pockets and a walking foot for more consistent quilting.
Suggested finished measurements
The following dimensions are suitable for an example center armrest measuring approximately 12 × 7 inches (30.5 × 18 cm).
| Component | Finished Size |
|---|---|
| Main padded top | 12 × 7 in (30.5 × 18 cm) |
| Front hanging panel | 7 × 5 in (18 × 12.5 cm) |
| Front pocket | 7 × 3½ in (18 × 9 cm) |
| Pocket opening | Approximately 6½ in (16.5 cm) |
| Seam allowance | ¼ in (0.6 cm) |
| Binding width | Approximately ⅜ in (1 cm) visible |
These are example dimensions. Measure your own vehicle before cutting.
Fabric cutting guide
For this example, cut the following pieces:
| Fabric Piece | Quantity | Cutting Size |
|---|---|---|
| Floral top panel | 1 | 12½ × 7½ in |
| Lining top panel | 1 | 12½ × 7½ in |
| Batting for top | 1 | 12½ × 7½ in |
| Floral front panel | 1 | 7½ × 5½ in |
| Lining front panel | 1 | 7½ × 5½ in |
| Batting for front | 1 | 7½ × 5½ in |
| Floral pocket panel | 1 | 7½ × 7½ in |
| Interfacing for pocket | 1 | 7 × 7 in |
| Elastic or webbing | 2 | Cut to fit the console |
The pocket panel will be folded in half to create a finished pocket approximately 3½ inches (9 cm) deep after seam allowances.
Measuring your car armrest
Begin by measuring the length of the armrest from front to back. Next, measure the width across the upper surface. If the armrest has rounded corners, trace its shape onto paper to create a more accurate template.
Measure the height of the front edge to determine how far the pocket should hang. The pocket must remain accessible without interfering with the gear selector, parking brake, seat-belt buckles, or other controls.
Finally, inspect the underside of the armrest. Identify safe positions for the attachment straps and check that they will not interfere with the console lid, hinges, latches, or storage compartment.
Preparing the fabric
Wash and dry the cotton fabric according to its care instructions before cutting. This helps minimize shrinkage after the organizer is finished.
Press the fabric thoroughly to remove wrinkles.
Place the pattern pieces on the fabric, keeping the floral design aligned.
Cut each piece accurately using a rotary cutter or sharp scissors.
Label the pieces if necessary to avoid confusion during assembly.
Step-by-Step Tutorial: Creating the Quilted Armrest Cover
The padded upper section is the most visible part of the Quilted Car Armrest Organizer. It should fit neatly over the center console, creating a smooth surface without excessive fabric or bulky seams.
The photograph shows a softly padded cover with rounded corners and contrasting binding. To achieve a similar result, the main panel is assembled as a traditional quilt sandwich, consisting of the decorative fabric, batting, and lining.
Quilting the layers together before assembling the organizer helps prevent shifting and gives the finished accessory a more structured appearance.
Step 1: Prepare the main fabric panel
Place the floral fabric right side up on your work surface.
Smooth the fabric carefully.
Make sure the design is centered.
If your fabric has large flowers, position the most attractive section near the middle.
Step 2: Create the quilt sandwich
Place the lining fabric wrong side up.
Position the batting on top.
Add the floral fabric right side up.
Smooth all three layers.
Secure with quilting clips or safety pins.
Step 3: Mark the quilting lines
Use a removable fabric marker to draw diagonal lines across the panel.
Space the lines approximately 1½ inches (4 cm) apart.
Draw another set of lines in the opposite direction to create a diamond pattern.
Alternatively, use straight parallel quilting lines for a simpler finish.
Step 4: Quilt the main panel
Install a walking foot if available.
Begin quilting near the center.
Sew along the marked lines.
Work gradually toward the outer edges.
Avoid stretching the fabric while sewing.
Step 5: Trim the quilted panel
After quilting, place the panel on your cutting mat.
Trim the edges to the intended shape.
Use your paper template to round the corners.
Check that the panel remains symmetrical.
Step 6: Test the fit
Place the quilted panel over the car armrest.
Check the width and length.
Make sure the cover lies flat.
If necessary, adjust the corners before adding the binding.
Step 7: Prepare the turquoise binding
Cut bias strips or use ready-made double-fold bias tape.
For homemade binding, cut strips approximately 2 inches (5 cm) wide.
Join the strips diagonally if a longer length is required.
Press the binding into a double-fold shape.
Step 8: Attach the binding
Position the binding along the outer edge of the quilted panel.
Sew it carefully around the rounded corners.
Fold the binding over the raw edge.
Secure it with a second line of stitching.
Keep the finished width consistent.
Step 9: Inspect the finished cover
Lay the panel flat.
Check that the binding is smooth.
Remove any visible basting threads.
Press gently with a pressing cloth.
The main quilted section is now ready for assembly.
How to Sew the Storage Pocket and Assemble the Organizer
The storage pocket is what makes this DIY Car Console Organizer especially useful. It provides an accessible location for everyday essentials that might otherwise become scattered around the vehicle.
The reference image shows a front pocket with a turquoise-trimmed opening. The pocket is large enough to hold a smartphone and several small items, while the quilted panel underneath provides additional structure.
For this tutorial, the pocket is attached to a separate hanging panel. This construction makes it easier to adjust the pocket depth and allows the upper cover to remain smooth.
Step 1: Prepare the hanging panel
Place the front lining fabric wrong side down.
Add the batting.
Position the floral front fabric right side up.
Secure the layers.
Step 2: Quilt the front panel
Mark straight quilting lines approximately 1 inch (2.5 cm) apart.
Sew along the lines.
Keep the fabric flat.
Trim the panel to 7½ × 5½ inches (19 × 14 cm).
Step 3: Prepare the pocket fabric
Place the 7½ × 7½-inch floral pocket piece wrong side up.
Center the interfacing on the wrong side.
Fuse according to the manufacturer’s instructions.
Allow the fabric to cool.
Step 4: Fold the pocket
Fold the pocket piece in half horizontally, wrong sides together.
The folded piece should measure approximately 7½ × 3¾ inches (19 × 9.5 cm).
Press the folded edge.
This folded edge becomes the pocket opening.
Step 5: Finish the pocket opening
Attach turquoise binding along the folded upper edge.
Stitch slowly to keep the binding straight.
Trim any excess thread.
Press the finished edge.
Step 6: Position the pocket
Place the pocket over the lower section of the quilted hanging panel.
Align the bottom and side raw edges.
Make sure the pocket opening faces upward.
Clip the layers together.
Step 7: Secure the pocket
Baste along both sides and the bottom edge, approximately ⅛ inch (3 mm) from the raw edges.
Leave the upper pocket opening free.
Check that the pocket lies flat.
Step 8: Add an optional pocket divider
If desired, mark a vertical line approximately 1½ inches (4 cm) from one side.
Sew from the pocket bottom to the upper edge.
This creates a narrow compartment for a pen.
Leave the remaining space open for a phone or other small accessories.
Step 9: Finish the hanging panel edges
Attach binding along the sides and bottom of the hanging panel.
Leave the upper edge unbound because it will be joined to the top panel.
Keep the corners neat.
Step 10: Attach the hanging panel to the main cover
Position the upper raw edge of the hanging panel against the front edge of the main quilted cover.
Place the hanging panel so it will fold downward when the organizer is installed.
Sew the two sections together using a ¼-inch (0.6 cm) seam allowance.
Cover the seam with a narrow strip of coordinating fabric if desired.
Step 11: Prepare the attachment straps
Measure the underside of your car’s center console.
Cut two elastic or webbing straps to the required length.
The straps should hold the organizer securely without pulling the cover out of shape.
Finish the strap ends to prevent fraying.
Step 12: Attach the straps
Position the straps across the underside of the quilted top panel.
Sew each strap securely near the side edges.
Use reinforced stitching at the attachment points.
Keep the straps away from the armrest hinge and latch.
Step 13: Install the organizer
Place the padded cover on top of the armrest.
Allow the storage pocket to hang over the front edge.
Secure the straps underneath.
Open and close the console lid to confirm that nothing catches.
Step 14: Check the final fit
Make sure the organizer does not slide.
Confirm that the pocket is easy to access.
Check that the straps remain secure.
Ensure the organizer does not interfere with seat adjustments or vehicle controls.
Your Quilted Armrest Organizer is complete.
Creative Variations, Professional Sewing Tips, and Frequently Asked Questions
The Quilted Armrest Organizer Pattern offers many opportunities for creative customization. By changing the fabric, pocket arrangement, quilting style, or binding color, you can create a completely different appearance while keeping the same practical construction.
The floral design shown in the image is particularly attractive because it combines a cheerful print with a sophisticated turquoise border. This contrast emphasizes the quilted texture and gives the accessory a polished finish.
For a more understated style, choose neutral fabrics such as beige, charcoal gray, navy blue, or black. For a brighter design, consider colorful patchwork, vintage florals, or geometric prints.
Beautiful fabric combinations
Floral and Turquoise: Fresh, colorful, and similar to the reference image.
Navy Blue and White: Classic and elegant.
Black and Gray: Modern and understated.
Burgundy and Cream: Sophisticated and warm.
Sage Green and Beige: Soft and natural.
Dusty Rose and White: Delicate and feminine.
Mustard Yellow and Brown: Vintage-inspired.
Emerald Green and Gold: Rich and eye-catching.
Ideas for additional pockets
A narrow pen pocket can be added beside the main compartment.
A second pocket can be sewn on the side of the hanging panel.
A small zippered pocket can hold coins or other lightweight accessories.
An elasticized pocket can help secure small items.
Avoid creating bulky storage areas that could interfere with the driver’s movements.
Professional sewing tips
Use accurate measurements. Center consoles vary widely between vehicles.
Choose durable fabric. The organizer will experience frequent handling.
Use low-loft batting. Excessively thick padding may prevent a neat fit.
Quilt before assembly. This makes the panels easier to handle.
Use contrasting binding. A coordinated border creates a professional appearance.
Reinforce pocket seams. Storage pockets experience repeated pulling.
Check the strap placement. The straps must not obstruct the console mechanism.
Keep pockets shallow. Lightweight accessories are more suitable than heavy objects.
Test the organizer in the car. Confirm that it remains secure during normal use.
Never obstruct safety equipment. Keep the organizer clear of seat belts, airbags, emergency controls, and moving seat components.
Frequently Asked Questions About the Quilted Armrest Organizer Pattern
1. Is this project suitable for beginners?
Yes. It uses basic quilting, straight stitching, binding, and simple assembly techniques.
2. What is the best fabric for a car armrest organizer?
Durable quilting cotton or a washable cotton blend is a practical choice.
3. Can I make the organizer without batting?
Yes, but the finished cover will have less padding and structure.
4. Can I use a different binding color?
Absolutely. Choose a color that complements the main fabric.
5. How do I adjust the organizer for my car?
Measure the armrest and modify the pattern dimensions before cutting.
6. Can I add more storage pockets?
Yes, provided they remain lightweight and do not interfere with vehicle controls.
7. Is the organizer machine washable?
It may be, depending on the fabric, batting, and attachment materials. Follow the care instructions for the materials used.
8. Can I use waterproof fabric?
Yes. A suitable water-resistant fabric can make cleaning easier, although it may require a different needle or sewing technique.
9. How much fabric do I need?
Approximately ½ yard of main fabric and ½ yard of lining should be sufficient for many small and medium armrest organizers.
10. Can I use leftover quilt fabric?
Yes. This is an excellent project for using coordinating fabric scraps.
11. How long does it take to make?
Most sewists can complete a simple version in approximately three to five hours, depending on experience.
12. Can I add a zipper?
Yes. A zipper can be added to an additional storage pocket if desired.
13. What type of batting is recommended?
Thin cotton batting or low-loft polyester batting works well.
14. How do I prevent the organizer from slipping?
Use properly fitted attachment straps and test the fit on your center console.
15. Can I sell finished organizers made from this tutorial?
You can generally sell items you create using your own materials and workmanship, subject to any applicable restrictions on the fabrics or other components you use.
Conclusion
The Quilted Armrest Organizer Pattern is a practical and attractive sewing project that combines everyday convenience with the beauty of handmade quilting. Its padded upper cover, convenient front pocket, colorful floral fabric, and contrasting binding create a stylish accessory that can make a car interior feel more organized and personalized.
By following the measurements, fabric preparation, quilting instructions, and assembly steps in this tutorial, you can create an organizer adapted to your vehicle’s center console.
The design is also highly customizable. You can experiment with different colors, decorative quilting, pocket sizes, and fabric combinations to create a unique accessory that reflects your personal style.
Whether you are an experienced quilter or a beginner looking for a useful project, this DIY Quilted Car Console Organizer is an enjoyable way to practice sewing skills while creating something functional.
With careful cutting, accurate stitching, secure attachment straps, and attention to vehicle safety, your finished organizer can become a beautiful and convenient handmade addition to your car.