
Creating beautiful handmade decorations from leftover fabric is one of the most enjoyable ways to combine creativity, sustainability, and practical sewing skills. The Fabric Scrap Balls Pattern is a colorful sewing project that transforms small pieces of cotton fabric into soft, rounded patchwork balls. These charming creations are perfect for using leftover materials from previous quilting projects while producing something decorative, playful, and unique. With their vibrant combinations of floral prints, gingham checks, polka dots, and geometric patterns, fabric scrap balls instantly attract attention and bring a cheerful handmade touch to any sewing collection.
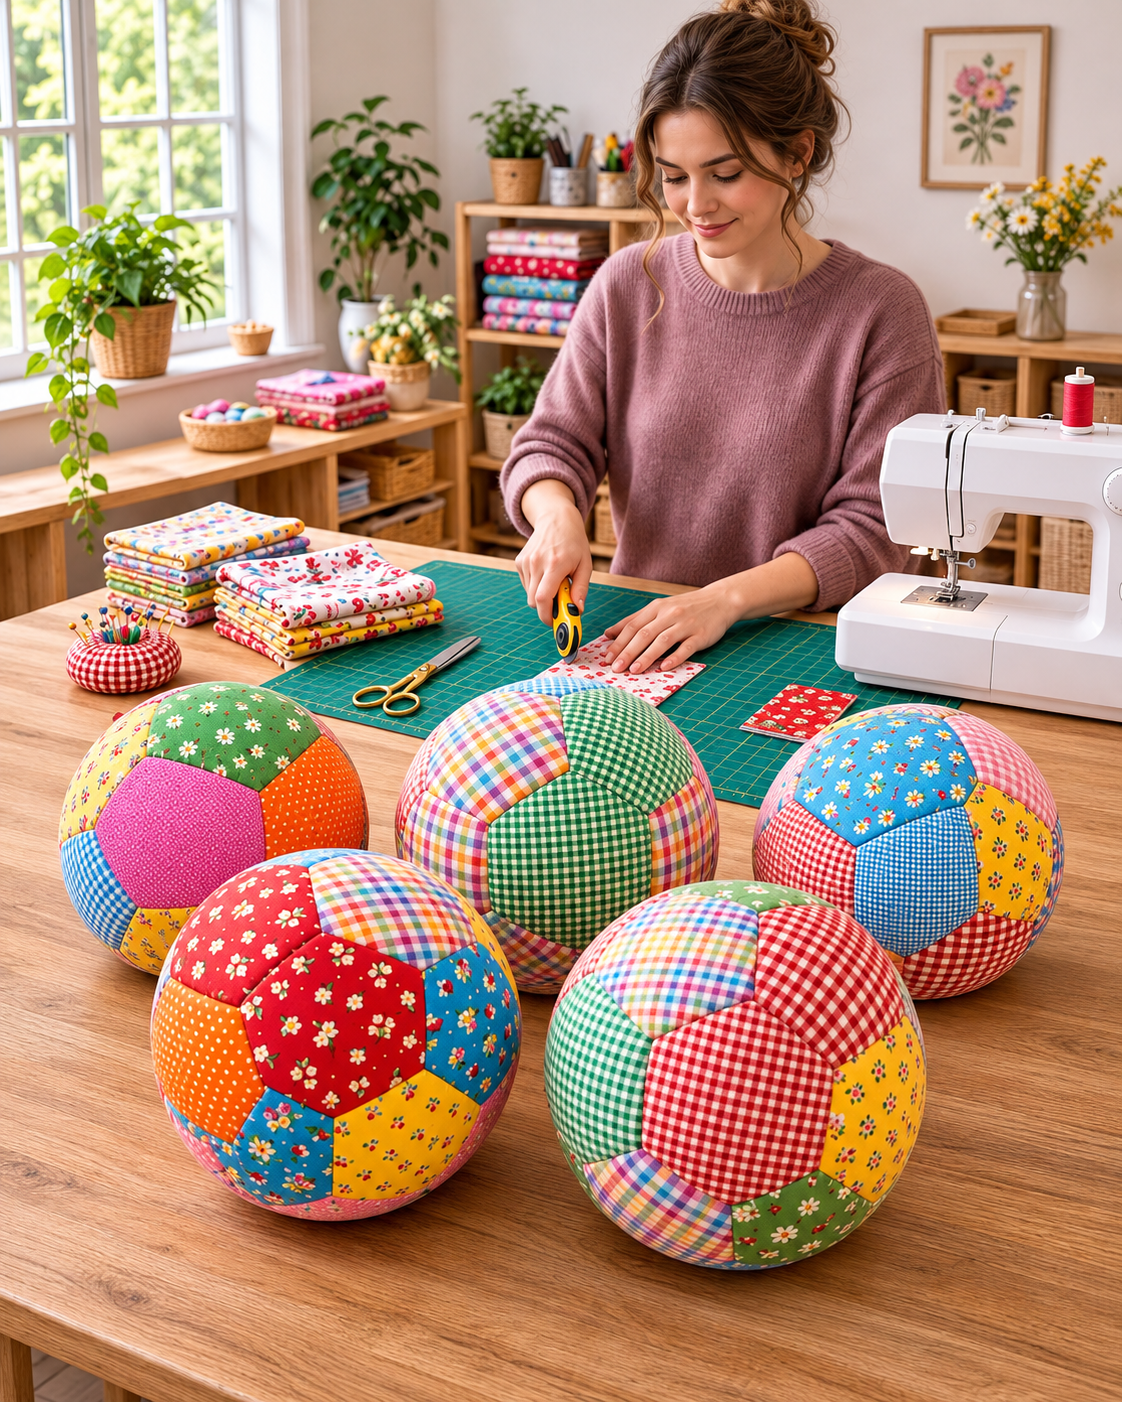
One of the most appealing features of this DIY patchwork fabric ball project is the freedom to experiment with different fabrics, colors, and arrangements. The balls shown in the inspiration image feature a delightful mixture of red, yellow, blue, green, pink, and multicolored prints, arranged in curved patchwork sections that create a beautifully rounded shape. Each section contributes to the overall design, making every finished ball slightly different. Whether you prefer vintage cotton prints, modern quilting fabrics, or bright scrappy combinations, this pattern allows you to explore endless possibilities without purchasing large amounts of new material.
Another reason to try this Fabric Scrap Balls Sewing Pattern is its accessibility to both beginners and experienced sewing enthusiasts. The construction relies on simple curved fabric pieces sewn together, followed by careful stuffing and finishing. Although the finished balls look intricate, the process becomes straightforward once you understand the cutting template and assembly sequence. These handmade balls can be used as decorative accessories, colorful bowl fillers, sensory play objects when appropriately constructed for the intended age, or thoughtful handmade gifts. This detailed tutorial explains the necessary materials, measurements, cutting instructions, sewing techniques, and finishing methods to help you recreate the colorful patchwork style featured in the photograph.
Materials and Measurements for the Fabric Scrap Balls Pattern
The first step in making beautiful patchwork fabric balls is choosing suitable materials. Lightweight cotton fabrics are particularly effective because they are easy to cut, press, pin, and sew along curved edges.
DISCOVER MORE FREE PATTERNS HERE!
Quilting cotton is an excellent option for this project. Its relatively stable weave allows individual pieces to maintain their shape during assembly, helping the completed ball look smooth and evenly rounded.
Materials needed:
- Assorted cotton fabric scraps in different colors and prints.
- Coordinating polyester sewing thread.
- Polyester fiberfill stuffing.
- Sewing machine with a straight-stitch setting.
- Fabric scissors or a rotary cutter.
- Cutting mat and acrylic quilting ruler.
- Paper or cardstock for making templates.
- Fabric marking pencil or washable marker.
- Sewing pins or fabric clips.
- Hand-sewing needle.
- Iron and ironing board.
- Measuring tape.
- Optional lightweight woven interfacing for delicate fabrics.
The colorful design works especially well when you combine small floral prints, gingham checks, polka dots, and bright solid fabrics. Mixing different patterns creates a playful appearance while keeping the construction simple.
For this tutorial, the finished fabric scrap ball will measure approximately 15 cm (6 inches) in diameter. This is a convenient size for decorative displays and many handmade gift projects.
A ball of this size has a circumference of approximately 47 cm. The project uses six identical curved fabric panels, sometimes called orange-peel segments or gore panels, to create its spherical shape.
Each panel should measure approximately 25 cm long and 8.8 cm wide at its widest point, including a 0.7 cm seam allowance. These are approximate template dimensions, and the actual size should be checked after making a test ball.
For a more accurate six-panel template, draw a vertical centerline measuring 25 cm. Mark its midpoint and draw a symmetrical, pointed oval with a maximum width of 8.8 cm. The two long edges should curve smoothly from one pointed end to the other.
A useful mathematical guide for the panel outline is to make its width at a given distance along the centerline proportional to the sine of that distance. This creates a smooth football-shaped panel that approaches a rounded ball when assembled.
When preparing your fabric pieces, avoid combining extremely stretchy materials with stable quilting cotton. Differences in elasticity can cause uneven seams and distort the finished spherical shape.
Before cutting, wash and press your cotton scraps if needed. Prewashing can reduce the risk of later shrinkage or color bleeding, especially when working with vibrant red and blue fabrics.
Step-by-Step Guide to Cutting and Sewing Patchwork Fabric Balls
The construction of a Fabric Scrap Balls Pattern begins with preparing the curved panels. The basic six-panel method is an approachable way to create a rounded fabric object with relatively few seams.
For a more colorful appearance like the photograph, each curved panel can be assembled from smaller scraps before the final ball is sewn together.
Step 1: Prepare the paper template.
Draw the curved panel shape on sturdy cardstock using the dimensions provided earlier. Make sure the outline is symmetrical, with two matching curved sides meeting at pointed ends.
Cut out the template carefully. You will use this same shape to prepare all six panels, helping ensure that the ball assembles evenly.
Step 2: Select your fabric scraps.
Choose six different fabric prints for a simple version. For a more elaborate patchwork design, select twelve or more scraps in contrasting colors.
A combination of red floral cotton, green gingham, yellow polka dots, blue prints, and colorful checks will create an appearance similar to the inspiration image.
Step 3: Create patchwork panels.
If you want a scrappy surface, sew small rectangles or irregularly shaped fabric pieces together into sections large enough to cover the curved paper template.
Press the seams open or to one side, depending on fabric thickness. Each completed patchwork section must be large enough to cut one full curved panel without exposing raw edges.
Step 4: Cut the six curved pieces.
Place the paper template over the prepared fabric sections and trace around it. Cut six identical panels, ensuring that the seam allowances are already included in the template.
For a balanced appearance, distribute contrasting colors across the six pieces instead of placing similar prints next to one another.
Step 5: Sew the first two panels together.
Place two curved panels right sides together. Align their pointed ends and carefully match the curved edges.
Pin or clip the pieces together, then sew along one long curved edge using a consistent 0.7 cm seam allowance.
Use a short stitch length of approximately 2.0–2.5 mm. Sew slowly around the curve, avoiding unnecessary stretching or pulling.
Step 6: Continue joining the panels.
Add the third panel to the available curved edge of the second panel, with right sides together. Sew from one pointed end to the other.
Continue adding panels until all six form one connected chain. Carefully press the seam allowances without stretching the fabric.
Step 7: Close the spherical shape.
Bring the first and sixth panels together, right sides facing, and sew their remaining curved edges to form a complete ball-shaped shell.
During assembly, leave an opening of approximately 5–6 cm along one seam for turning and stuffing. Backstitch at both ends of this opening.
Step 8: Prepare the seam allowances.
Carefully clip or notch the seam allowances along the curves where necessary, without cutting into the stitching.
Reducing excess bulk helps the curved panels form a smooth sphere when turned right side out.
Step 9: Turn the fabric ball.
Turn the entire sewn shell right side out through the opening. Gently push the fabric into shape, paying attention to the points where the six panels meet.
Avoid using sharp tools that could damage the seams or puncture the fabric.
Step 10: Add the stuffing.
Begin filling the ball with small amounts of polyester fiberfill. Distribute the stuffing evenly around the interior instead of placing one large clump in the center.
Continue adding filling until the ball is firm enough to maintain its rounded shape but remains comfortably soft.
Step 11: Close the opening.
Fold the raw edges of the opening inward, aligning the seam. Use a hand-sewing needle and matching thread to close the opening with a ladder stitch.
Pull the stitches gently to create an almost invisible seam, then secure the thread and hide the tail inside the ball.
Step 12: Shape the finished ball.
Roll the completed ball gently between your hands to redistribute the stuffing. Check that the seams remain smooth and that the overall shape appears symmetrical.
Your handmade patchwork fabric ball is now ready for decorating, gifting, or displaying.
Creative Fabric Combinations and Professional Sewing Tips
The most exciting part of this project is experimenting with different combinations of fabric scraps. Because each ball uses relatively small pieces, you can create numerous designs without buying matching fabric collections.
For a colorful traditional patchwork appearance, combine red, yellow, blue, green, and pink cotton fabrics. Small floral prints and checks work especially well together, producing the nostalgic handmade style visible in the photograph.
If you prefer a softer aesthetic, try using pastel pink, lavender, sage green, cream, and pale blue. These colors create a delicate decorative ball suitable for nurseries or spring-inspired home décor.
A vintage version can feature faded floral prints, muted mustard yellow, dusty rose, and warm cream fabrics. These combinations work beautifully with rustic baskets, farmhouse shelves, and handmade quilt displays.
For Christmas decorations, use deep red, forest green, white, and gold-toned cotton prints. Several matching fabric balls can be arranged in a decorative wooden bowl or displayed alongside handmade fabric ornaments.
One important technique is to keep the fabric grain consistent when cutting the curved panels. Aligning the long axis of each panel with the fabric’s lengthwise or crosswise grain helps reduce unwanted stretching during sewing.
Another useful tip is to sew slowly when approaching the pointed ends of each panel. The seam intersections at the top and bottom of the ball are particularly noticeable, so accurate alignment improves the final appearance.
Avoid overstuffing the fabric shell. Excessive filling can pull the seams apart, distort the curved panels, and cause visible puckering. Gradually add stuffing until the surface becomes smooth without creating excessive pressure.
If your ball develops flat spots, remove a little stuffing and redistribute the remaining filling. Concentrating small amounts of fiberfill near underfilled sections often improves the shape.
For even more decorative variety, combine several small scraps into each panel before cutting. This technique produces scrappy patchwork fabric balls with extra seams, colorful intersections, and a more detailed quilt-inspired surface.
Decorating, Using, and Caring for Handmade Fabric Scrap Balls
After completing your fabric balls, you can use them in various decorative and practical projects. Their bright colors and rounded shapes make them attractive additions to craft rooms, children’s spaces, handmade displays, and seasonal decorations.
One popular idea is arranging several fabric scrap balls inside a decorative basket. Mixing different ball sizes creates an interesting composition while showcasing the variety of prints and colors.
You can also create a matching set using scraps left over from a quilt. This provides a coordinated decorative accessory that complements the original sewing project.
For craft-room decorations, display finished balls on shelves near folded fabrics, sewing baskets, and colorful thread collections. Their playful patterns celebrate traditional patchwork techniques and make excellent conversation pieces.
Another idea is to prepare handmade gift sets containing two or three fabric balls in coordinating colors. A simple cotton drawstring bag can serve as reusable packaging and enhance the handmade presentation.
When making fabric balls intended for babies or young children, safety requires special consideration. Use strong seams, secure construction, and materials appropriate for the child’s age. Avoid buttons, beads, ribbons, detachable ornaments, or other small components that could become choking hazards.
Remember that a homemade ball is not automatically a safety-tested toy. Items intended for young children should meet applicable toy-safety requirements, and any damaged or leaking ball should be removed from use.
To clean decorative cotton fabric balls, gently spot-clean with mild detergent and a damp cloth. Avoid soaking heavily stuffed balls unless you are confident the materials can be washed and dried thoroughly.
If machine washing is appropriate for your chosen fabrics and construction, use a gentle cycle and protective laundry bag. Dry completely to prevent moisture from remaining inside the stuffing.
Store finished patchwork fabric decorations in a clean, dry location away from prolonged direct sunlight. Proper storage helps preserve the bright fabric colors and protects the carefully sewn seams.
Frequently Asked Questions About the Fabric Scrap Balls Pattern
1. Is the Fabric Scrap Balls Pattern suitable for beginners?
Yes. This project is suitable for beginners who know how to operate a sewing machine and sew basic seams. The curved panel construction requires patience, but the overall process is straightforward.
2. What type of fabric works best for making patchwork balls?
Lightweight woven cotton and quilting cotton are excellent choices. They are easy to cut, sew, and press, and they provide a smooth finish without excessive stretching.
3. How many fabric pieces are needed to make one ball?
The basic version uses six curved panels. However, each panel can be assembled from multiple smaller scraps, allowing you to incorporate many different fabric colors and patterns.
4. Can I make fabric scrap balls without a sewing machine?
Yes. You can sew the panels together by hand using small, consistent backstitches. Hand sewing takes longer but can produce attractive results when the stitches are secure and evenly spaced.
5. What is the best stuffing for fabric balls?
Polyester fiberfill is a practical option because it is lightweight, soft, and easy to distribute. Small amounts should be inserted gradually to help create a smooth, rounded shape.
6. How can I make different-sized fabric balls?
Scale the curved panel template proportionally. Enlarging the template creates a larger ball, while reducing the template produces a smaller version. Preserve the same proportions to maintain the spherical shape.
7. Why does my finished fabric ball look uneven?
Uneven shapes can result from inconsistent seam allowances, stretched fabric, inaccurate cutting, or poorly distributed stuffing. Using an identical template for all panels helps reduce these problems.
8. Can fabric scrap balls be used as Christmas decorations?
Absolutely. Choose festive cotton fabrics featuring red, green, white, and gold-toned prints. Finished balls can be arranged in decorative bowls, baskets, or seasonal centerpieces.
9. Are handmade fabric balls good for using leftover quilting fabric?
Yes. This project is an excellent way to reuse smaller cotton scraps that might otherwise remain unused. It allows you to combine many patterns into a functional or decorative handmade object.
10. Can I sell handmade fabric scrap balls?
You can sell items you make from this original tutorial, subject to applicable requirements. Decorative versions may be suitable for craft fairs and handmade marketplaces. Products marketed as toys must comply with relevant toy-safety regulations.
Conclusion: Transform Leftover Fabric Into Beautiful Handmade Patchwork Balls
The Fabric Scrap Balls Pattern demonstrates how even the smallest pieces of leftover fabric can become attractive handmade creations. By combining colorful cotton prints, carefully cut curved panels, and simple sewing techniques, you can produce charming spherical decorations that celebrate the beauty of patchwork.
This project is particularly enjoyable because no two fabric balls need to look alike. Every combination of floral prints, checks, polka dots, and vibrant colors creates a different result, allowing you to express your creativity while making practical use of fabric scraps.
Whether you are decorating your sewing room, preparing seasonal displays, creating handmade gifts, or exploring a new beginner-friendly sewing technique, these DIY patchwork fabric balls offer a rewarding project. With a little imagination, accurate stitching, and careful finishing, your leftover fabrics can become a beautiful collection of colorful handmade treasures.