
The Christmas Tree Organizer Pattern is a charming holiday crochet project that combines festive decoration with practical storage. Designed in the shape of a Christmas tree, this handmade organizer features a beautiful triangular silhouette, decorative crochet stitches, and convenient pockets for keeping small everyday essentials neatly arranged. It is an excellent way to add Christmas spirit to your home while creating something useful and unique.
One of the most appealing features of this Crochet Christmas Tree Organizer is its versatility. You can hang it on a wall, place it near a craft station, or use it as part of your seasonal decorations. The organizer can hold lightweight items such as crochet hooks, gift tags, ribbon, small sewing accessories, and Christmas cards. With its cheerful green branches, colorful ornaments, and decorative star, it becomes a wonderful handmade addition to any holiday setting.
This Christmas Tree Organizer Crochet Tutorial provides an original, beginner-friendly construction method using basic crochet stitches and simple assembly techniques. The project is made from a triangular crochet panel with individually attached storage pockets and decorative appliqués. The following instructions explain the materials, measurements, stitch abbreviations, row-by-row construction, pocket placement, and finishing details needed to create a beautiful Christmas tree organizer.
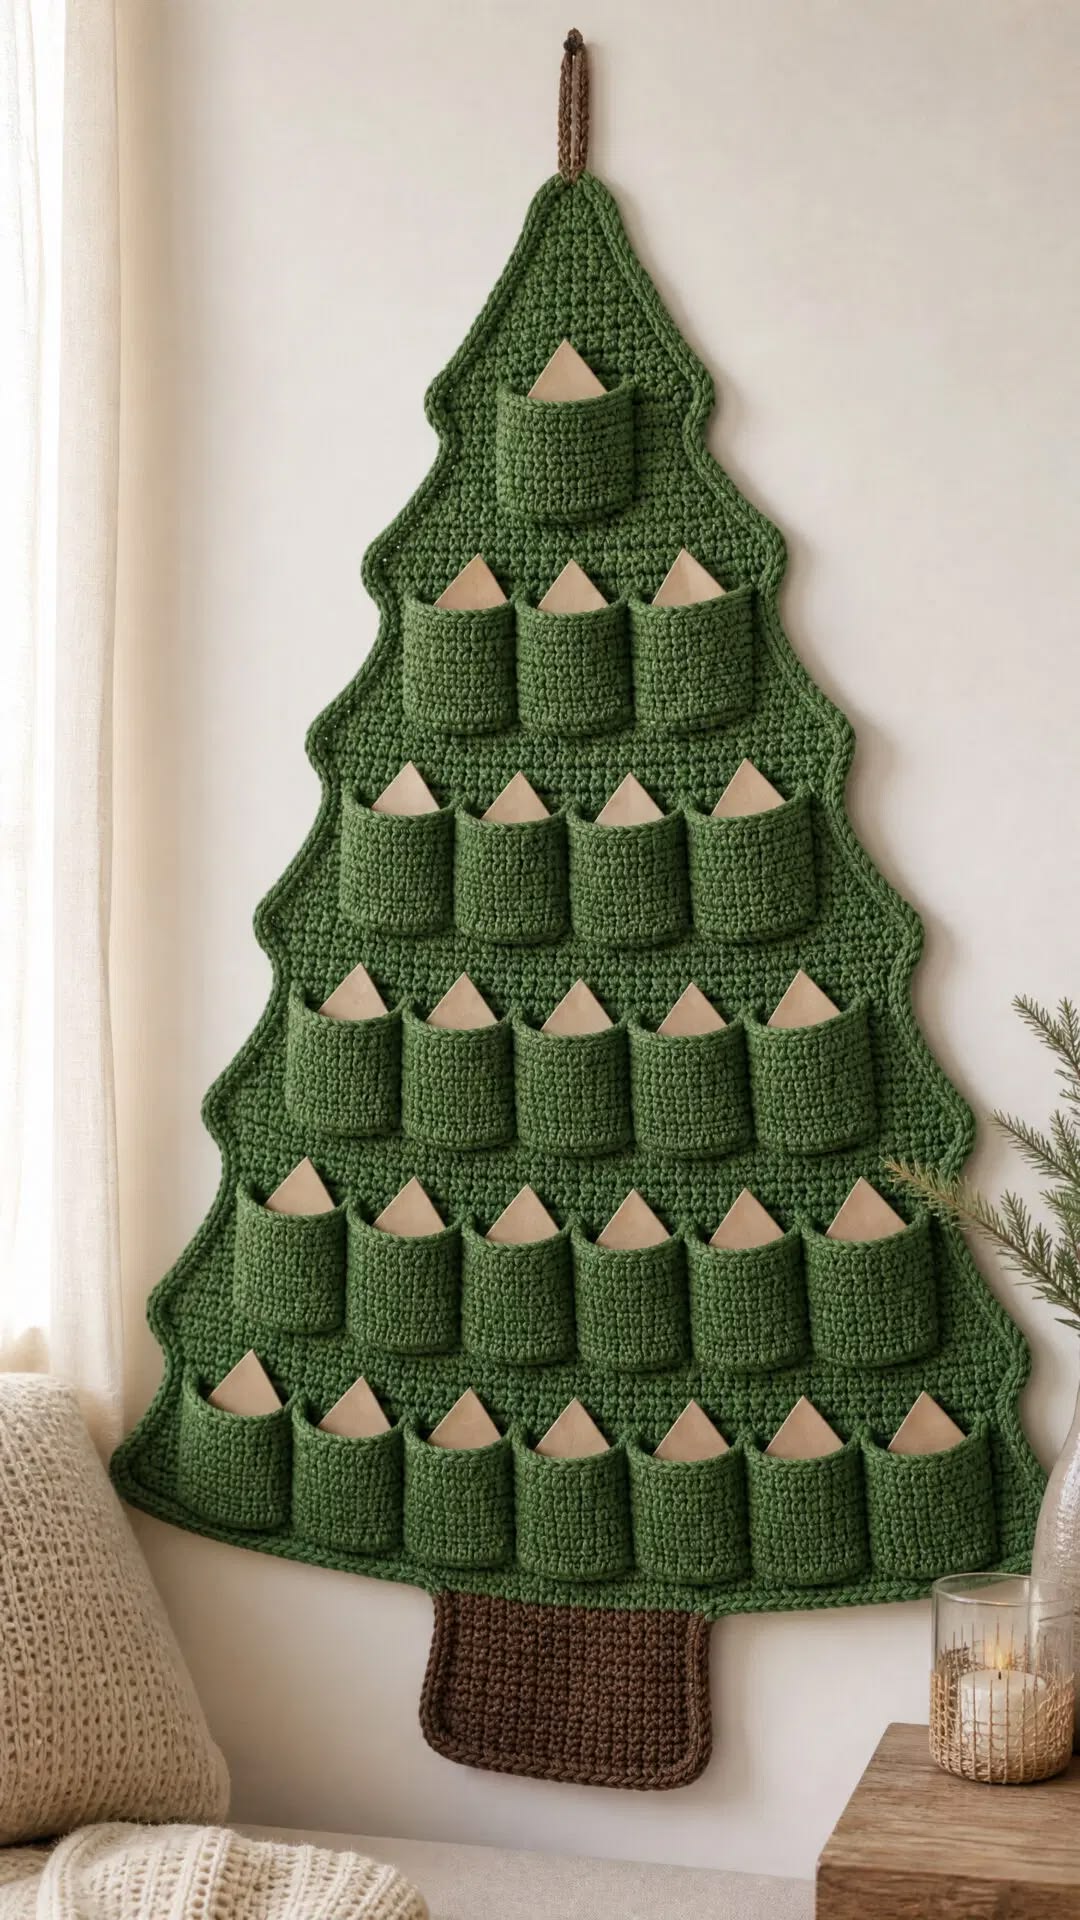
1. Materials and Measurements for the Christmas Tree Organizer
Before starting your Crochet Christmas Tree Organizer Pattern, gather the materials and select your favorite Christmas colors.
DISCOVER MORE FREE PATTERNS HERE!
A medium-weight cotton yarn is recommended because it creates a firm fabric that can support lightweight storage pockets.
Acrylic yarn can also be used, although cotton generally provides better stitch definition and structure.
Materials Needed
- 250–350 yards of medium-weight cotton yarn in Christmas green.
- 40–60 yards of red yarn for decorative pockets or ornaments.
- 30–50 yards of white or cream yarn.
- Small amounts of yellow or gold yarn for the star.
- 4.0 mm crochet hook, or the size needed to obtain a firm fabric.
- Yarn needle.
- Stitch markers.
- Scissors.
- Measuring tape.
- Optional wooden dowel for hanging.
- Optional fabric lining for extra stability.
- Optional buttons or crocheted decorations.
Recommended Christmas Color Combinations
The traditional version uses Christmas green, red, white, and gold.
For a sophisticated appearance, combine emerald green with cream and champagne gold.
For a modern holiday decoration, use white, silver-gray, and deep forest green.
A vintage-inspired organizer can feature burgundy, moss green, and warm beige.
You can also make the entire tree in bright red and decorate it with white snowflakes.
Finished Measurements
The sample organizer is designed for lightweight storage.
| Component | Approximate Measurement |
|---|---|
| Tree panel width | 16 inches (40.5 cm) |
| Tree panel height | 20 inches (51 cm) |
| Small pocket | 4 × 3 inches (10 × 7.5 cm) |
| Medium pocket | 5 × 4 inches (12.5 × 10 cm) |
| Large pocket | 6 × 4 inches (15 × 10 cm) |
| Hanging loop | 4–5 inches (10–12.5 cm) |
| Decorative star | 3 inches (7.5 cm) |
These are approximate measurements. Your final dimensions will depend on the yarn, hook size, and personal tension.
Crochet Abbreviations – US Terms
| Abbreviation | Meaning |
|---|---|
| ch | Chain |
| sc | Single crochet |
| hdc | Half double crochet |
| dc | Double crochet |
| sl st | Slip stitch |
| st | Stitch |
| sts | Stitches |
| inc | Increase |
| BLO | Back loop only |
| FO | Fasten off |
Gauge: Approximately 14 single crochet stitches and 16 rows equal 4 inches (10 cm).
Gauge is helpful for estimating the finished dimensions, but a firm, even fabric is more important than matching an exact measurement.
Important Construction Notes
The tree is crocheted from the top downward.
Two increases are made on each row to create the triangular shape.
The pockets are made separately and sewn onto the front panel.
The finished organizer should be hung securely and used only for lightweight objects.
2. How to Crochet the Christmas Tree Base
The main body of the Christmas Tree Organizer is a large triangular panel.
This simple construction creates the classic Christmas tree silhouette.
The panel begins with a narrow tip and gradually becomes wider toward the bottom.
Step 1: Create the Foundation
Using green yarn, make a slip knot.
Row 1: Ch 2. Work 3 sc into the second chain from the hook. Turn. (3 sts)
This creates the narrow top of the Christmas tree.
Step 2: Begin the Increases
Row 2: Ch 1, turn. Work 2 sc in the first st, sc in the next st, and 2 sc in the last st. (5 sts)
Row 3: Ch 1, turn. Work 2 sc in the first st, sc in each of the next 3 sts, and 2 sc in the last st. (7 sts)
Row 4: Ch 1, turn. Work 2 sc in the first st, sc across until one stitch remains, and 2 sc in the last st. (9 sts)
Continue using the same increase method.
Each completed row adds two stitches.
Step 3: Continue Shaping the Tree
Repeat the following instructions:
Increase Row: Ch 1, turn, 2 sc in the first st, sc in every stitch until the final stitch, and 2 sc in the last st.
Continue until you have completed approximately 45 rows.
At Row 45, you should have 91 stitches.
Your tree will have a wide triangular shape.
Depending on your gauge, the panel will measure approximately 20 inches tall and 26 inches across the bottom.
For a narrower tree, stop increasing earlier.
Step 4: Adjust the Tree Size
The 45-row version creates a wide organizer.
If you prefer a smaller version closer to 16 inches across, stop after Row 28.
At Row 28, you will have 57 stitches.
With the suggested gauge, the smaller panel measures approximately 16 inches across the base and 7 inches tall before additional shaping.
To make the tree taller without increasing its width, continue working even rows with no increases.
For a balanced organizer, work approximately 35 additional even rows after Row 28.
This produces a taller, more compact triangular tree with a broad lower section.
Step 5: Add a Decorative Border
Once the panel reaches your desired size, do not fasten off immediately.
Work sc evenly along the outside edges.
At the corners, work 3 sc into the same corner space.
Continue around the entire panel.
Join with a slip stitch.
This border strengthens the edges and gives the tree a neat finish.
Step 6: Create a Textured Branch Effect
For a more decorative Christmas tree, add horizontal rows of shell stitches across the front.
Attach green yarn near one side of the panel.
Work a row of decorative shells using the following sequence:
Skip 2 stitches, work 5 dc in the next stitch, skip 2 stitches, and work 1 sc in the next stitch.
Repeat across the available section.
Adjust the spacing at the edges as necessary.
These decorative rows create a layered branch appearance.
Use a slightly lighter green yarn to make the textured branches stand out.
3. How to Crochet and Attach the Organizer Pockets
The storage pockets are the most practical feature of this Christmas Tree Organizer Crochet Pattern.
You can make several pockets in different sizes to resemble colorful Christmas presents.
For the sample design, create three pockets and arrange them vertically on the tree.
Step 1: Crochet the Small Pocket
Using red yarn, ch 15.
Row 1: Sc in the second chain from the hook and in each remaining chain. (14 sts)
Rows 2–12: Ch 1, turn, sc in each stitch across. (14 sts)
Fasten off, leaving a long tail for sewing.
This creates a small rectangular pocket.
Its finished size will depend on your gauge.
Step 2: Crochet the Medium Pocket
Using cream or white yarn, ch 19.
Row 1: Sc in the second chain from the hook and in each remaining chain. (18 sts)
Rows 2–16: Ch 1, turn, sc across. (18 sts)
Fasten off, leaving a sewing tail.
This pocket is suitable for gift tags, small craft supplies, or other lightweight items.
Step 3: Crochet the Large Pocket
Using red or dark green yarn, ch 23.
Row 1: Sc in the second chain from the hook and across. (22 sts)
Rows 2–18: Ch 1, turn, sc in every stitch. (22 sts)
Fasten off.
This larger pocket can be positioned near the bottom of the tree.
Step 4: Add Decorative Pocket Borders
Attach contrasting yarn to the top edge of each pocket.
Work one row of sc across.
For a scalloped appearance, use a simple shell edging.
Work 5 dc into one stitch, skip 2 stitches, and secure with a sc.
Repeat where the stitch count allows.
This creates a decorative edge resembling Christmas ribbon or snowy trim.
Step 5: Position the Pockets
Lay the tree panel flat on a table.
Place the smallest pocket near the upper section.
Position the medium pocket below it.
Place the largest pocket near the bottom.
Leave sufficient space between pockets so they can be opened and used comfortably.
Use stitch markers to hold the pieces in position.
Step 6: Sew the Pockets in Place
Thread a yarn needle with matching yarn.
Sew along the left side, bottom, and right side of each pocket.
Leave the top edge completely open.
Use small, secure stitches.
Avoid pulling the yarn too tightly because this can distort the tree panel.
For extra durability, reinforce the upper corners of each pocket.
Step 7: Add More Storage Sections
You can create additional pockets using the same method.
Make narrow pockets for crochet hooks.
Create wider pockets for Christmas cards.
Use small square pockets for decorative accessories.
Keep the weight evenly distributed across the organizer.
4. Christmas Decorations, Hanging Loop, and Finishing
The final stage transforms the crocheted panel into a festive Christmas decoration.
A beautiful Crochet Christmas Tree Organizer can be customized with stars, ornaments, snowflakes, bows, and colorful edging.
These details make the organizer look like a decorated Christmas tree.
How to Crochet the Christmas Star
Using yellow or gold yarn, begin with a magic ring.
Round 1: Ch 1, work 10 sc into the ring, and join with a sl st. (10 sts)
Round 2: Repeat the following sequence five times:
Ch 4, sl st in the second chain from the hook, sc in the next chain, hdc in the next chain, skip the next stitch of Round 1, and sl st into the following stitch.
This creates five pointed sections.
Fasten off and weave in the ends.
Lightly shape the points with your fingers.
Sew the star securely to the top of the tree.
How to Make Small Crochet Ornaments
Use red, white, gold, or pink yarn.
Round 1: Make a magic ring and work 6 sc into the ring. (6 sts)
Round 2: Work 2 sc in each stitch around. (12 sts)
Round 3: Work 2 sc in the first stitch, then 1 sc in the next stitch. Repeat around. (18 sts)
Fasten off.
These small circles can be sewn onto the tree as decorative Christmas ornaments.
Make several in different colors.
Arrange them around the storage pockets.
Add a Christmas Garland
Using white or gold yarn, make a long chain.
The length depends on the size of your tree.
Arrange the chain across the front of the panel in gentle curves.
Sew it in place at several points.
This creates the appearance of a decorative Christmas garland.
For additional texture, make a second garland in a contrasting color.
Create the Hanging Loop
Using green yarn, ch 35.
Starting in the second chain from the hook, work sc across. (34 sts)
Fasten off, leaving a long sewing tail.
Fold the strip into a loop.
Attach both ends securely to the top back of the organizer.
For a larger organizer, a wooden dowel with a separate hanging cord can distribute the weight more evenly.
Reinforce the Organizer
If you plan to use several pockets, consider adding a fabric backing.
Cut a piece of cotton fabric slightly smaller than the crochet panel.
Fold the fabric edges inward.
Hand-sew the backing to the reverse side.
This helps prevent excessive stretching.
For extra stability, insert a lightweight stabilizer between the crochet panel and fabric backing.
Creative Christmas Tree Organizer Ideas
Traditional Christmas Tree: Use emerald green yarn, red pockets, white edging, and a gold star.
Snowy Christmas Tree: Use white and pale green yarn with silver-colored decorations.
Vintage Christmas Tree: Combine moss green, burgundy, and cream.
Pink Christmas Tree: Use pastel pink, white, and champagne-colored details.
Rustic Christmas Tree: Use forest green, beige, and wooden decorative accents.
Colorful Christmas Tree: Combine bright red, yellow, blue, green, and pink ornaments.
Each variation creates a different holiday atmosphere.
How to Care for Your Crochet Organizer
Remove all stored items before cleaning.
Hand-wash gently in cool water with a mild detergent suitable for the yarn.
Avoid twisting or wringing the fabric.
Lay the organizer flat on a towel.
Reshape the tree and pockets while damp.
Allow it to dry completely before hanging.
Store it flat during the off-season to preserve its shape.
Frequently Asked Questions About the Christmas Tree Organizer Pattern
Is this crochet pattern suitable for beginners?
Yes. The main panel uses basic single crochet stitches and simple increases.
Beginners who understand chains, single crochet, and sewing crochet pieces together should be able to complete the project.
What yarn is best for a Christmas Tree Organizer?
Medium-weight cotton yarn is an excellent choice.
It creates a firm fabric and helps the organizer maintain its shape.
Can I make the organizer larger?
Yes.
Continue increasing the tree panel until it reaches your preferred width.
You can also add more rows to increase its height.
Can I use different colors?
Absolutely.
Traditional Christmas colors are popular, but pastel, vintage, and modern color combinations also work beautifully.
How many pockets should I make?
Three pockets are a good starting point.
You can add more if the panel is large enough.
Avoid overcrowding the design.
Can I use this organizer for crochet supplies?
Yes.
The pockets can hold lightweight crochet hooks, stitch markers, yarn needles in a protective case, and small accessories.
Can I hang it on a door?
Yes, provided it is attached to a suitable hook and does not interfere with the door’s operation.
Make sure the hanging loop is securely sewn.
Can I add Christmas lights?
Decorative crocheted light motifs are a safer choice for a fabric organizer.
If using actual lights nearby, keep the organizer away from heat sources and follow the lighting manufacturer’s safety instructions.
Can I make this project as a Christmas gift?
Yes.
A handmade Christmas tree organizer is a thoughtful gift for people who enjoy crochet, sewing, crafting, and seasonal decorations.
How long does it take to make?
The time depends on the size and number of decorations.
A simple version may take a few evenings, while a larger organizer with detailed appliqués will require additional time.
Conclusion
The Christmas Tree Organizer Pattern is a delightful crochet project that combines holiday creativity with practical handmade storage.
Its triangular Christmas tree shape, colorful pockets, decorative ornaments, and beautiful crochet details make it a wonderful addition to festive home décor.
With basic stitches, carefully planned measurements, and simple assembly techniques, you can create a personalized organizer that is both decorative and useful.
Whether you choose traditional red and green, elegant cream and gold, or cheerful multicolored yarn, your finished Crochet Christmas Tree Organizer will bring warmth and handmade charm to your home.
Gather your favorite Christmas yarns, prepare your crochet hook, and enjoy making a beautiful holiday organizer that can become part of your seasonal decorating tradition for years to come.