
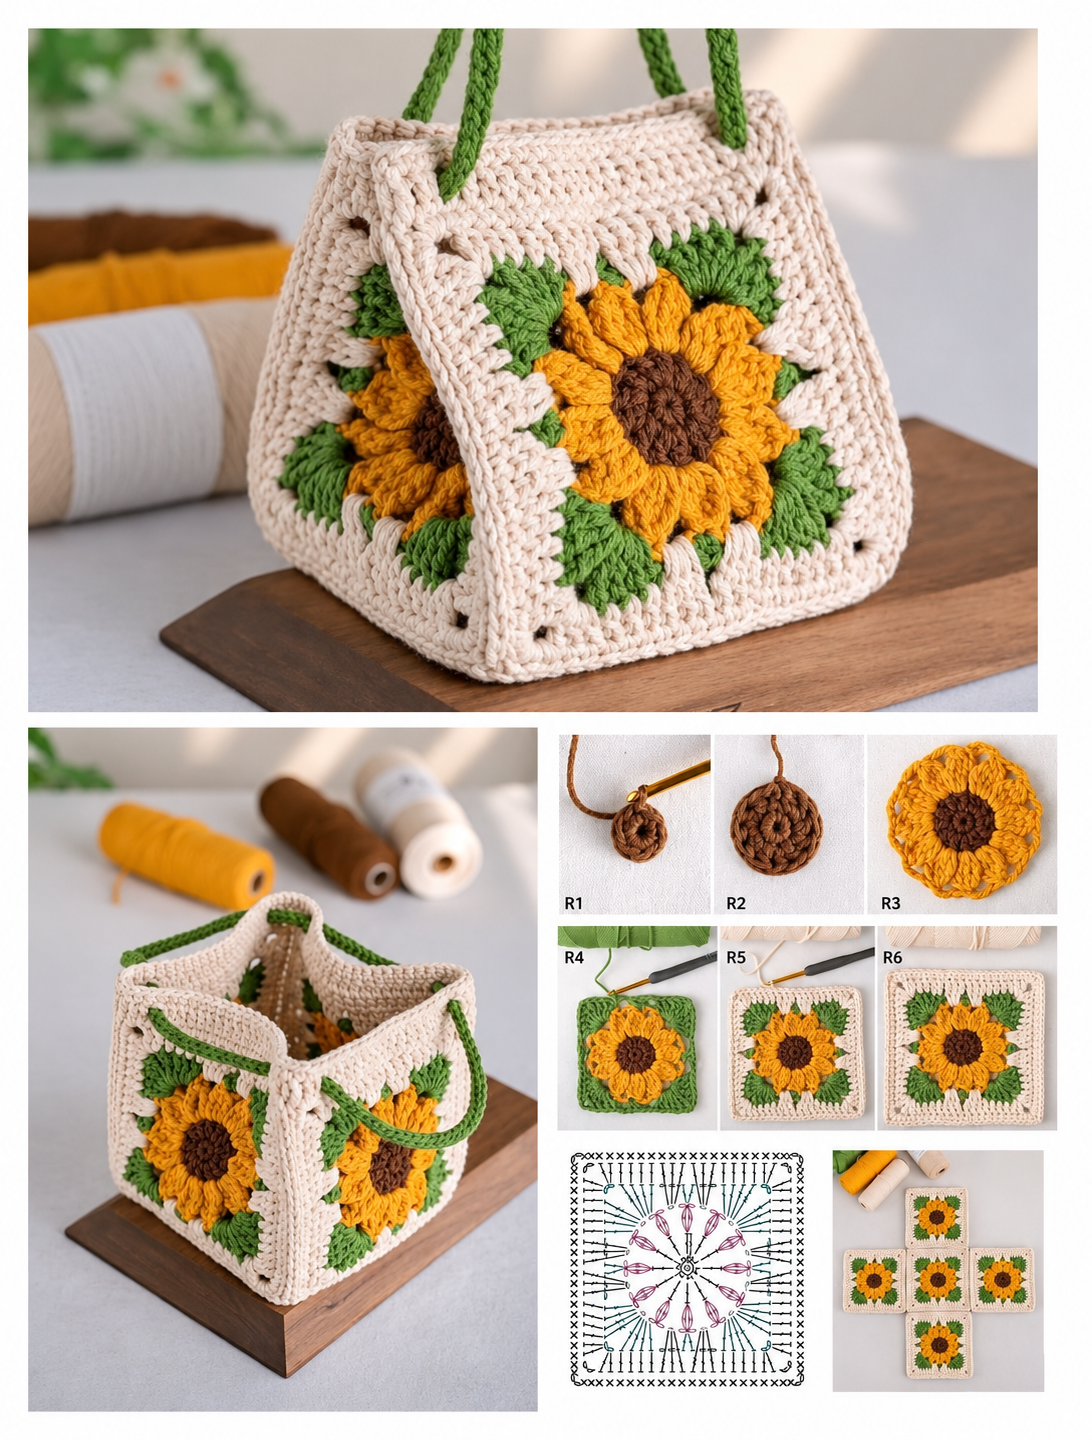
The Granny Square Bag Pattern is a beautiful and creative crochet project that combines the timeless charm of traditional granny squares with the cheerful appearance of sunflowers. Featuring vibrant golden-yellow petals, rich brown flower centers, fresh green leaves, and an elegant cream-colored background, this handmade bag is a wonderful accessory for anyone who loves colorful crochet designs. Its structured shape, decorative floral panels, and comfortable handles make it both practical and visually attractive.
One of the most appealing features of this Crochet Sunflower Granny Square Bag is its unique construction. Instead of using a single continuous crochet fabric, the bag is assembled from individual sunflower granny squares that are joined together to create a three-dimensional shape. Each square features a raised sunflower surrounded by green corner details and a neutral border. The combination of textured flower petals and classic crochet stitches produces a sophisticated handmade appearance that works beautifully with casual outfits, summer accessories, and decorative storage projects.
This Granny Square Bag Crochet Tutorial explains how to recreate a bag inspired by the photograph using individual sunflower motifs, a sturdy square base, and crocheted handles. The project is suitable for intermediate beginners who understand basic crochet stitches and want to practice working in rounds, creating textured petals, joining motifs, and assembling crochet accessories. The instructions include materials, measurements, stitch abbreviations, detailed construction steps, finishing techniques, and creative color combinations so you can make your own beautiful sunflower granny square bag.
1. Materials, Measurements, and Crochet Stitches for the Granny Square Bag Pattern
Before starting your Crochet Granny Square Bag Pattern, prepare your yarn, crochet hook, and sewing accessories. Choosing the correct yarn is important because the bag should maintain its shape while remaining comfortable to carry.
DISCOVER MORE FREE PATTERNS HERE!
Medium-weight cotton yarn is highly recommended for this project. Cotton creates clear stitch definition, holds the raised sunflower petals beautifully, and provides more structure than many soft acrylic yarns.
The bag shown in the inspiration photograph features a combination of cream, yellow, brown, and green yarn. These colors create a classic sunflower design with a warm, natural appearance.
Materials Needed
- 200–250 yards of cream or ivory cotton yarn.
- 100–150 yards of golden-yellow cotton yarn.
- 40–60 yards of dark brown cotton yarn.
- 80–100 yards of green cotton yarn.
- 4.0 mm crochet hook (US G/6).
- Yarn needle.
- Stitch markers.
- Scissors.
- Measuring tape.
- Optional cotton fabric for lining.
- Optional lightweight bag stabilizer.
- Optional magnetic snap or button closure.
- Sewing needle and matching thread.
Use medium-weight yarn, Category 4, for the main project.
If your yarn is thinner, adjust the crochet hook accordingly.
Recommended Finished Measurements
This tutorial creates a small structured crochet bag.
| Component | Approximate Measurement |
|---|---|
| Bag width | 20 cm (8 inches) |
| Bag height | 20 cm (8 inches) |
| Bag depth | 20 cm (8 inches) |
| Individual granny square | 20 × 20 cm (8 × 8 inches) |
| Handle length | 35–40 cm (14–16 inches) |
| Handle width | 1.5–2 cm (0.6–0.8 inches) |
| Number of granny squares | 5 |
These are suggested dimensions. The finished measurements depend on yarn thickness, crochet tension, and blocking.
Crochet Abbreviations – US Terms
| Abbreviation | Meaning |
|---|---|
| ch | Chain |
| sl st | Slip stitch |
| sc | Single crochet |
| hdc | Half double crochet |
| dc | Double crochet |
| tr | Treble crochet |
| st | Stitch |
| sts | Stitches |
| sp | Space |
| MR | Magic ring |
| rep | Repeat |
| FO | Fasten off |
| BLO | Back loop only |
All instructions use US crochet terminology.
Recommended Gauge
Using a 4.0 mm crochet hook and medium-weight cotton yarn:
16 double crochet stitches = approximately 10 cm (4 inches).
8 double crochet rows = approximately 10 cm (4 inches).
Gauge is not essential for the decorative flower itself, but it helps maintain consistent square dimensions.
Understanding the Bag Construction
The Sunflower Granny Square Bag Pattern is assembled from five individual crochet squares.
Four squares form the sides of the bag.
One square forms the bottom.
The top remains open.
Two green crochet handles are attached to opposite sides.
This creates a beautiful open-top box-shaped bag similar to the project shown in the photograph.
Suggested Color Combinations
Classic Sunflower: Golden yellow, chocolate brown, forest green, and ivory.
Vintage Sunflower: Mustard yellow, caramel brown, sage green, and cream.
Elegant Floral: Burgundy petals, dark brown centers, olive green leaves, and beige.
Summer Garden: Bright yellow, emerald green, and snowy white.
Pastel Floral: Soft pink, lavender, mint green, and warm cream.
Autumn Sunflower: Burnt orange, mustard yellow, dark brown, and moss green.
For a design closest to the photograph, use bright golden-yellow petals, a dark brown center, medium green leaves, and a cream border.
2. How to Crochet the Sunflower Granny Square Step by Step
The sunflower is the main decorative feature of this Granny Square Bag Pattern.
Each square begins with a brown circular center, followed by textured yellow petals, green corner sections, and a cream-colored border.
Work the motifs carefully to maintain consistent measurements.
You will need five completed squares for the bag.
Step 1: Create the Brown Flower Center
Using dark brown yarn, make a magic ring.
Round 1: Ch 3 (counts as the first dc), work 11 dc into the magic ring.
Pull the yarn tail to close the ring.
Join with a sl st to the top of the beginning ch 3.
Total: 12 dc.
Step 2: Increase the Flower Center
Round 2: Ch 3, work 1 dc into the same stitch.
Work 2 dc into each remaining stitch.
Join with a sl st.
Total: 24 dc.
Fasten off the brown yarn.
The flower center should be circular and slightly textured.
Step 3: Attach the Yellow Yarn
Join golden-yellow yarn to any stitch of Round 2.
Ch 1.
Work 1 sc into the same stitch.
Continue working 1 sc into each stitch around.
Join with a sl st.
Total: 24 sc.
This round provides a foundation for the flower petals.
Step 4: Begin the Sunflower Petals
The sunflower in the photograph features raised, dimensional petals.
To create a similar appearance, work petal groups around the brown center.
For each petal:
Ch 3.
Work 2 dc into the same stitch.
Ch 3.
Sl st into the same stitch.
Skip the next stitch.
Repeat around the flower.
You should create 12 decorative petals.
Keep the petals evenly spaced.
Step 5: Add Dimension to the Petals
For a fuller sunflower, work an additional decorative layer.
Join yellow yarn behind the first petal round.
Work small chain loops between the petals.
Into each loop, crochet a combination of hdc, dc, and tr stitches.
This creates a second layer of petals.
The additional layer is optional but produces a more dimensional appearance.
Step 6: Prepare the Green Background
Join green yarn behind the sunflower petals.
The goal is to transform the circular flower into a square.
Work evenly spaced stitch groups around the flower.
Create four corner spaces using:
(3 dc, ch 2, 3 dc)
Place the corner groups approximately one-quarter of the way around the flower.
Fill the spaces between corners with double crochet groups as needed.
Adjust the stitch placement so the flower remains centered.
Step 7: Shape the Granny Square
Continue working with green yarn.
At each corner, work:
(3 dc, ch 2, 3 dc)
Along the sides, work groups of 3 dc separated by ch 1 where needed.
Continue until the motif forms a recognizable square.
Make sure all four sides have the same number of stitch groups.
Step 8: Add the Cream Border
Join cream-colored yarn at any corner.
Ch 3.
Work 2 dc into the same corner space.
Ch 2.
Work 3 dc into the same corner space.
Continue around the square, working 3 dc groups into the spaces between previous groups.
At each corner, work:
(3 dc, ch 2, 3 dc)
Join with a sl st.
Step 9: Continue the Cream Rounds
Repeat the granny square border pattern.
Work 3 dc into each side space.
Work the corner combination into every corner.
Continue adding rounds until the square measures approximately 20 × 20 cm (8 × 8 inches).
The exact number of rounds will depend on your yarn and tension.
Step 10: Finish the Square
Work one final round of sc around the entire square.
At each corner, work 3 sc into the corner space.
Join with a sl st.
Fasten off and weave in the ends.
Step 11: Block the Granny Square
Lightly dampen the completed square.
Place it on a blocking mat.
Gently stretch it into a square shape.
Pin the corners if necessary.
Allow it to dry completely.
Blocking helps the motifs maintain consistent dimensions.
Step 12: Repeat the Pattern
Make four additional sunflower granny squares.
You should now have five matching squares.
Try to maintain consistent yarn tension throughout all five motifs.
This will make the assembly process easier.
3. How to Assemble the Sunflower Granny Square Bag
Once the five sunflower squares are complete, you can begin assembling the Crochet Sunflower Bag.
The bag is constructed in a box shape, with one square forming the base and four squares forming the sides.
The assembly is simple, but careful alignment is important for achieving a neat finished appearance.
Step 1: Arrange the Squares
Lay the five granny squares on a flat surface.
Place one square in the center.
Position the remaining four squares around it.
The layout should resemble a cross.
The center square will become the bottom of the bag.
The surrounding squares will become the four side panels.
Step 2: Check the Flower Direction
Make sure all sunflower motifs face outward.
The center square can face either direction because it forms the base.
For a coordinated appearance, position all four side flowers in the same orientation.
Step 3: Join the First Side Panel
Place one side square against the center square.
Align the edges.
Using cream yarn, join the squares with a single crochet seam.
Insert the hook through corresponding edge stitches of both squares.
Work sc evenly across the entire edge.
Fasten off.
Step 4: Attach the Remaining Side Panels
Repeat the joining process with the remaining three squares.
Each side panel should be connected to one edge of the center square.
At this stage, the project should still resemble a cross when laid flat.
Step 5: Fold the Bag into Shape
Lift the four side panels upward.
Bring the adjacent vertical edges together.
The panels should form a box shape.
Use stitch markers to hold the corners in place.
Step 6: Join the Vertical Seams
Using cream yarn, work sc along the first vertical seam.
Join the corresponding edge stitches carefully.
Repeat for the remaining three corners.
The bag should now have four upright sides and a square bottom.
Step 7: Reinforce the Corners
Work additional secure stitches at the bottom corners.
These areas experience tension when the bag is used.
Avoid pulling the yarn too tightly.
The corners should remain firm but flexible.
Step 8: Create the Upper Border
Join cream yarn to any stitch along the upper opening.
Work one round of sc evenly around the entire top edge.
Join with a sl st.
Repeat for two or three additional rounds.
This creates a sturdy upper rim.
Step 9: Add a Decorative Edge
For a more elegant finish, work one final round using a contrasting color.
Green yarn creates a beautiful contrast against the cream background.
Work one sc into each stitch around.
Join and fasten off.
Step 10: Check the Bag Shape
Place the bag on a flat surface.
Gently adjust the corners.
Check that the base sits evenly.
If the bag feels too soft, consider adding a fabric lining or lightweight stabilizer.
Step 11: Prepare for the Handles
Lay the bag flat.
Identify two opposite side panels.
Mark two attachment points near the upper edge of each selected panel.
The handles should be positioned symmetrically.
4. Crochet Handles, Lining, Finishing, and Creative Variations
The handles are an important part of the Granny Square Bag Pattern because they provide both functionality and decorative contrast.
The inspiration photograph features beautiful green crochet handles that coordinate with the sunflower leaves.
For this tutorial, the handles are made using a firm crochet cord technique.
Step 1: Begin the First Handle
Using green yarn, ch 6.
Row 1: Sc in the second chain from the hook and in each remaining chain.
Total: 5 sc.
Ch 1 and turn.
Step 2: Crochet the Handle Length
Row 2: Sc in each stitch across.
Ch 1 and turn.
Repeat Row 2 until the handle measures approximately 35–40 cm (14–16 inches).
Fasten off, leaving a long tail for sewing.
Step 3: Make the Second Handle
Repeat the same instructions to create another handle.
Make sure both handles have the same length.
Use a measuring tape to compare them.
Step 4: Reinforce the Handles
Fold each handle lengthwise if desired.
Sew the long edges together to create a thicker strap.
Alternatively, keep the handles flat for a wider grip.
For additional strength, thread a nonstretch cotton cord through the center.
This helps reduce stretching during use.
Step 5: Attach the Handles
Position the first handle on one side of the bag.
Place the ends approximately 5 cm (2 inches) from the upper corners.
Sew the ends securely to the inside of the upper border.
Repeat with the second handle on the opposite side.
Use several reinforcing stitches at each attachment point.
Step 6: Check the Handle Strength
Lift the empty bag by both handles.
Check that the attachment points remain secure.
Add reinforcing stitches if necessary.
Do not overload the bag.
Step 7: Prepare the Fabric Lining
For a more professional finish, add a cotton fabric lining.
Measure the inside of the completed bag.
Cut one fabric square for the bottom and four fabric squares for the sides.
Add approximately 1 cm (3/8 inch) seam allowance to each edge.
Step 8: Sew the Lining
Sew the four side pieces to the bottom fabric square.
Join the vertical seams.
Press the seams carefully.
Fold the upper raw edge inward.
Step 9: Insert the Lining
Place the fabric lining inside the crochet bag.
Align the upper edges.
Use small hand stitches to attach the lining to the inside of the crochet border.
Avoid stitching through the decorative front of the bag.
Step 10: Add an Optional Closure
A magnetic snap or button closure can be added to the lining.
Position the closure near the center of the upper opening.
Make sure it is securely attached.
For a softer handmade appearance, use a crocheted loop and button.
Step 11: Final Shaping
Place the completed bag on a flat surface.
Adjust the corners and handles.
Check the sunflower motifs.
Make sure the lining fits smoothly.
Your Crochet Sunflower Granny Square Bag is now ready to use.
Creative Color Variations
Classic Sunflower Bag: Golden yellow petals, brown centers, green leaves, and cream borders.
Vintage Floral Bag: Mustard yellow, caramel brown, sage green, and beige.
Pink Daisy Bag: Pink petals, yellow centers, mint green leaves, and white borders.
Purple Flower Bag: Lavender petals, dark purple centers, green leaves, and cream borders.
Christmas Floral Bag: Deep red flowers, forest green leaves, and ivory borders.
Elegant Neutral Bag: Cream petals, warm brown centers, olive green leaves, and beige borders.
Professional Crochet Tips
Use cotton yarn. Cotton provides excellent structure for crochet bags.
Maintain consistent tension. Matching square sizes make assembly easier.
Block the motifs. Blocking improves the shape and alignment.
Reinforce the handles. Strong attachment points improve durability.
Add a lining. Fabric lining prevents small objects from slipping through the crochet stitches.
Choose contrasting colors. A neutral border makes the sunflower motifs stand out.
Weave in all ends securely. This creates a neat, professional finish.
Avoid excessive weight. Crochet bags can stretch when overloaded.
How to Care for Your Granny Square Bag
Follow the yarn manufacturer’s care instructions.
If the bag has a fabric lining, check that both the yarn and lining are washable.
Hand-wash gently in cool water with a mild detergent.
Avoid twisting or wringing the fabric.
Press excess water out using a clean towel.
Reshape the bag while damp.
Allow it to dry completely on a flat surface.
Store it in a dry place away from direct sunlight to help preserve the colors.
Frequently Asked Questions About the Granny Square Bag Pattern
Is this crochet bag suitable for beginners?
Yes, the pattern is suitable for confident beginners who understand basic crochet stitches and simple joining techniques.
The sunflower petals and square shaping may require additional practice.
How many granny squares do I need?
This tutorial uses five sunflower granny squares.
Four squares form the sides of the bag, and one square forms the bottom.
What yarn is best for a granny square bag?
Medium-weight cotton yarn is highly recommended.
It provides structure, durability, and clear stitch definition.
Can I make the bag larger?
Yes.
You can increase the size of each granny square by adding more border rounds.
You can also create a larger bag using additional squares.
Can I use different flower patterns?
Absolutely.
You can replace the sunflower motifs with daisies, roses, or traditional granny squares.
Do I need to add a lining?
A lining is optional but recommended.
It helps protect the crochet fabric and prevents small items from slipping through the stitches.
Can I use acrylic yarn?
Yes.
Acrylic yarn can be used, although the finished bag may be softer and more flexible.
How long does it take to make?
The project may take approximately 8–12 hours, depending on your experience and the complexity of the sunflower motifs.
Can I make longer handles?
Yes.
Simply crochet additional rows until the handles reach your preferred length.
Can I sell finished bags made from this pattern?
You can generally sell handmade bags created from this original tutorial, subject to applicable local requirements.
Is the bag suitable for everyday use?
Yes, for lightweight personal items.
A lining and reinforced handles can improve durability.
Can I use this pattern to make a storage basket?
Yes.
You can omit the handles and use the same five-square construction to create a decorative crochet storage basket.
Conclusion
The Granny Square Bag Pattern is a beautiful crochet project that combines traditional granny square construction with the cheerful charm of sunflowers.
With golden-yellow petals, rich brown centers, green leaves, and elegant cream borders, this handmade bag offers a wonderful combination of color, texture, and practicality.
The five-square construction makes the project easy to customize, while the sturdy handles and optional lining provide useful finishing details.
Whether you prefer classic sunflower colors, soft pastels, vintage-inspired shades, or bold modern combinations, each bag can become a unique expression of your creativity.
Gather your favorite cotton yarn, prepare your crochet hook, and enjoy creating a beautiful Handmade Sunflower Granny Square Bag that showcases your crochet skills and adds a cheerful handmade touch to your everyday accessories.