
The Crochet Collar Pattern is a beautiful and timeless accessory that combines delicate lacework, elegant scalloped edges, and charming floral details. Inspired by traditional vintage crochet designs, this handmade collar features an open neckline, intricate fan-shaped motifs, and decorative ties finished with small crocheted flowers. Its soft cream color creates a sophisticated appearance that can transform even the simplest blouse, dress, or sweater into an elegant outfit.
One of the most attractive features of this Vintage Crochet Lace Collar is its graceful construction. The design begins with a curved neckline and gradually expands into a decorative lace pattern featuring open chain spaces, double crochet stitches, and large shell motifs. The outer edge forms beautiful rounded scallops that resemble delicate flower petals. At the front, two crocheted cords can be tied into a bow, adding a romantic finishing touch while allowing the collar to be adjusted comfortably around the neck.
This Crochet Collar Tutorial explains how to create a collar inspired by the photograph using an original, adaptable lace construction. The design preserves the main visual features: a rounded neckline, openwork lace, large decorative fans, scalloped edges, and flower-tipped ties. Because the photograph does not provide complete written stitch instructions or a fully verifiable stitch count, this tutorial uses a practical interpretation rather than claiming to reproduce every stitch exactly. With clear measurements, materials, US crochet terminology, and detailed instructions, you can create a beautiful handmade collar suitable for everyday wear, special occasions, and vintage-inspired outfits.
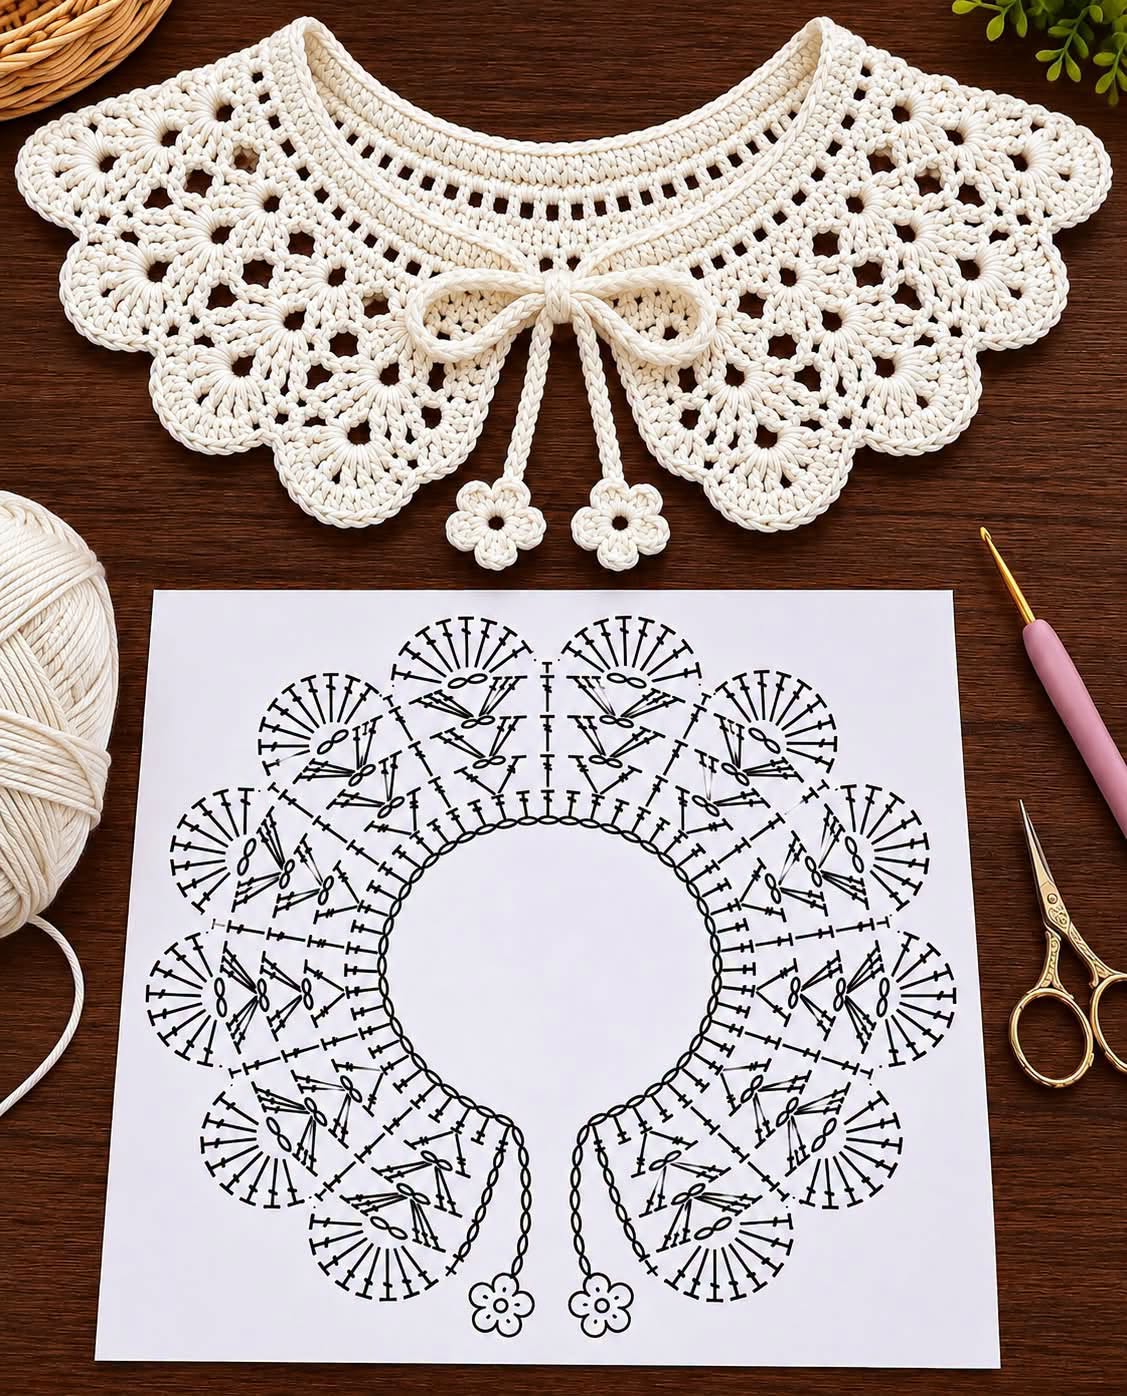
1. Materials, Measurements, and Crochet Stitches for the Crochet Collar Pattern
Before beginning your Crochet Lace Collar Pattern, prepare your yarn and crochet supplies.
DISCOVER MORE FREE PATTERNS HERE!
Choosing the right yarn is especially important because the collar should be lightweight, flexible, and comfortable around the neckline.
Fine cotton yarn is highly recommended for this project.
Cotton provides excellent stitch definition and allows the decorative lace motifs to maintain their shape.
Materials Needed
- 150–220 yards (137–201 meters) of fine cotton yarn.
- 2.5 mm crochet hook.
- Yarn needle.
- Sharp scissors.
- Stitch markers.
- Measuring tape.
- Blocking mat.
- Rustproof blocking pins.
- Optional fabric stiffener.
- Optional decorative beads for the flower centers.
For a delicate vintage appearance, choose fine mercerized cotton or sport-weight cotton yarn.
If you prefer a larger, more textured collar, use slightly thicker cotton yarn and an appropriately sized hook.
Recommended Yarn Colors
Ivory White: Classic, elegant, and suitable for vintage-inspired clothing.
Snow White: Beautiful for formal outfits and delicate accessories.
Champagne Beige: Sophisticated and timeless.
Dusty Rose: Soft and romantic.
Burgundy: Rich and elegant for autumn outfits.
Sage Green: Delicate and natural.
Navy Blue: Classic and versatile.
Lavender: Beautiful for spring-inspired accessories.
For a design closest to the photograph, choose warm ivory or natural cream cotton yarn.
Finished Measurements
This tutorial creates an adult-size decorative collar.
| Component | Approximate Measurement |
|---|---|
| Inner neckline length | 45–50 cm (17.7–19.7 inches) |
| Collar depth | 12–15 cm (4.7–5.9 inches) |
| Outer width when laid flat | 50–60 cm (19.7–23.6 inches) |
| Decorative tie length | 25–30 cm (9.8–11.8 inches) each |
| Small crochet flowers | 2.5–3 cm (1–1.2 inches) |
| Recommended hook | 2.5 mm |
| Yarn weight | Fine cotton |
These measurements are approximate.
The finished size depends on your yarn, hook size, tension, and number of lace repeats.
Crochet Abbreviations – US Terms
| Abbreviation | Meaning |
|---|---|
| ch | Chain |
| sl st | Slip stitch |
| sc | Single crochet |
| hdc | Half double crochet |
| dc | Double crochet |
| tr | Treble crochet |
| st | Stitch |
| sts | Stitches |
| sp | Space |
| sk | Skip |
| rep | Repeat |
| FO | Fasten off |
All instructions use US crochet terminology.
Special Crochet Stitches
Shell Stitch: A group of double crochet stitches worked into the same stitch or chain space.
Fan Stitch: A wider group of tall crochet stitches that creates a rounded decorative shape.
Picot: A small decorative loop made with chain stitches and a slip stitch.
Chain Space: An open section formed by one or more chain stitches.
Scalloped Edge: A decorative border made from repeated curved shell or fan motifs.
Recommended Gauge
Using fine cotton yarn and a 2.5 mm crochet hook:
Approximately 22 double crochet stitches = 10 cm (4 inches).
Approximately 11 double crochet rows = 10 cm (4 inches).
Gauge is less important for lace accessories than for fitted garments.
However, consistent tension helps create a symmetrical collar.
Understanding the Collar Construction
The Elegant Crochet Collar Pattern is worked from the neckline outward.
The collar remains open at the front.
The first rows create a smooth neckline.
The middle rows form an openwork lace foundation.
The outer rows create large fan-shaped motifs and scalloped edges.
Finally, two decorative ties are attached to the front.
This construction makes the collar easy to adjust and customize.
2. How to Crochet the Neckline and Lace Foundation
The neckline is the foundation of the entire Crochet Collar Pattern.
It should sit comfortably around the neck without pulling or curling.
For this tutorial, the collar begins with a foundation chain and is worked back and forth in rows.
Step 1: Create the Foundation Chain
Using cream cotton yarn and a 2.5 mm crochet hook, make a slip knot.
Chain 101.
Make sure the chain is not twisted.
The foundation chain should measure approximately 45–50 cm, depending on your yarn and tension.
If necessary, adjust the number of chains in multiples of four.
Step 2: Crochet the First Row
Row 1: Work 1 sc into the second chain from the hook.
Continue working 1 sc into each remaining chain.
You should have 100 sc.
Ch 1 and turn.
This creates a neat foundation for the neckline.
Step 3: Create a Smooth Neckline Border
Row 2: Work 1 sc into each stitch across.
Ch 3 and turn.
The beginning chain 3 counts as the first double crochet in the next row.
This second row reinforces the neckline and creates a smooth edge.
Step 4: Begin the Openwork Lace
Row 3: Work 1 dc into the next stitch.
Ch 1, skip 1 stitch, and work 1 dc into the following stitch.
Repeat the openwork sequence across the row.
Adjust the final stitches as necessary to keep the edges even.
This creates small decorative openings beneath the neckline.
Step 5: Add a Second Lace Row
Row 4: Ch 3 and turn.
Work 1 dc into the first available chain space.
Ch 2.
Work 1 dc into the next chain space.
Repeat across the row.
This creates a delicate openwork foundation.
Step 6: Create Gentle Increases
To allow the collar to spread comfortably over the shoulders, gradually increase the number of stitches.
Work additional double crochet stitches into selected chain spaces.
Distribute the increases evenly across the row.
Avoid placing all increases in one area.
The collar should begin to curve naturally.
Step 7: Check the Shape
Lay the collar flat on a table.
The neckline should form a gentle semicircular curve.
The lower edge should be wider than the upper edge.
If the fabric pulls inward, additional increases may be necessary.
If the fabric ripples excessively, reduce the number of increases.
Step 8: Create the Decorative Transition Row
Work a row of double crochet stitches separated by chain spaces.
Use the sequence:
(2 dc, ch 2, 2 dc)
Work this group into selected chain spaces at regular intervals.
These groups will form the foundation for the decorative lace fans.
Step 9: Prepare the Fan Motifs
Count the available chain spaces.
Divide them into evenly spaced sections.
Place stitch markers where each fan motif will begin.
The collar in the photograph features repeated large rounded motifs.
Consistent spacing will help create a similar appearance.
Step 10: Finish the Foundation Section
Complete the final openwork row.
Do not fasten off.
The next section will create the decorative lace fans.
Your Crochet Collar Neckline is now ready for the outer lace design.
3. How to Crochet the Decorative Fan Motifs and Scalloped Edge
The decorative fans are the most recognizable feature of this Vintage Crochet Collar Pattern.
The photograph shows large rounded scallops arranged around the outer edge.
Each scallop contains several tall stitches that spread outward like a fan.
These motifs create a beautiful lace texture.
Step 1: Begin the First Fan
Move the hook to the first marked chain space.
Work the following group into the space:
(3 dc, ch 2, 3 dc)
This creates the beginning of a fan motif.
Ch 2.
Work 1 sc into the next available connecting space.
Step 2: Continue the Fan Row
Repeat the fan sequence across the collar.
Work:
(3 dc, ch 2, 3 dc)
into each marked fan space.
Separate the fans with chain stitches and single crochet anchors.
Keep the motifs evenly spaced.
Step 3: Expand the Fans
On the next row, work into the chain-2 space at the center of each fan.
Crochet:
(4 dc, ch 2, 4 dc)
into each center space.
Use chain stitches to move between motifs.
This increases the width of each fan.
Step 4: Add More Decorative Texture
For the following row, work:
(5 dc, ch 2, 5 dc)
into each fan center.
Continue separating the motifs with chain spaces.
The fans should begin forming rounded decorative sections.
Step 5: Create the Large Outer Fans
For a more dramatic scalloped appearance, increase each fan again.
Work:
(6 dc, ch 2, 6 dc)
into the center space of each fan.
The additional stitches create wider rounded edges.
Adjust the stitch count if your yarn produces excessive ruffling.
Step 6: Shape the Scalloped Border
The outer edge should form a series of rounded lace sections.
Work single crochet stitches into the spaces between fans.
At the top of each fan, add small chain loops.
These loops help define the decorative scallops.
Step 7: Add a Picot Edge
For a delicate vintage finish, add picots along the outer border.
Work 1 sc into the next stitch.
Ch 3.
Sl st into the first chain.
Continue with the next stitch.
Repeat at selected intervals around the outer edge.
This creates tiny decorative points.
Step 8: Finish the Outer Border
Continue working evenly around the collar.
Make sure each scallop has a similar shape.
Join or fasten off at the end of the row.
Leave a long yarn tail if you plan to add decorative details.
Step 9: Weave in the Ends
Thread the yarn tails through a yarn needle.
Weave them carefully through several stitches on the wrong side.
Avoid pulling too tightly.
Trim any excess yarn.
Step 10: Check the Lace Pattern
Lay the collar flat.
Arrange the fan motifs evenly.
The outer edge should spread naturally.
If some scallops appear uneven, adjust them gently during blocking.
Step 11: Prepare for Blocking
Lightly dampen the collar with clean water.
Place it on a blocking mat.
Gently stretch the scallops into shape.
Pin the outer points carefully.
Allow the collar to dry completely.
Blocking helps the lace motifs open beautifully.
4. Crochet Flower Ties, Finishing Techniques, and Creative Variations
The final details transform the Crochet Collar Pattern into an elegant handmade accessory.
The photograph features two decorative cords tied into a bow at the front.
Each cord ends with a small crocheted flower.
These details create a romantic vintage appearance.
Step 1: Crochet the First Tie
Using the same cream cotton yarn, make a slip knot.
Chain approximately 70–80 stitches.
The cord should measure around 25–30 cm.
Work 1 sl st into each chain across.
This creates a slightly thicker cord.
Fasten off, leaving a sewing tail.
Step 2: Make the Second Tie
Repeat the same instructions.
Make sure both cords are the same length.
Place them side by side to compare.
Adjust if necessary.
Step 3: Crochet the First Small Flower
Using cream yarn, make a magic ring.
Round 1: Ch 1, work 5 sc into the ring.
Join with a sl st.
Total: 5 sc.
Step 4: Create the Flower Petals
Work the following sequence into each stitch:
(sl st, ch 2, 2 dc, ch 2, sl st)
Repeat around the flower.
This creates five small petals.
Fasten off.
Step 5: Make the Second Flower
Repeat the flower instructions.
Make sure both flowers are approximately the same size.
Gently shape the petals.
Step 6: Attach the Flowers to the Cords
Sew one flower to the end of each crochet cord.
Use small, secure stitches.
Hide the yarn tails inside the flower.
Step 7: Attach the Ties to the Collar
Position one cord at each front neckline corner.
Sew the cords securely to the collar.
Reinforce the attachment points.
The ties should be long enough to create a comfortable bow.
Step 8: Add a Decorative Bow
Place the collar around the neckline of a blouse or dress.
Bring the two cords together.
Tie them into a loose bow.
Allow the flower-tipped ends to hang naturally.
Do not tie the collar tightly around the neck.
Step 9: Final Blocking
Lightly dampen the completed collar if necessary.
Arrange the neckline and scallops on a blocking mat.
Pin the outer edges.
Allow the collar to dry completely.
Step 10: Final Inspection
Check the stitches and decorative details.
Make sure the ties are securely attached.
Inspect the scalloped edges.
Remove any loose yarn ends.
Your Handmade Crochet Lace Collar is now complete.
Creative Color Variations
Classic Ivory Collar: Elegant and timeless.
Vintage Beige Collar: Perfect for romantic outfits.
Dusty Rose Collar: Soft and feminine.
Burgundy Lace Collar: Sophisticated and eye-catching.
Black Lace Collar: Beautiful for formal clothing.
Lavender Collar: Delicate and spring-inspired.
Emerald Green Collar: Rich and elegant.
White and Gold Collar: Perfect for special occasions.
Styling Ideas
A Crochet Lace Collar can transform a simple blouse into a vintage-inspired outfit.
Wear it over a plain dress for a romantic appearance.
Pair it with a cardigan for a classic handmade style.
Use it as a decorative accessory for family photographs or special celebrations.
The collar can also be displayed on a mannequin as part of a handmade craft collection.
Professional Crochet Tips
Use fine cotton yarn. It creates clear stitch definition.
Maintain even tension. Consistent stitches improve symmetry.
Count your repeats. Evenly spaced motifs create a balanced collar.
Block carefully. Blocking helps define the scallops.
Avoid overly tight chains. Flexible chain spaces allow the lace to spread naturally.
Use a smaller hook for delicate lace. Fine stitches create an elegant appearance.
Secure decorative ties. Reinforced attachment points improve durability.
Choose soft yarn. The neckline should feel comfortable against the skin.
How to Care for Your Crochet Collar
Hand-wash gently in cool water.
Use a mild detergent suitable for cotton yarn.
Avoid twisting or wringing the lace.
Place the collar on a clean towel.
Gently press out excess water.
Reshape the scallops while damp.
Allow the collar to dry flat.
Store it carefully to prevent stretching.
Frequently Asked Questions About the Crochet Collar Pattern
Is this crochet collar suitable for beginners?
Yes, although the decorative lace motifs require some practice.
Confident beginners who understand chains, double crochet, and slip stitches should be able to complete the project.
What yarn is best for a crochet lace collar?
Fine cotton yarn is highly recommended.
It creates delicate stitches and helps the collar maintain its shape.
Can I make the collar larger?
Yes.
Increase the foundation chain and add more lace repeats.
Make sure the motifs remain evenly spaced.
Can I make the collar smaller?
Yes.
Reduce the foundation chain and adjust the number of fan motifs.
Check the neckline measurement before beginning.
Do I need to block the collar?
Blocking is strongly recommended.
It helps open the lace stitches and define the scalloped edges.
Can I use thicker yarn?
Yes.
However, thicker yarn will create a larger and heavier collar.
Use an appropriately sized crochet hook.
Can I make the collar without ties?
Yes.
You can replace the ties with a small button and loop closure.
Can I add beads?
Yes.
Small decorative beads can be added to the flower centers.
For garments intended for children, avoid loose embellishments that could create a choking hazard.
How long does it take to crochet?
The project may take approximately four to eight hours, depending on your experience and yarn thickness.
Can I use different crochet stitches?
Yes.
You can experiment with shell stitches, picots, and other lace motifs.
However, changing the stitch pattern may affect the collar’s shape.
Can I sell finished crochet collars?
You can generally sell handmade collars created from this original tutorial, subject to applicable local requirements.
Is this collar suitable for special occasions?
Absolutely.
A delicate crochet collar can complement dresses, blouses, and vintage-inspired outfits.
Conclusion
The Crochet Collar Pattern is a beautiful handmade accessory that combines traditional lace crochet techniques with timeless vintage elegance.
With its curved neckline, delicate openwork stitches, large scalloped fans, and charming flower-tipped ties, the design creates a sophisticated decorative collar suitable for many outfits.
The project offers wonderful opportunities to practice lace construction, decorative crochet motifs, and professional finishing techniques.
Whether you choose classic ivory, romantic dusty rose, elegant burgundy, or another favorite color, each collar can become a unique expression of your creativity.
Gather your favorite cotton yarn, prepare your crochet hook, and enjoy creating a beautiful Vintage Crochet Lace Collar that adds handmade charm, elegance, and delicate texture to your wardrobe.