
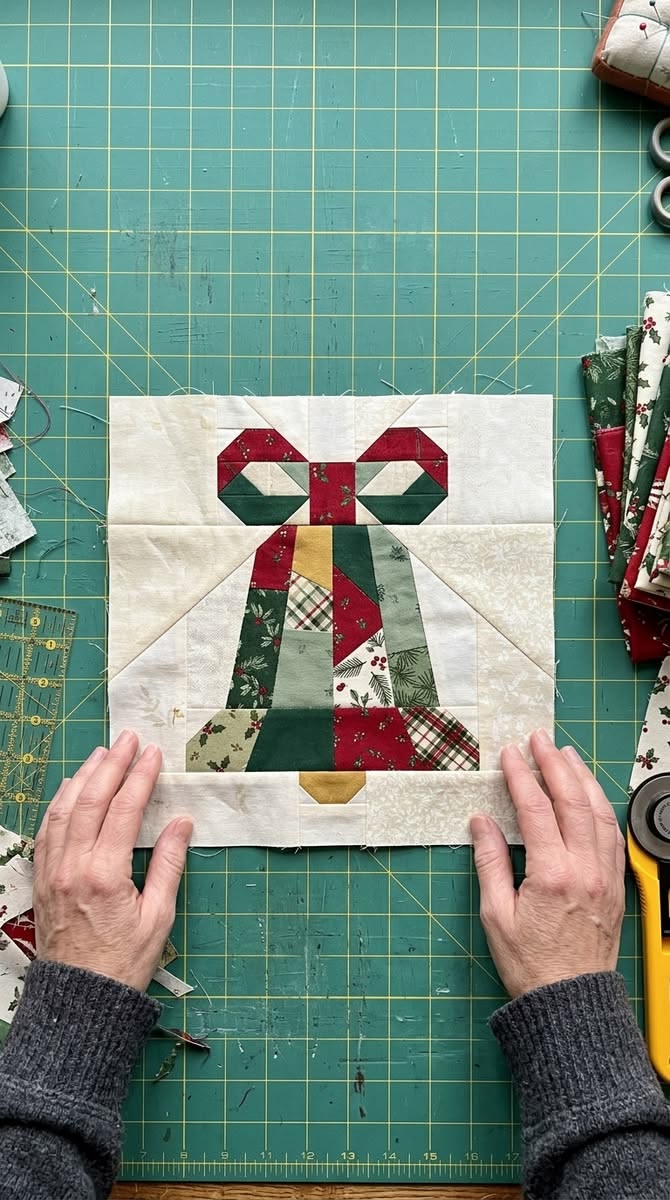
The Christmas Bell Block Pattern brings together the charm of traditional patchwork and the warmth of handmade holiday decorations. Inspired by the pictured block, this design features a colorful bell, a decorative bow, and a small golden clapper against a soft cream background. Red, green, gold, and neutral fabrics create a festive combination that feels welcoming and timeless.
One of the most appealing features of this Christmas quilt block is its scrappy appearance. Small pieces of floral cotton, checks, leafy prints, and solid fabrics give the bell character without requiring a perfectly matched collection. The quiet background helps define the silhouette, allowing the patchwork details to stand out beautifully.
The tutorial below explains an original, simplified version inspired by the photograph, using a pieced fabric panel and appliqué to create the bell and bow. The photographed block appears to use more intricate piecing; this method recreates its overall style without claiming to reproduce the original pattern. Suggested measurements produce a 30 cm finished block, suitable for cushions, table runners, wall hangings, or a larger Christmas quilt.
1. Choosing Fabrics and Preparing Your Christmas Bell Block
Start with a balanced selection of quilting cotton fabrics. For a look similar to the photograph, choose deep red, forest green, sage green, warm cream, and muted gold. Combine small floral prints with checks and solids, keeping the strongest colors within the bell and bow. A cream background with a subtle print adds texture while maintaining a clear outline around the decorative shapes.
DISCOVER MORE FREE PATTERNS HERE!
For one block, prepare a cream background square measuring 34 × 34 cm, approximately twelve to sixteen assorted scraps measuring at least 6 × 10 cm, and additional red and green scraps for the bow. You will also need a gold scrap measuring approximately 6 × 6 cm for the clapper. These quantities allow some flexibility when arranging and trimming the patchwork.
Gather a rotary cutter, cutting mat, ruler, fabric scissors, pins, an iron, and coordinating sewing thread. For the appliqué method described here, also prepare lightweight paper-backed fusible web suitable for sewing through. Follow its manufacturer’s pressing directions, since heat settings and application times vary. A fabric marking pencil and a sheet of paper will help you draft the shapes accurately.
Use a 0.6 cm seam allowance when joining the scraps into the bell panel. This seam allowance applies to the patchwork seams only: the raw-edge appliqué shapes are cut at their finished outlines without added allowances. After all appliqué stitching is complete, trim the background to 31.2 × 31.2 cm. Sewing that block into a project with 0.6 cm seams produces a 30 cm finished square.
Before cutting, press the fabrics and check that strongly colored scraps do not release dye when dampened. If you prefer to prewash your quilting cotton, treat all fabrics consistently before assembly. Avoid mixing stretchy clothing scraps with stable quilting cotton for this version, because uneven stretch can distort the bell panel and make the background ripple during stitching.
Arrange your scraps beside the cream background before sewing. Distribute dark greens and reds across the bell instead of grouping every dark piece together. Add a small gold accent near its upper section and a plaid piece near the bottom for variety. Taking a quick photograph of the arrangement can help you remember the color balance as you assemble your scrappy Christmas block.
2. Drafting the Bell, Bow, and Clapper Shapes
Draw the main bell template on paper inside a rectangle measuring 20 cm wide × 17 cm high. Mark a centered top edge measuring 8 cm wide. From each end of that top edge, draw a sloping line outward to a point 8 cm from the centerline and 13 cm below the top. These lines establish the gently widening sides of the bell.
Create the flared lower rim by extending each side outward to the bottom corners of the 20 × 17 cm rectangle. Connect those corners with a straight horizontal bottom edge. The resulting silhouette has a narrow top, widening body, and broad lower section. Fold the paper vertically along its centerline before cutting if you want both sides of the bell template to match precisely.
For each bow loop, draw a polygon approximately 7 cm wide × 6 cm high, with clipped outer corners and a narrower inner end. Cut two mirrored loops from red fabric. Draft two smaller green shapes, approximately 6 × 2.5 cm, to overlap the lower portion of those loops. These layered pieces suggest the red-and-green folded ribbon visible in the reference.
Add a cream inset approximately 3.5 × 1.5 cm to the center of each loop, shaping it like a small slanted diamond or parallelogram. These cream pieces suggest the open spaces inside the bow. Draft a separate red center knot measuring 3 × 4.5 cm. Positioning this knot over the inner ends of the loops will hide their joins and make the bow read as one complete shape.
Draft the gold clapper approximately 4 cm wide × 3 cm high, with a flat top and clipped lower corners. Its upper edge will sit behind the bell’s lower rim, leaving roughly 2 cm visible. Keep this element compact so it looks like part of the bell rather than a separate ornament beneath it. A mustard or antique-gold cotton works especially well.
Test the paper pieces on the background before cutting fabric. Center the complete arrangement horizontally, with the bow immediately above the bell and the knot slightly overlapping its top. Aim for an overall motif height of approximately 25 cm, including the visible clapper. Leave enough cream space around the design for trimming and the eventual block seams, adjusting the paper shapes if necessary.
3. Sewing the Patchwork Bell and Adding the Appliqué
Begin the patchwork bell panel by making four vertical fabric strips. For each strip, cut several scraps 6.5 cm wide, using varied lengths between approximately 5 and 10 cm. Join their short edges with 0.6 cm seams until each strip measures at least 19 cm long. Alternate the placement of reds, greens, plaids, and lighter prints to avoid obvious repeated bands.
Press the seams within each strip, then join the four strips along their long edges. Four 6.5 cm strips joined with three 0.6 cm seams create a panel approximately 22.4 cm wide, providing enough width for the 20 cm bell silhouette. Keep the strip edges straight and check that the assembled panel is at least 19 cm high throughout before cutting the bell.
Place the paper bell template over the panel and choose the most attractive position. Move it slightly to include favorite prints or to avoid cutting away a useful color accent. Following the fusible-web instructions, transfer the bell outline to the paper backing, bond the web to the wrong side of the patchwork panel, and cut out the bell accurately. Use a pressing cloth if recommended.
Prepare the bow pieces and clapper with fusible web in the same way. Remember that tracing onto the paper backing reverses asymmetrical shapes, so keep the two bow loops mirrored. Lightly mark the background’s vertical centerline, then arrange the clapper, bell, red loops, green overlays, cream insets, and center knot. Check the complete composition before permanently pressing anything into place.
Fuse and stitch the design in layers. Start with the clapper, then place the bell over its upper edge and secure the bell’s perimeter. Add the red bow loops, followed by their green overlays and cream insets. Finish with the red center knot. This sequence keeps overlapping edges tidy and allows each layer to conceal the relevant attachment area beneath it.
Use a small blanket stitch, narrow zigzag, or another appliqué stitch to secure exposed raw edges. Test the stitch on fused scraps first and adjust the tension if the fabric puckers. Support the block as you sew, pivot carefully at corners, and avoid pulling it through the machine. Once stitching is complete, press gently and trim the block square to 31.2 × 31.2 cm, keeping the motif centered.
4. Finishing and Using Your Christmas Bell Quilt Block
Decide how you want to display the Christmas Bell Block Pattern before adding batting or backing. If the block will become part of a larger quilt, leave it unquilted until the quilt top is assembled. For a small standalone wall hanging, you can add borders first, then layer the finished top with batting and backing. This keeps construction manageable and helps maintain an even finished shape.
For a framed block, cut two border strips 4.2 × 31.2 cm and attach them to opposite sides. Then cut two strips 4.2 × 37.2 cm for the remaining sides. With 0.6 cm seams, these strips create a border that finishes 3 cm wide and a framed unit measuring 37.2 cm unfinished. Check your actual sewn measurements before cutting the second pair.
Choose quilting that supports the motif without overwhelming its small fabric pieces. Gentle straight lines or loose curves in the cream background can provide texture, while quilting just outside the bell helps emphasize its shape. Avoid placing dense quilting in only one small area, since uneven density can affect how the finished piece lies. Follow the batting manufacturer’s maximum spacing guidance.
To make a Christmas table runner, arrange three bell blocks in a row with cream sashing between them. Alternate the distribution of red and green within each bell while keeping the backgrounds consistent. For a cushion front, surround one block with borders sized to suit your chosen insert. A group of blocks can also alternate with stars, trees, or plain quilted squares.
For a larger quilt, repeat a few fabrics across all the blocks to connect the different scrap combinations. Using the same cream background and gold clapper fabric throughout provides an easy visual link. You can still vary the bell panels considerably. This approach is especially useful when working from a scrap collection that contains many small pieces but limited quantities of any single print.
Finish the completed project with binding that complements the block. Deep green creates a calm frame, red adds warmth, and a small plaid echoes the scrappy bell. Label the back with the date and any personal dedication. For care, follow the requirements of your fabrics, batting, and fusible product, using gentle handling to help preserve the appliqué edges and the block’s shape.
Frequently Asked Questions
Is this the exact pattern used in the photograph?
No. This is an original, simplified interpretation of the pictured design. It uses a pieced bell panel and raw-edge appliqué to recreate the main visual features; the exact construction and measurements of the photographed block cannot be confirmed from the image alone.
Can a beginner make this Christmas bell block?
Yes, a beginner comfortable sewing consistent seams can try this version. Practice the appliqué stitch on scraps first. The cream bow insets are relatively small, so take your time around their corners or enlarge them slightly for easier stitching.
Can I make the bell from one piece of fabric?
Yes. Cut the bell from a single festive print instead of assembling a patchwork panel. This reduces the number of seams and makes the project quicker while preserving the bell silhouette, layered bow, and golden clapper.
Do the appliqué pieces need seam allowances?
No seam allowances are added to the raw-edge appliqué shapes used here. The patchwork panel does require seam allowances when its scraps are joined. If you switch to turned-edge appliqué, you must add suitable turning allowances to the templates.
Can I resize the block?
Yes. Scale all motif templates by the same percentage and choose a background that leaves room around the complete arrangement. Calculate the block’s outer seam allowances separately; they should remain appropriate for your sewing method rather than increasing automatically with the design.
How can I prevent puckering around the appliqué?
Use lightweight fusible web, press according to its instructions, and test the stitch settings before starting. If needed, place a suitable removable stabilizer behind the background during stitching. Avoid overly dense stitches and keep the fabric relaxed as it passes under the presser foot.
Conclusion
The Christmas Bell Block Pattern transforms small fabric scraps into a festive design with plenty of personality. Its colorful patchwork body, ribbon-inspired bow, and golden clapper capture the warmth of handmade holiday quilting. With careful placement, consistent seams, and neatly secured appliqué, this photo-inspired version can become a charming centerpiece for a cushion, runner, wall hanging, or Christmas quilt.