
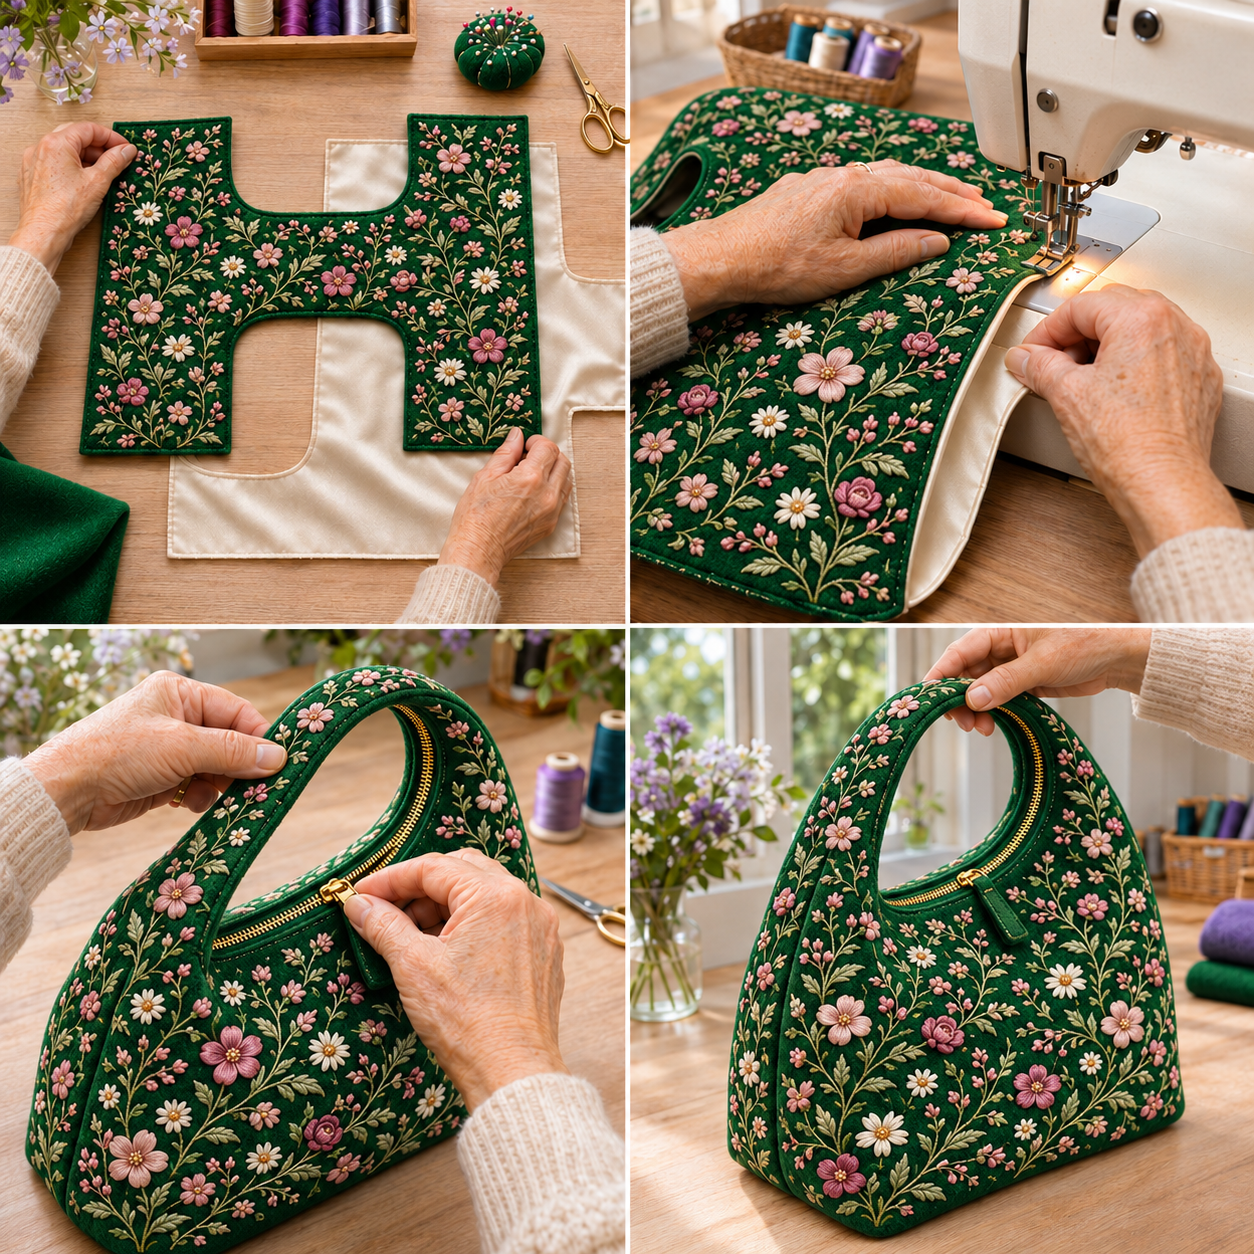
The Hobo Bag Pattern is a beautiful sewing project that combines elegance, practicality, and the charm of handmade craftsmanship. With its softly rounded silhouette, comfortable integrated handle, and delicate floral fabric, this handbag is an excellent example of how quilting and creative sewing can transform ordinary materials into a sophisticated accessory. The deep emerald green fabric, decorated with soft pink blossoms, white daisies, and graceful botanical details, creates a timeless design that feels both luxurious and welcoming.
One of the most appealing features of this quilted hobo bag is its unique construction. Unlike traditional rectangular tote bags, this design features a curved upper opening, a beautifully shaped handle, and a spacious lower compartment. The gentle curves give the handbag its distinctive appearance, while the padded fabric adds structure without making it excessively stiff. A carefully installed zipper provides additional security, making the finished bag suitable for shopping, traveling, everyday outings, and special occasions.
Creating a handmade fabric hobo bag is also a rewarding opportunity to explore important sewing techniques, including fabric preparation, precision cutting, quilting, curved seams, zipper installation, and decorative topstitching. This project is suitable for confident beginners who want to improve their skills and for experienced quilters looking for an elegant accessory to add to their collection. With the right materials, careful measurements, and a little patience, you can create a beautiful handbag inspired by the floral design in the image.
Materials and Fabric Preparation for the Hobo Bag Pattern
The success of a Hobo Bag Pattern begins with selecting appropriate fabrics and preparing them correctly. Because the finished handbag must hold its shape while remaining comfortable to carry, choosing the right combination of exterior fabric, lining, and stabilizer is especially important.
DISCOVER MORE FREE PATTERNS HERE!
For the exterior, consider using high-quality quilting cotton, cotton canvas, or a durable cotton-linen blend. The emerald green floral fabric shown in the inspiration image is an excellent example of an elegant botanical design. Similar results can be achieved with vintage floral prints, delicate embroidered fabrics, or rich jewel-toned materials.
The lining should be lightweight but strong enough to withstand everyday use. Cotton poplin, quilting cotton, or another tightly woven fabric works particularly well. A contrasting cream lining provides a clean interior appearance and complements the rich green exterior.
Materials Needed
-
50 cm of floral exterior fabric, approximately 110 cm wide
-
50 cm of coordinating lining fabric
-
50 cm of fusible fleece
-
50 cm of medium-weight fusible interfacing
-
One 30 cm nylon or metal zipper
-
Matching polyester sewing thread
-
Coordinating embroidery thread, optional
-
Sewing machine
-
Universal sewing needle, size 90/14
-
Fabric scissors or rotary cutter
-
Measuring tape and quilting ruler
-
Fabric marking pen or tailor’s chalk
-
Sewing clips or pins
-
Iron and ironing board
-
Zipper foot and standard presser foot
For an additional decorative finish, you may use floral embroidery, a small fabric zipper pull, or subtle contrasting topstitching. These details allow the handmade quilted bag to look more personalized without changing its basic construction.
Finished Bag Measurements
The following dimensions are suggested for a medium-sized hobo handbag inspired by the photograph.
| Bag component | Approximate measurement |
|---|---|
| Finished body width | 32 cm |
| Finished body height | 24 cm |
| Bottom depth | 8 cm |
| Handle opening width | 16 cm |
| Handle opening height | 10 cm |
| Handle band width | 5 cm |
| Zipper length | 30 cm |
| Seam allowance | 1 cm |
These measurements are intended as a practical starting point rather than an exact reproduction of a commercial pattern. Always make a paper or inexpensive fabric prototype to verify the shape and handle opening before cutting your final materials.
Understanding the Hobo Bag Shape
The most distinctive feature of this pattern is the continuous curved handle that flows naturally into the handbag body. This creates a smooth, unified appearance without the need for separate shoulder straps.
To reproduce this design, draw a symmetrical paper pattern that includes the rounded lower body, gently sloping upper sides, and curved handle opening. The outer silhouette should be slightly wider at the bottom than at the upper opening.
For a medium-sized handbag, begin with a paper rectangle measuring approximately 36 cm wide and 39 cm high. Use this as a drafting guide, then sketch the lower body and upper handle contour inside it.
The body should measure approximately 32 cm wide after sewing, with enough additional space for the side and bottom seams. The handle opening should be comfortably sized so the bag can be carried by hand or over the forearm.
Once the shape is balanced, cut a test piece from inexpensive cotton fabric. This will help you confirm the proportions, curved edges, and overall appearance before working with your decorative materials.
Step-by-Step Instructions to Sew the Quilted Hobo Bag
Constructing a quilted hobo handbag involves several stages. Working carefully through each one will help you achieve smooth curves, balanced seams, and a neat professional finish.
The main steps include preparing the exterior fabric, adding quilting or embroidery, constructing the handbag body, installing the zipper, and finishing the handle.
Step 1: Prepare and Cut the Fabric
Begin by pressing your exterior and lining fabrics to remove wrinkles. If your materials are washable, prewash them according to their care instructions to reduce the possibility of shrinkage after sewing.
Transfer your paper pattern onto the wrong side of the exterior fabric. Cut two mirrored main body pieces, remembering to include the 1 cm seam allowance.
Cut two matching lining pieces and two fusible fleece pieces using the same body shape. Trim the fleece from the seam allowances if necessary to reduce bulk.
For a bag with a separate boxed bottom, also prepare small rectangular reinforcement pieces for the lower corners. These will help maintain the finished handbag’s depth.
Keep all cut components organized and label their corresponding positions using removable fabric markers.
Step 2: Add Floral Embroidery or Decorative Quilting
The floral details are one of the most beautiful features of the inspiration design. Small pink flowers, white daisies, and fine green branches create an elegant botanical appearance against the dark emerald background.
If you are using plain fabric, draw a delicate floral arrangement onto the exterior panels using a washable fabric marker. Embroider the flowers with satin stitches, French knots, and simple stem stitches.
Alternatively, choose a floral print that already contains the desired decorative pattern. This option is especially practical for beginners and reduces the overall construction time.
For a more traditional quilted fabric handbag, add subtle quilting lines between the floral motifs. A small diamond grid or gently curved free-motion quilting design can create attractive texture without overwhelming the flowers.
Position the fusible fleece behind each exterior panel according to the manufacturer’s instructions. If you are quilting the panels, a temporary fabric backing can help stabilize the layers while sewing.
Step 3: Construct the Main Bag Body
Place the two exterior panels right sides together, carefully aligning their lower edges and sides.
Sew around the side and bottom edges using a 1 cm seam allowance. Leave the upper zipper opening and handle opening unsewn.
Because the pattern contains rounded corners, sew slowly and guide the fabric gently through the machine. Avoid pulling the material, as this may distort the curves.
To create approximately 8 cm of bottom depth, flatten each lower corner so the side seam aligns with the bottom seam. Mark and sew a line measuring 8 cm across the flattened corner, with the seam intersection centered.
Repeat on the opposite side, checking that both corners are symmetrical. Trim away the excess fabric, leaving approximately 1 cm beyond each new seam.
Turn the exterior body right side out and check its shape. The base should now provide enough depth for the bag to stand more comfortably.
Step 4: Prepare the Lining
Place the lining pieces right sides together and repeat the construction process used for the exterior body.
Sew the side seams and bottom edge with a 1 cm seam allowance, but leave an opening of approximately 12 cm along the bottom seam. This opening will be used later to turn the completed handbag right side out.
Box the lining corners using the same 8 cm measurements as the exterior. Matching these dimensions will help the lining fit neatly inside the finished bag.
Press the lining seams carefully and trim any excess fabric around the curved edges.
If you want to add an interior pocket, sew it onto one lining panel before assembling the lining. A practical pocket size is approximately 16 cm wide by 12 cm high.
Step 5: Install the Zipper
A zipper makes the Hobo Bag Pattern more functional by keeping personal belongings securely inside.
For this design, a recessed zipper opening offers a particularly neat finish. Prepare two fabric zipper facings, approximately 32 cm long by 6 cm wide, and reinforce them with lightweight interfacing.
Fold and press the facings, then attach them to opposite sides of the zipper tape. Use a zipper foot to stitch close to the zipper teeth while maintaining an even seam allowance.
Position the completed zipper unit along the bag’s upper opening, just below the curved handle area. The zipper should sit smoothly without pulling or distorting the exterior panels.
Baste the zipper assembly in position and check that it opens and closes freely. Once the placement is correct, secure it permanently with machine stitching.
The exact placement will depend on your chosen paper pattern. Test the zipper facing length against the curved opening before sewing, trimming or extending the facings when necessary.
Step 6: Finish the Integrated Handle
The integrated handle gives this DIY fabric hobo bag its elegant and recognizable silhouette.
Align the exterior and lining around the handle opening, keeping the fabric edges even. Sew the curved opening with a consistent 1 cm seam allowance.
Clip small notches into the curved seam allowance without cutting through the stitches. These notches allow the fabric to lie smoothly after turning.
Carefully turn the fabric right side out through the opening left in the lining. Smooth the handle curve using your fingers or a blunt turning tool.
Press the handle edges gently, making sure the lining remains hidden behind the exterior fabric.
Finish with a narrow row of topstitching approximately 3 mm from the edge. This reinforces the handle and creates the clean decorative outline visible in the inspiration image.
Step 7: Complete the Bag
Once the handle and zipper are securely attached, inspect all seams and make any necessary adjustments.
Close the turning opening in the lining using a ladder stitch or a narrow machine seam.
Push the lining gently into the exterior handbag, making sure the bottom corners fit correctly.
Press the upper edges and handle contours using a pressing cloth to protect the decorative fabric.
For additional structure, you may insert a removable fabric-covered base panel measuring approximately 24 × 8 cm into the bottom of the handbag.
Your quilted floral hobo bag is now ready to use.
Creative Ideas for Customizing Your Handmade Hobo Bag
One of the greatest advantages of sewing a Hobo Bag Pattern is the opportunity to explore different fabrics, colors, and decorative styles. The same basic construction can produce a wide variety of handbags, from delicate everyday accessories to sophisticated statement pieces.
For an elegant botanical style, combine emerald green fabric with pink and ivory flowers. This color palette creates a beautiful contrast while maintaining a refined, classic appearance. A small gold zipper can complement the floral details and add a subtle touch of luxury.
If you prefer a romantic vintage look, use dusty rose fabric with cream lace accents and delicate floral embroidery. Soft pastel colors work especially well for spring accessories, handmade gifts, and feminine sewing collections.
A patchwork version is another wonderful option. Instead of using a single exterior fabric, combine small pieces of coordinating quilting cotton in a carefully arranged design. Floral prints, tiny geometric patterns, and subtle textured fabrics can create a charming handmade appearance.
For a more contemporary design, choose a solid-colored exterior and add decorative quilting. Straight diagonal lines, curved waves, or a classic diamond pattern can transform simple cotton fabric into an attractive textured handbag.
You can also personalize the zipper area with a decorative fabric pull, small leather tab, or coordinating ribbon. These details are easy to add and can make the finished accessory feel more polished.
Another useful customization is the addition of interior compartments. A zippered pocket, divided slip pocket, or small key loop helps organize everyday essentials without changing the bag’s exterior appearance.
Practical Sewing Tips, Care Instructions, and Gift Ideas
Achieving a professional result with a handmade quilted hobo bag depends on careful preparation and consistent sewing techniques. Even small improvements in cutting, pressing, and finishing can make a noticeable difference in the final appearance.
Always check the direction of your fabric design before cutting the exterior panels. Floral patterns with upright stems or directional prints should be aligned consistently so the flowers appear correctly positioned on the finished handbag.
When working with curved seams, use sewing clips or fine pins to hold the layers securely. Sew slowly around tight curves and stop occasionally with the needle lowered to reposition the fabric.
Pressing is equally important. Carefully press the seams after each major construction stage, using steam only when appropriate for the fabric and stabilizer. Well-pressed seams create smoother edges and help the handbag maintain its intended silhouette.
For everyday care, remove loose dust using a soft cloth or fabric brush. Spot clean minor marks with a mild detergent, testing the cleaning solution on a hidden area first. Avoid machine washing if the bag contains delicate embroidery, metal embellishments, or stabilizers that may lose their shape.
The Hobo Bag Pattern also makes a thoughtful handmade gift. A beautifully finished floral handbag can be presented for birthdays, Mother’s Day, holidays, or special celebrations. Choosing fabrics that reflect the recipient’s favorite colors makes the gift even more personal.
If you enjoy sewing coordinated accessories, consider using leftover fabric to create a matching zipper pouch, keychain, or small wallet. These additional pieces can turn a single handmade handbag into a complete and attractive gift set.
Frequently Asked Questions About the Hobo Bag Pattern
Is the Hobo Bag Pattern suitable for beginners?
Yes, although it is best suited to confident beginners who already understand basic machine sewing. The curved handle and zipper installation require patience, but both techniques become easier with careful preparation.
What is the best fabric for a quilted hobo bag?
Quilting cotton, cotton canvas, and cotton-linen blends are excellent choices. They provide good durability and work well with fusible fleece and interfacing.
Can I make this bag without embroidery?
Absolutely. You can use printed floral fabric, patchwork panels, or solid-colored material with decorative quilting. Embroidery is optional.
How can I make my hobo bag more structured?
Use medium-weight fusible interfacing, fusible fleece, and a removable base insert. These materials help the bag maintain its shape while remaining soft and comfortable.
Can I adjust the size of the bag?
Yes. Enlarge or reduce the paper pattern while preserving the proportions of the curved handle, body, and bottom corners. Check the zipper opening measurement after resizing.
Is a zipper necessary for this design?
No. You may replace the zipper with a magnetic snap or an open-top construction. However, a zipper provides additional security and gives the handbag a more finished appearance.
How long does it take to sew a hobo bag?
A basic version may take approximately 4–6 hours. Elaborate embroidery, decorative quilting, or additional interior pockets can increase the total construction time.
Can I sell handbags made using this tutorial?
You can generally sell handmade bags based on your own drafted pattern and construction, provided you respect any applicable rights associated with third-party patterns, branded fabrics, or decorative artwork.
Conclusion
The Hobo Bag Pattern is a beautiful combination of practical design, creative sewing, and timeless handmade elegance. Its rounded silhouette, integrated curved handle, decorative floral exterior, and secure zipper closure make it a versatile accessory that can be used throughout the year.
By choosing quality fabrics, preparing the pattern carefully, and following each construction stage, you can create a quilted fabric handbag with an attractive shape and a professional finish. The project also provides valuable experience in working with curved seams, stabilizers, zipper facings, and decorative stitching.
Whether you prefer the sophisticated emerald green floral design or decide to experiment with romantic pastels, vintage patchwork, or modern quilted textures, this DIY Hobo Bag Pattern offers countless possibilities. With thoughtful details and careful craftsmanship, your finished handbag can become a favorite everyday accessory or a meaningful handmade gift that reflects the beauty of sewing and quilting.