
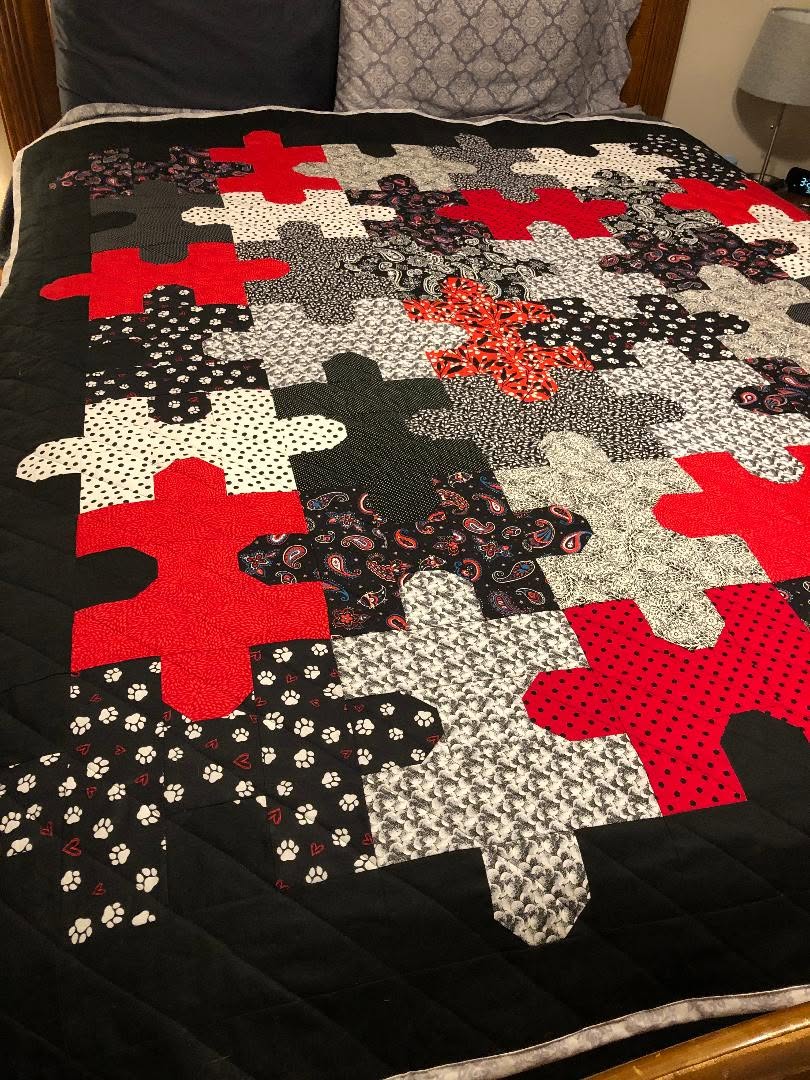
One of the most attractive features of this Jigsaw Puzzle Quilt is its ability to bring together contrasting colors and prints in a harmonious design. The quilt shown in the image features a striking combination of deep black, vibrant red, soft white, and beautiful patterned fabrics. Some pieces display delicate floral designs, while others incorporate polka dots, paisley patterns, and playful paw prints. These different textures and colors create visual movement across the quilt, making each puzzle-shaped section stand out.
Whether you are an experienced quilter or someone looking to explore a new patchwork technique, this Jigsaw Puzzle Quilt Pattern offers an enjoyable opportunity to develop your sewing skills. The design can be adapted to different sizes, color combinations, and decorating styles, making it suitable for bedrooms, guest rooms, or thoughtful handmade gifts. With careful cutting, accurate stitching, and a little patience, you can create a beautiful quilt that celebrates creativity and traditional quilting techniques.
Materials and Fabric Selection for the Jigsaw Puzzle Quilt Pattern
Choosing the right materials is an important first step when making a Jigsaw Puzzle Quilt Pattern. Because this design features several interlocking puzzle shapes, fabric selection plays a significant role in creating contrast and highlighting the individual pieces. High-quality quilting cotton is recommended because it is easy to cut, sew, press, and maintain throughout the quilting process.
DISCOVER MORE FREE PATTERNS HERE!
For a quilt inspired by the reference image, consider selecting black, red, white, and gray cotton fabrics with different prints and textures. Solid red pieces create bold accents, while black-and-white prints provide balance and sophistication. Floral prints, paisley patterns, polka dots, and small geometric designs are excellent choices for creating a visually interesting patchwork arrangement.
A coordinated fabric collection can make the project easier, especially for beginners. However, this quilt is also a wonderful opportunity to use leftover fabric from previous sewing projects. By combining carefully selected scraps, quilters can create a unique scrap-friendly puzzle quilt without needing every piece to come from the same fabric collection.
The following materials are recommended for a throw-size quilt measuring approximately 60 × 72 inches (152 × 183 cm). These quantities are estimates for the example layout described in this tutorial and may vary depending on fabric width, cutting waste, and the size of the puzzle pieces.
| Material | Suggested Quantity |
|---|---|
| Assorted quilting cotton | 4–4½ yards total |
| Black cotton for borders | 1–1¼ yards |
| Quilt backing fabric | Approximately 4½ yards, depending on width and piecing |
| Cotton or polyester batting | At least 68 × 80 inches |
| Binding fabric | Approximately ½ yard |
| Matching sewing thread | As needed |
| Rotary cutter and cutting mat | 1 each |
| Quilting ruler and fabric scissors | 1 each |
| Sewing machine and quilting needles | 1 set |
| Pins or fabric clips | As needed |
Before cutting the fabrics, wash and press them if you prefer to work with prewashed materials. This can help minimize unexpected shrinkage and color bleeding, particularly when combining saturated red fabrics with white or cream-colored prints. Always use the same fabric preparation method throughout the project to maintain consistent results.
For the most attractive finish, arrange the selected fabrics on a large table or design wall before sewing. Alternate dark and light prints, distribute the red pieces evenly, and avoid placing too many similar patterns directly beside one another. This simple planning technique helps create the balanced appearance that makes the Jigsaw Puzzle Quilt Pattern so distinctive.
How to Cut and Prepare the Jigsaw Puzzle Quilt Pieces
The cutting stage is one of the most important parts of creating a successful Jigsaw Puzzle Quilt. Unlike a traditional square patchwork quilt, this design incorporates pieces with tabs and matching recesses that resemble actual jigsaw puzzle pieces. These shapes must be carefully planned so the different fabric sections fit together correctly during assembly.
Begin by deciding on the desired quilt size and preparing a paper template for the puzzle units. For this example, use a 6-inch (15.2 cm) finished puzzle grid, with each puzzle unit occupying one grid position. The visible tabs and recesses extend across the boundaries between neighboring grid positions. A 9-column by 11-row arrangement creates a finished puzzle field approximately 54 × 66 inches before borders.
To make the template, draw a 6-inch square on sturdy paper and design rounded puzzle tabs along selected edges. Every outward tab must have a corresponding inward recess on the neighboring piece. Keep the curved sections smooth and avoid overly narrow necks, which can be difficult to sew accurately. Add a consistent ¼-inch (6 mm) seam allowance outside every sewing line, including the curves.
For a coordinated appearance, prepare several compatible templates rather than using a single identical puzzle shape for every section. Some units may feature tabs on two sides, while others may have one tab and one recess. Edge and corner units need straight outer edges so the finished puzzle field can be joined neatly to the borders.
Transfer the templates onto the wrong side of the chosen fabrics using a removable fabric marker. Mark the sewing lines, seam allowances, and alignment points carefully. A transparent acrylic template or sturdy cardstock pattern can help maintain consistent shapes, particularly when cutting many individual pieces for a large quilt.
When cutting curved puzzle sections, use sharp fabric scissors or a small rotary cutter for greater control. Cut slowly around each rounded tab and recessed opening, taking care not to distort the fabric. Keep the pieces organized by row or position, and use temporary labels on the wrong side if necessary to simplify assembly.
The photo shows an organic arrangement of interlocking shapes rather than perfectly repeated square blocks. To reproduce that appearance, create a full-size paper layout before cutting the fabric. The measurements in this article form a suggested construction plan, not an exact printable template copied from the photograph.
Step-by-Step Instructions for Sewing the Jigsaw Puzzle Quilt
After preparing the fabric pieces, the next stage involves assembling the Jigsaw Puzzle Quilt Pattern into a complete patchwork top. This process requires patience because the curved tabs and recesses must be sewn together accurately. However, by working in manageable sections and pressing the seams carefully, quilters can achieve a smooth and professional-looking finished quilt.
Step 1: Arrange the puzzle pieces. Place all the cut pieces on a design wall, bed, or large table according to the planned layout. Distribute the solid red, black, white, and patterned fabrics across the design. Make sure each puzzle tab matches the corresponding recess of the neighboring piece.
Step 2: Prepare the curved seams. Place two adjacent fabric pieces right sides together, matching their sewing lines and alignment marks. The raw edges may not align neatly because of the curves. Pin generously along the stitching line, keeping the fabrics flat and avoiding unnecessary stretching.
Step 3: Sew the puzzle connections. Using a sewing machine, stitch slowly along the marked curved seam with a ¼-inch seam allowance. Shortening the stitch length slightly can improve control around the rounded areas. Stop with the needle down when repositioning the fabric, and avoid pulling the material while sewing.
Step 4: Press and check each connection. After sewing a curved section, carefully clip the seam allowance where necessary to help the fabric lie flat. Do not cut through the stitching. Press the seam gently and inspect the puzzle connection before adding another piece. For bulky intersections, pressing seams open may provide a smoother finish.
Step 5: Assemble the complete quilt top. Continue joining puzzle pieces into small groups, then combine those groups into larger sections. Because the shapes interlock, assembly may require partial seams rather than simple straight rows. Follow the planned layout and complete each curved connection before closing the adjoining seams.
Step 6: Add the borders and prepare for quilting. Once the puzzle field is complete, square the outer edges carefully and add a black border approximately 3 inches wide on each side. Layer the quilt top with batting and backing fabric, then baste the layers together. Quilt with a walking foot or free-motion quilting technique, trim the excess layers, and attach the binding.
For a finish similar to the reference image, use diagonal quilting lines across the black borders. These lines create a subtle diamond pattern that complements the playful puzzle shapes without distracting from the colorful patchwork. The central puzzle section may be quilted with gentle curves, echo quilting, or a simple allover design.
When attaching the binding, cut fabric strips approximately 2½ inches wide and join them into one continuous length. Fold the binding lengthwise with wrong sides together, sew it around the quilt perimeter, and finish the reverse side by hand or machine. A narrow cream-colored or patterned binding can provide an elegant contrast against the dark border.
Creative Design Ideas and Tips for a Professional Quilt Finish
The Jigsaw Puzzle Quilt Pattern is incredibly versatile because its appearance changes dramatically depending on the fabrics and colors selected. While the black, red, and white combination in the reference image creates a bold and sophisticated design, quilters can experiment with softer colors, seasonal prints, or modern fabric collections to develop their own interpretation.
For a romantic bedroom decoration, consider using blush pink, ivory, dusty rose, and sage green fabrics. These gentle colors create a delicate patchwork appearance that works beautifully in cottage-inspired interiors. Floral prints and small geometric patterns can add visual interest while maintaining a coordinated, elegant finish.
A modern interpretation could feature Tiffany blue, white, charcoal gray, and navy blue. These colors provide strong contrast without creating an overly busy composition. To emphasize the individual puzzle sections, alternate solid fabrics with subtle prints and use a consistent background color throughout the quilt.
For a cheerful children’s quilt, select bright fabrics featuring animals, stars, hearts, and playful patterns. Colors such as sunshine yellow, coral, turquoise, and lavender can create a lively arrangement. The interlocking puzzle shapes make the finished quilt especially appealing for children’s bedrooms and family spaces.
To achieve accurate seams, always maintain a consistent seam allowance and avoid stretching the curved fabric edges. A sewing machine with adjustable speed can make sewing rounded sections easier. If your machine has a needle-down function, use it when navigating small curves and maintaining control over the puzzle connections.
Finally, take time to evaluate the quilt before completing the finishing stitches. Check that the edges lie flat, the batting is evenly distributed, and the quilting lines are consistent. These finishing details have a significant impact on the appearance and durability of the completed handmade patchwork quilt.
Frequently Asked Questions About the Jigsaw Puzzle Quilt Pattern
Is the Jigsaw Puzzle Quilt Pattern suitable for beginners?
The pattern is best suited to confident beginners or intermediate quilters because it involves curved seams and matching irregular shapes. Beginners can practice with a smaller puzzle block before attempting a full-size quilt.
What is the best fabric for making this quilt?
100% quilting cotton is an excellent choice because it is stable, durable, and easy to sew. Fabrics with similar weights and textures generally produce the most consistent results.
Can I make a Jigsaw Puzzle Quilt using fabric scraps?
Yes. This design is particularly suitable for using leftover quilting cotton. Mixing different prints and colors creates a distinctive patchwork appearance while making good use of smaller fabric pieces.
How large should each puzzle piece be?
A finished 6-inch grid provides a practical starting point for a throw-size quilt. Larger pieces are easier to handle, while smaller pieces create a more detailed design but require additional precision.
Do I need a special sewing machine?
No. A standard sewing machine with a straight stitch is sufficient. A ¼-inch presser foot, sharp needle, and adjustable stitch length can make the assembly process easier.
How can I prevent puckering around the puzzle curves?
Use accurate sewing lines, pin the curved sections carefully, and stitch slowly. Clip concave seam allowances where necessary, press gently, and avoid stretching the fabric during assembly.
Can I use different colors instead of red, black, and white?
Absolutely. The pattern works with almost any coordinated color palette. Pastel shades, holiday fabrics, vintage prints, and modern solids can all create attractive variations.
How should I wash the finished quilt?
Follow the care recommendations for the selected fabrics and batting. Most quilts made from quilting cotton can be machine-washed on a gentle cycle with mild detergent and dried according to the materials used.
Conclusion
The Jigsaw Puzzle Quilt Pattern is a wonderful combination of creativity, traditional patchwork techniques, and decorative design. Its interlocking puzzle shapes transform carefully chosen fabrics into a memorable quilt that can become a beautiful centerpiece in any bedroom.
The striking arrangement of red, black, white, and patterned fabrics demonstrates how contrasting colors can create visual interest while maintaining a coordinated appearance. Each puzzle-shaped section contributes to the finished composition, making the project especially rewarding for quilters who enjoy creative fabric arrangements.
Whether you choose to reproduce the dramatic color palette shown in the photograph or experiment with your own favorite fabrics, this Jigsaw Puzzle Quilt offers endless opportunities for personalization. With careful preparation, precise cutting, and thoughtful quilting, the finished project can become a treasured handmade piece that brings warmth, character, and artistic beauty into the home.