The Crochet Turtles Amigurumi – PATTERN is a delightful and beginner-friendly crochet project that brings to life adorable little turtles perfect for gifting, collecting, or decorating. These mini amigurumi turtles can be customized in color, size, and expression, making them ideal for all ages and occasions.
Amigurumi, the Japanese art of crocheting small, stuffed yarn creatures, has become a global crafting trend. And turtles—symbolizing patience, protection, and longevity—make especially lovable characters. With just a few basic stitches and some creativity, you can bring your very own crochet turtle to life.
Whether you’re a seasoned crocheter or just starting out, this pattern will guide you step-by-step through creating a charming turtle friend. Grab your hook and yarn, and let’s dive into the world of soft-shelled cuteness!
1. Why Everyone Loves the Crochet Turtles Amigurumi – PATTERN
The popularity of the Crochet Turtles Amigurumi – PATTERN comes from its simplicity, charm, and versatility. These tiny turtles are fun to make and even more fun to share.
DISCOVER MORE FREE PATTERNS HERE!
First, they’re perfect for beginners. You only need to know a few basic stitches like single crochet, increases, and decreases. The small size means you’ll see quick results, which is great motivation for new crocheters.
Second, these turtles are completely customizable. Want a rainbow turtle? Go for it. Prefer a realistic green-and-brown combo? That works too. You can also personalize the eyes, add accessories like bows or hats, or stitch on a cute smile to give each turtle a unique personality.
They’re also ideal gifts or party favors. These amigurumi turtles can be used as keychains, baby shower decorations, or shelf mascots. Because they’re soft and safe, they also make great toys for toddlers or stress-relief buddies for adults.
Another reason for their popularity is that they’re great stash-busting projects. You can make a whole turtle family using leftover yarn from other projects. They don’t require much material, making them budget-friendly too.
And finally, who doesn’t love a turtle? Their gentle look, round shells, and tiny limbs are irresistibly cute. One turtle turns into two… and suddenly you’ve got a whole pond full of crocheted happiness.
2. Materials Needed for the Crochet Turtles Amigurumi – PATTERN
To create your own adorable turtle using the Crochet Turtles Amigurumi – PATTERN, you’ll only need a handful of materials. You can also swap out colors or yarn types depending on the final look and feel you want.
Materials:
-
Worsted weight cotton or acrylic yarn in two main colors: one for the shell, one for the body (e.g., green + brown)
-
Small amount of black yarn or embroidery floss (for the eyes or mouth, if embroidered)
-
Crochet hook: typically 2.5 mm to 3.5 mm (check your yarn label for guidance)
-
Stuffing (polyester fiberfill)
-
Safety eyes (6mm to 10mm) or black beads/buttons
-
Tapestry needle
-
Scissors
-
Stitch marker (optional)
Optional extras:
-
Tiny ribbon or felt for accessories
-
Keyring attachment or loop
-
Fabric glue (for attaching decorative items)
Yarn tip:
Use a tighter gauge to ensure the stuffing doesn’t show through the stitches. Cotton yarn holds shape well and gives a clean finish, but soft acrylic can work for a squishier look.
Color ideas:
Classic turtle = green body, brown shell
Playful look = mint body, lavender shell
Ocean vibe = blue body, turquoise shell
Rainbow theme = multicolor shell with a white body
Let your imagination guide your palette!
3. Step-by-Step Instructions to Make Your Amigurumi Turtle
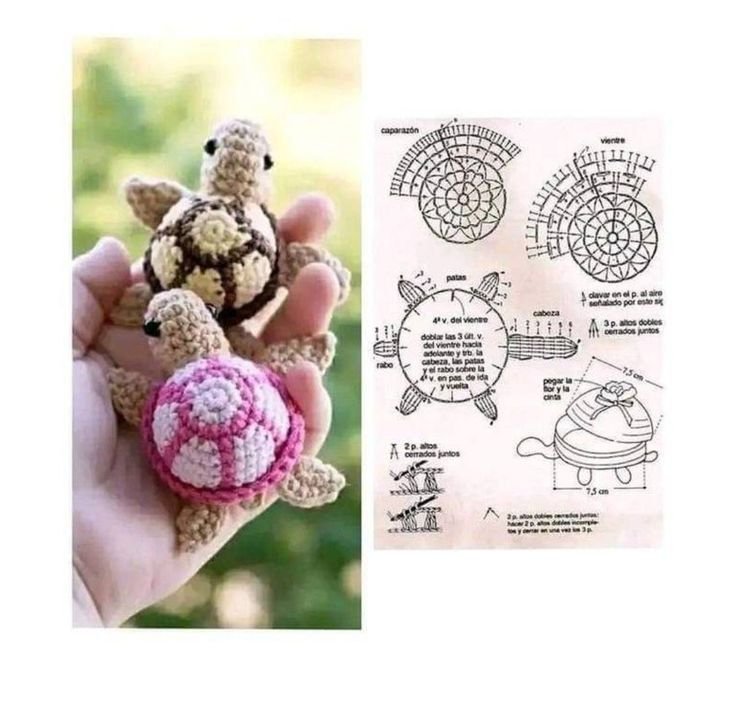
The Crochet Turtles Amigurumi – PATTERN consists of a few small parts: the shell (top and bottom), the head, four legs, and a tail. These are sewn together at the end to form the complete turtle.
Step 1: Crochet the shell (make 2 pieces: top and bottom)
-
Round 1: Magic ring, 6 sc into the ring (6)
-
Round 2: Inc in each stitch (12)
-
Round 3: (Sc, inc) repeat around (18)
-
Round 4: (2 sc, inc) repeat (24)
-
Continue increasing evenly until the shell is about 2.5”–3” across. Fasten off the top shell.
-
For the bottom shell, repeat same steps but do not fasten off—you’ll use it to join the body later.
Step 2: Crochet the head
-
Magic ring, 6 sc
-
Increase evenly to about 18–24 stitches
-
Work even for several rounds to form a cylinder
-
Begin decreasing until closed or leave an open end
-
Stuff lightly and sew to the front edge of the shell
Step 3: Crochet the legs (make 4)
-
Magic ring, 6 sc
-
Work even for 4–5 rounds
-
Fasten off and stuff slightly
-
Sew evenly spaced around the body
Step 4: Crochet the tail (optional)
-
Chain 3–4
-
Slip stitch back
-
Fasten off and attach to the back
Step 5: Assembly
-
Place safety eyes on the head, about 5–6 stitches apart
-
Embroider a smile or cheeks
-
Sew the head, legs, and tail onto the bottom shell
-
Line up the top shell, and using sc or whip stitch, attach the two shell pieces around the edge. Stuff before fully closing.
Your Crochet Turtle Amigurumi is now complete! Give it a name, snap a photo, and get ready to make more.
4. Creative Variations and Fun Uses
Once you’ve mastered the basic Crochet Turtles Amigurumi – PATTERN, the creative possibilities are endless. Here are some fun ways to personalize and use your turtles:
Create a turtle family
Make a mama turtle and several baby turtles in various sizes. Use a smaller hook and finer yarn to make miniature versions.
Add accessories
Give your turtle a tiny bow, hat, scarf, or backpack. This adds personality and charm—especially if gifting to kids.
Holiday versions
Make a red-and-green turtle for Christmas, or a pink one for Valentine’s Day. Add holiday-themed decorations like hearts, stars, or tiny candy canes.
Turn them into keychains
Attach a small loop to the top of the shell before final assembly and add a keyring. They’re perfect as bag charms or backpack buddies.
Educational toys
Use these turtles as counting toys, color matching, or storytime props. Add numbers or letters to the shells for a learning game.
Home décor
Place a few turtles in a glass bowl or terrarium-style dish for a whimsical display on your craft desk or shelf.
With every new variation, your turtles become more than just crafts—they become characters with charm and story.
🌟Join our exclusive Quilt broadcast list on Messenger! Receive the best patterns, tips, and updates directly in your inbox. Our team is ready to send you delightful content that will inspire your projects. Don’t miss this opportunity to stay updated and create amazing pieces. Join now and be part of this passionate quilt community!✨📩
FAQ – Crochet Turtles Amigurumi – PATTERN
Is this pattern suitable for beginners?
Yes! It uses basic stitches and small parts, making it a great beginner-friendly amigurumi project.
What if I don’t have safety eyes?
You can embroider eyes with black yarn or use tiny buttons instead. Always secure tightly for safety.
Can I use different yarn weights?
Yes, but it will affect the size. For tiny turtles, try fingering yarn; for plush ones, use bulky yarn.
How long does it take to complete one turtle?
Most crocheters can complete one in 1–2 hours. It’s a fast and satisfying project.
Can I sell the turtles I make?
Yes, but always check if the pattern is for personal or commercial use. If it’s free or original, crediting the designer is courteous.
How do I wash the finished turtle?
Spot clean with mild soap and water. If using machine-safe yarn and stuffing, you may handwash gently and air dry.
Conclusion
The Crochet Turtles Amigurumi – PATTERN is a joyful, customizable, and beginner-friendly project that lets your creativity shine. Whether you make just one or a whole collection, these little turtles will steal hearts and spark smiles.
They’re perfect for gifting, decorating, teaching, or simply enjoying the meditative rhythm of crochet. With a small amount of yarn and a lot of love, you’ll bring a soft, huggable turtle to life.
Have you tried this pattern? Leave a comment below with your experience, color choices, or ideas for fun variations—we’d love to hear how your turtle turned out! 🐢🧶💚