DIY – Plush Baby Rattle Tutorial is a charming and practical quilting project that allows you to create soft, safe, and adorable handmade toys for babies. This pattern is perfect for crafters who want to combine creativity with functionality, producing a meaningful item that can be cherished by both parents and little ones.
One of the greatest advantages of the DIY – Plush Baby Rattle Tutorial is its simplicity and versatility. Whether you are making a gift for a baby shower or adding a personal touch to a nursery, this project offers endless possibilities for customization while maintaining a beginner-friendly approach.
In this complete guide, you will learn everything you need to create your own DIY – Plush Baby Rattle Tutorial, including understanding the structure, selecting the best materials, following a step-by-step process, and exploring creative customization ideas.
1. Understanding the DIY – Plush Baby Rattle Tutorial
The DIY – Plush Baby Rattle Tutorial is a soft toy project that combines basic quilting or sewing techniques with simple construction methods.
DISCOVER MORE FREE PATTERNS HERE!
The rattle typically consists of a small plush shape, lightly padded and filled with a safe rattle insert that produces a gentle sound.
The outer layer is made from soft fabric, designed to be comfortable for babies to hold and explore.
One important feature of the DIY – Plush Baby Rattle Tutorial is its compact size, making it easy for small hands to grip.
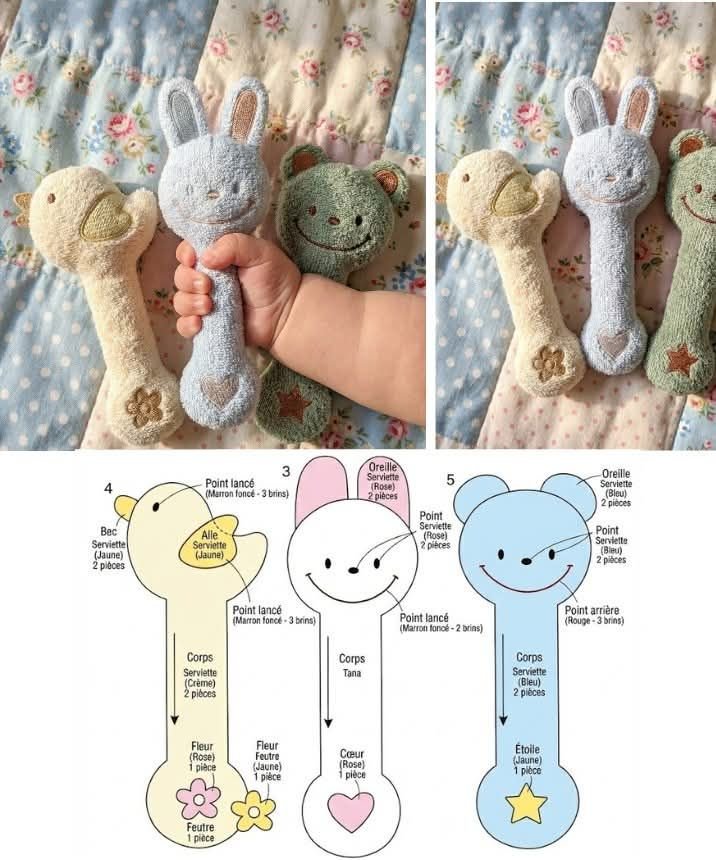
The structure can vary from simple shapes like circles or animals to more detailed designs depending on your creativity.
Understanding how the layers and components work together ensures a safe and durable final product.
2. Best Materials for DIY – Plush Baby Rattle Tutorial
Selecting the right materials is essential when working on the DIY – Plush Baby Rattle Tutorial.
Soft cotton fabric is widely used because it is breathable, gentle on sensitive skin, and easy to sew.
Minky or fleece fabrics can also be used for a softer and more plush texture.
Polyester fiberfill is the preferred choice for stuffing, providing both softness and shape retention.
A baby-safe rattle insert is necessary to create the sound effect inside the toy.
Strong thread is important to ensure that all seams are secure and long-lasting.
Basic tools include scissors, pins, a sewing machine, and a hand needle for finishing.
Using high-quality and baby-safe materials is crucial for both comfort and safety.
3. Step-by-Step DIY – Plush Baby Rattle Tutorial Process
Creating your own DIY – Plush Baby Rattle Tutorial becomes easy when broken down into clear steps.
Start by choosing a design and cutting out two identical fabric pieces for the front and back.
Place the pieces together with the right sides facing inward and sew around the edges, leaving a small opening.
Turn the fabric right side out through the opening, ensuring all corners are shaped properly.
Insert the rattle component into the center, positioning it evenly.
Add stuffing around the rattle insert until the toy reaches the desired firmness.
Carefully close the opening using a secure hand stitch to ensure durability.
4. Creative Ideas for DIY – Plush Baby Rattle Tutorial
The DIY – Plush Baby Rattle Tutorial allows for endless creativity and personalization.
You can create different shapes such as animals, stars, or simple geometric designs.
Using colorful fabrics or playful prints adds visual interest and engages a baby’s attention.
The DIY – Plush Baby Rattle Tutorial can be enhanced with sensory elements like fabric tags or textured sections.
You might consider adding embroidery details for a personalized touch, such as initials or small patterns.
Creating matching sets with blankets or quilts can make a thoughtful and coordinated gift.
Experimenting with eco-friendly or organic fabrics can add extra value to your handmade piece.
FAQ About DIY – Plush Baby Rattle Tutorial
Is this project beginner-friendly?
Yes, it is simple and suitable for beginners with basic sewing skills.
What type of fabric is best?
Soft cotton, fleece, or minky fabrics are ideal for comfort and safety.
How do I ensure the rattle is secure?
Place it in the center and surround it with stuffing, then close the opening tightly.
Can I wash the finished rattle?
Yes, but gentle washing is recommended to maintain its shape and quality.
Do I need a sewing machine?
A sewing machine is helpful, but the project can also be completed by hand.
Can I sell handmade rattles?
Yes, they are popular items, especially when made with high-quality materials.
Conclusion
The DIY – Plush Baby Rattle Tutorial is a simple yet meaningful quilting project that allows you to create soft, safe, and engaging toys for babies. In this guide, you learned how to understand the structure, choose the best materials, follow a step-by-step process, and explore creative customization ideas.
This pattern is perfect for making thoughtful gifts or adding a handmade touch to a baby’s environment. Its versatility and ease make it a favorite among crafters of all levels.
Now it’s your turn to create your own DIY – Plush Baby Rattle Tutorial. Explore different designs, try new materials, and enjoy the creative process. Don’t forget to leave your honest opinion and share your suggestions—your feedback helps inspire even more creative ideas!