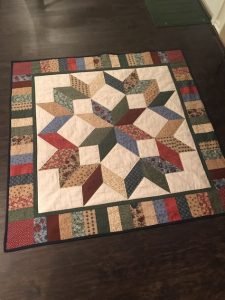
The Carpenter’s Star Quilt Block is a classic design that has stood the test of time, admired for its intricate pattern and stunning visual appeal. This quilt block, also known as the Carpenter’s Wheel, is a perfect blend of geometry and artistry, making it a favorite among quilters of all skill levels. Whether you’re an experienced quilter or just starting out, the Carpenter’s Star offers a rewarding challenge that will enhance your skills and result in a beautiful finished piece.
This quilt block is characterized by its star-shaped design, which is created by a series of half-square triangles (HSTs) and squares arranged in a specific pattern. The Carpenter’s Star is versatile and can be made in various sizes, depending on your project needs. It can be the centerpiece of a larger quilt, or you can repeat the block to create an entire quilt made up of these stunning stars.
In this tutorial, we’ll guide you through the process of creating your own Carpenter’s Star Quilt Block, from selecting the right fabrics to cutting and assembling the pieces. With detailed instructions and tips for each step, you’ll be able to create a quilt block that showcases your quilting skills and adds a touch of elegance to your projects.
Materials and Fabric Selection
Selecting the right materials is the first step to creating a successful Carpenter’s Star Quilt Block. The fabrics you choose will not only determine the overall look of your quilt but also influence how easy it is to work with the pieces. For this pattern, it’s important to select fabrics that contrast well with each other, as the design relies on clear distinctions between the different sections of the block.
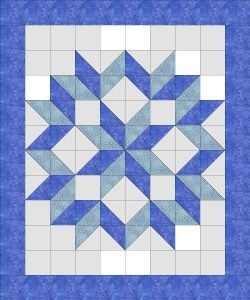
To begin, you’ll need two contrasting fabrics for the star and background. A light and dark combination works best, as this will make the star pattern stand out. You can also choose a third fabric if you want to add more complexity to the design, such as using a patterned fabric for the star and solid fabrics for the background. For a standard 12-inch Carpenter’s Star Quilt Block, you will need the following fabric cuts:
LEARN HOW TO MAKE THE HUNTER’S STAR BLOCK QUILT PATTERN!
- Fabric A (Star): Cut two 6.5-inch squares and four 7.25-inch squares.
- Fabric B (Background): Cut four 6.5-inch squares and four 7.25-inch squares.
In addition to the fabric, you will need basic quilting supplies such as a rotary cutter, cutting mat, quilting ruler, sewing machine, thread, and an iron for pressing seams. Having all your materials ready before you start will ensure a smooth quilting process and allow you to focus on the creative aspects of your project.
Cutting the Fabric: Precise Measurements
Accurate fabric cutting is crucial to achieving a perfectly pieced Carpenter’s Star Quilt Block. Precision in this step will ensure that your pieces fit together seamlessly, creating crisp, sharp lines that define the star pattern. Let’s break down the cutting process for this quilt block.
Start by cutting your squares as per the measurements provided in the materials section. For the half-square triangles (HSTs), take the four 7.25-inch squares of Fabric A and four 7.25-inch squares of Fabric B. Place one Fabric A square and one Fabric B square right sides together. Using a ruler and pencil, draw a diagonal line from one corner to the opposite corner on the back of the top fabric. This line will be your guide for sewing.
Next, sew a seam 1/4 inch on each side of the drawn line. After sewing, cut along the diagonal line to create two HSTs from each pair of squares. Press the seams open or to one side, depending on your preference. You should now have eight HSTs in total. Trim these HSTs down to 6.5 inches square to match the size of your Fabric A and Fabric B squares.
The precision of your cuts and seams will determine how well the pieces fit together in the final assembly. Taking your time to measure and cut accurately will pay off when you start assembling the quilt block, ensuring that all the points align perfectly.

Assembling the Carpenter’s Star Quilt Block
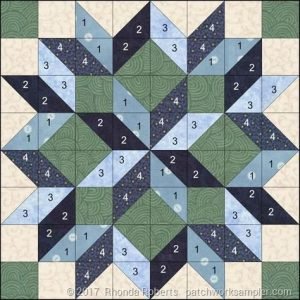
With all your pieces cut and prepped, it’s time to start assembling the Carpenter’s Star Quilt Block. This is where the design begins to take shape, as you arrange and sew the HSTs and squares into the iconic star pattern. The assembly process requires careful attention to the layout to ensure that the star is formed correctly.
Begin by laying out your fabric pieces on a flat surface, following the Carpenter’s Star layout. Start with the center of the block, placing a Fabric A square in the middle. Surround this center square with four HSTs, arranging them so that the Fabric A triangles point towards the center. This will create the inner diamond shape of the star.
Next, add the outer squares and HSTs. Place the remaining four HSTs around the inner diamond, ensuring that the Fabric A triangles form the outer points of the star. Finally, place the four Fabric B squares in the corners to complete the block. Double-check your layout before you start sewing to make sure all the pieces are in the correct position.
Sew the pieces together in rows, using a 1/4-inch seam allowance. Press the seams open or to one side as you complete each row. Once all the rows are sewn, join them together to complete the block. Take extra care to align the seams at each intersection for a polished, professional look. The result is a stunning Carpenter’s Star Quilt Block that showcases the precision and artistry of traditional quilt patterns.
Finishing Touches and Variations
Once you’ve completed the Carpenter’s Star Quilt Block, there are several ways to finish and customize your project. Depending on your creative vision, you can use this block as part of a larger quilt, turn it into a wall hanging, or even make a table runner by joining multiple blocks together. The possibilities are endless, and the versatility of this pattern allows you to experiment with different color schemes and layouts.
To finish the quilt block, you can add a border or sashing to frame the star and make it stand out. Choose a fabric that complements the colors in your block and adds a cohesive finish to the design. If you’re creating a larger quilt, consider using sashing between multiple Carpenter’s Star blocks to create a striking visual effect.
For a more personalized touch, experiment with different fabric patterns and colors. Try using a gradient of colors for the star to create a dimensional effect or mix in prints and solids for added texture and interest. You can also play with the size of the block by adjusting the measurements, making larger or smaller stars depending on your project needs.
EXPLORE THE BEST QUILT PATTERNS FOR INSPIRATION!
In conclusion, the Carpenter’s Star Quilt Block is a timeless pattern that offers endless creative possibilities. By following this step-by-step tutorial, you’ll be able to create a quilt block that is both visually stunning and a testament to your quilting skills.
🌟 Join our exclusive Quilt broadcast list on Messenger! Receive the best patterns, tips, and updates directly in your inbox. Our team is ready to send you delightful content that will inspire your projects. Don’t miss this opportunity to stay updated and create amazing pieces. Join now and be part of this passionate quilt community! ✨📩
Whether used as part of a larger quilt or as a standalone piece, the Carpenter’s Star is sure to be a cherished addition to your collection. Happy quilting!


