Creating a magical handmade decoration during the holiday season becomes even more special when following a Crochet Tutorial: Christmas Dreamcatcher. This delightful pattern transforms simple yarn into a festive ornament filled with charm, meaning, and creativity. Whether you’re an experienced crocheter or someone just beginning, this project invites you to explore techniques that combine tradition and holiday cheer in a beautiful and functional design. The Crochet Tutorial: Christmas Dreamcatcher encourages creativity while being accessible to all skill levels.
This project is a wonderful addition to Christmas décor because it blends the classic dreamcatcher aesthetic with seasonal colors and textures. The structure is simple yet visually captivating, making it a great project for personal decoration or heartfelt gifting. Working with the Crochet Tutorial: Christmas Dreamcatcher allows you to experiment with yarn types, embellishments, and colors to create something truly unique and magical. It is versatile, customizable, and perfect for crafting a cozy, handmade holiday.
Throughout this guide, you will learn how to construct the circular base, crochet the inner web, add festive elements, and finish the ornament with decorative details. The Crochet Tutorial: Christmas Dreamcatcher is designed to walk you through each step with clarity so you can enjoy both the process and the final result. In addition, you will gain insights into yarn selection, tension control, assembly, and creative enhancements that elevate your dreamcatcher into a true holiday treasure.
1. Understanding the Structure of the Christmas Dreamcatcher
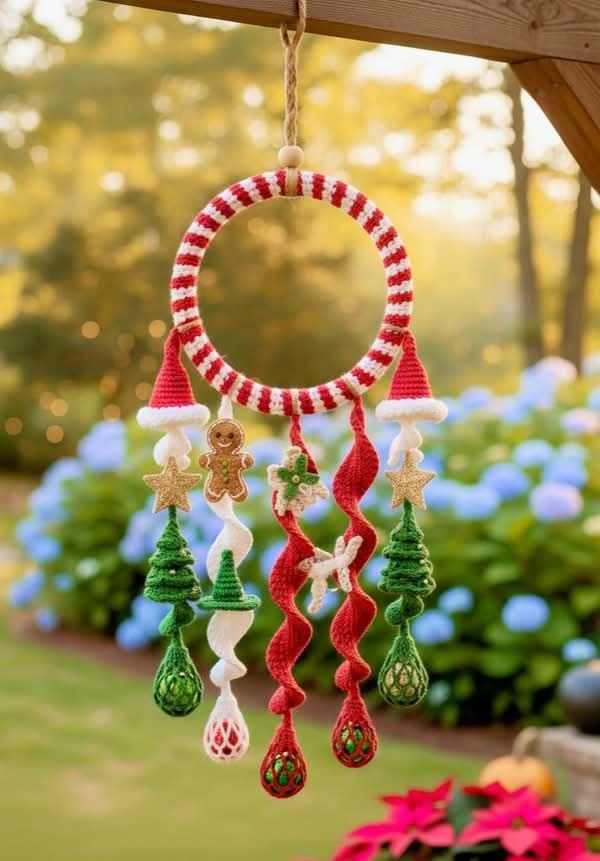
The first part of the Crochet Tutorial: Christmas Dreamcatcher focuses on understanding its overall structure. A classic dreamcatcher consists of a circular frame wrapped or covered with yarn, and this tutorial adapts that traditional format for Christmas with themed colors and embellishments. Knowing the foundation helps you visualize the entire process before starting your stitches.
DISCOVER MORE FREE PATTERNS HERE!
The circular frame is typically made from metal, plastic, or a sturdy ring. Crocheting around this ring creates the base for the web. This is where consistent tension becomes important, as it ensures the yarn sits neatly against the frame. Maintaining this consistency helps the dreamcatcher look polished and symmetrical.
The inner web is the heart of the design. In this pattern, the web can be made using chains, single crochet stitches, or lace-style openwork. The effect is elegant, delicate, and decorative, contributing to the magical appearance of the dreamcatcher. It also reflects the traditional meaning associated with dreamcatchers: catching good dreams and positive energy.
Choosing Christmas colors adds charm and seasonal identity to your project. Reds, greens, golds, whites, and silvers are common choices, but the Crochet Tutorial: Christmas Dreamcatcher encourages creativity. You may blend glitter yarn, metallic threads, or textured fibers to achieve a glowing holiday look.
The structure allows for additional decorations like miniature bells, ribbons, beads, or even tiny crocheted snowflakes. These details make the dreamcatcher feel more personal and festive. The versatility of the pattern ensures that every crafter can add their signature touch.
Once you understand these structural components, constructing your dreamcatcher becomes an enjoyable and intuitive process. The foundation sets the tone for the entire project, making your finished ornament visually balanced and beautifully detailed.
2. Yarn, Hooks, and Materials Needed for the Crochet Tutorial: Christmas Dreamcatcher
Selecting the right materials is essential for achieving a polished and festive result in the Crochet Tutorial: Christmas Dreamcatcher. You don’t need many supplies, but choosing them thoughtfully will make your project stand out. The main materials include yarn, a crochet hook, the ring, and embellishments.
Yarn type plays a huge role in the final appearance. Cotton yarn is a popular choice because it provides structure and crisp stitch definition. Acrylic yarn works beautifully if you want a softer texture or more color variety. Mixing both can create interesting contrast and visual depth.
Hook size should match the yarn weight and your tension style. A smaller hook helps keep stitches tight and neat around the ring, while a slightly larger hook is ideal for creating the airy web. This adaptability is one of the strengths of the Crochet Tutorial: Christmas Dreamcatcher.
Decorative accessories add personality. Beads, sequins, tiny ornaments, and festive ribbons bring color and shine to your dreamcatcher. These additions reflect the spirit of Christmas and turn a simple crochet piece into a meaningful decoration that stands out on walls, doors, or Christmas trees.
The type of ring you choose affects the stability of the project. Metal rings offer durability, while wooden rings bring natural charm and warmth. Plastic rings are lightweight and budget-friendly. Each option works well, and the tutorial supports all choices.
You may also want blocking pins and a foam board for shaping your web. This ensures that the inner lace design dries evenly and maintains symmetry. Blocking improves the presentation of the finished product, especially when making multiple dreamcatchers.
Gathering all materials before starting helps you follow the tutorial smoothly from beginning to end. Preparedness makes the experience enjoyable, and the Crochet Tutorial: Christmas Dreamcatcher becomes a relaxing and fulfilling project.
3. Step-by-Step Instructions for Building the Dreamcatcher
The crafting process in the Crochet Tutorial: Christmas Dreamcatcher begins by covering or crocheting around the ring. Attach your yarn securely and work single crochet stitches tightly around the frame. This creates the foundation and ensures that your stitches stay in place without sliding.
After covering the ring, start the inner web. Join your yarn at any point and begin chaining and connecting with slip stitches around the ring. You can follow a symmetric pattern or create a more organic, lace-inspired design. The tutorial offers flexibility to match your skill level.
Continue building the web by working from the outer part inward. With each round, tighten or loosen the spacing depending on how dense you want the design. Adding picots or small decorative loops enhances the elegance of the dreamcatcher and adds a delicate touch.
Once the web is finished, you can attach long yarn strands or ribbons at the bottom. These strands add movement and complete the traditional dreamcatcher style. For Christmas, these can be decorated with beads or miniature jingle bells for extra sparkle.
You may also crochet small motifs like stars, snowflakes, hearts, or holly leaves to attach to the web or the bottom strands. These small accents turn your creation into a true holiday piece with personal meaning. The Crochet Tutorial: Christmas Dreamcatcher encourages you to express your creativity here.
When all pieces are assembled, secure the ends neatly and block the inner web if needed. This final touch ensures that your dreamcatcher keeps its shape and looks symmetrical. Your Christmas dreamcatcher is now ready to display or gift.
4. Finishing Techniques and Personalization Ideas
Finishing the dreamcatcher involves refining the design and adding custom touches. The Crochet Tutorial: Christmas Dreamcatcher includes multiple ideas for personalization so you can enhance the magic and charm of your project.
One way to finish the dreamcatcher is by adding a bow at the top. A festive ribbon bow in red, gold, or plaid adds instant Christmas appeal. It also serves as the perfect hanger for displaying your ornament on walls, windows, or the tree.
Another option is to incorporate a small LED light string. Wrapping delicate fairy lights around the frame creates a glowing effect that stands out beautifully at night. This transforms the dreamcatcher into an illuminated holiday decoration.
You can also personalize the strands by varying their lengths or mixing different yarn textures. Metallic threads, faux fur yarn, and sparkly fibers make the ornament feel luxurious and joyful. These creative choices highlight the uniqueness of your handmade craft.
Adding initials, names, or a year tag turns the dreamcatcher into a keepsake. Many crafters enjoy giving these as Christmas gifts, making them meaningful and memorable. The Crochet Tutorial: Christmas Dreamcatcher supports endless personalization ideas.
If you prefer a minimalist look, you can skip additional embellishments and let the beauty of the stitches shine on their own. Clean, simple designs often look elegant and timeless, especially in soft winter colors like cream, silver, or sage green.
Finishing your dreamcatcher with attention to detail ensures a professional and polished appearance. Whether simple or heavily decorated, the result is a charming piece full of holiday spirit.
FAQ – Crochet Tutorial: Christmas Dreamcatcher
Do I need advanced crochet skills to follow this pattern?
No. This tutorial is beginner-friendly and uses simple stitches.
What yarn is best for the frame?
Cotton yarn works wonderfully, but acrylic and mixed fibers also perform well.
Can I make the dreamcatcher larger or smaller?
Yes. Simply use a different ring size and adjust the web proportionally.
How long does the project take to complete?
Most crocheters finish in one to two hours, depending on experience.
Can I use leftover yarn?
Absolutely. It is a great scrap-friendly project.
Is blocking necessary?
Optional but recommended for a more uniform and polished web.
Conclusion
The Crochet Tutorial: Christmas Dreamcatcher offers a beautiful way to add handmade charm to your holiday décor.
By combining simple stitches, festive colors, and creative embellishments, you can craft a meaningful ornament that brings joy to any space. I hope this guide inspires you to create your own magical dreamcatcher this season. Please leave your honest opinion and share suggestions so I can continue improving future tutorials.

