The Amigurumi Christmas Tree Free – TUTORIAL is a delightful and beginner-friendly project that brings handmade charm to your holiday decorations. By learning how to crochet your own mini tree, you can create personalized ornaments, cozy gift toppers, or cute festive accents for your home. The appeal of this pattern lies in its simplicity, versatility, and the warm, homemade feel it adds to Christmas celebrations. Using the Amigurumi Christmas Tree Free – TUTORIAL, crafters of all skill levels can enjoy a fun project that works up quickly and offers endless customization opportunities.
This small amigurumi tree is perfect for anyone who loves seasonal crafts and wants to add a handmade touch to their holiday décor. Whether you’re making it for yourself, for friends, or as part of a craft fair collection, the pattern allows for creativity while still keeping the structure clear and easy to follow. The compact size also makes this project ideal for using leftover yarn, reducing waste while resulting in something cute and festive. With the techniques shared in the Amigurumi Christmas Tree Free – TUTORIAL, even beginners will feel confident completing the project.
Because the holiday season often inspires a desire to create meaningful handmade items, learning this pattern can be both rewarding and relaxing. Crocheting a small decorative piece like this tree can help you unwind while developing your crafting skills. And since amigurumi continues to be a popular trend worldwide, creating your own iconic Christmas symbol feels both fun and fashionable. By following the Amigurumi Christmas Tree Free – TUTORIAL, you can enjoy a simple yet charming crochet project that brings joy from start to finish.
1. Understanding the Amigurumi Christmas Tree Structure
The base structure of the Amigurumi Christmas Tree Free – TUTORIAL is built using simple crochet stitches that create a solid, cone-shaped form. Most versions of this tree use single crochet stitches worked in rounds, making it ideal for beginners who want to practice amigurumi fundamentals. You’ll typically start from the top and gradually increase to build a wider base.
DISCOVER MORE FREE PATTERNS HERE!
One of the advantages of this pattern is that it doesn’t require advanced techniques, making it approachable even for new crocheters. The shape forms naturally as you follow the increases, and stuffing is added near the end to create a firm and stable structure. The softness of the tree combined with its compact size makes it easy to display anywhere.
The pattern also offers flexibility in choosing yarn types. You can create a traditional look using classic green yarn, or opt for textured yarns to mimic the appearance of real evergreen branches. This adaptability allows you to personalize your tree while still following the main structure of the Amigurumi Christmas Tree Free – TUTORIAL.
Another important aspect is the use of stitch markers to keep track of rounds. Amigurumi pieces rely on precision to maintain their shape, so marking your rounds is a simple but essential step. With the help of these markers, you can confidently complete the shape without worrying about losing your place.
The stuffing stage is where your mini Christmas tree comes to life, giving it volume and stability. Poly-fiberfill is commonly used, but you can also use yarn scraps as an eco-friendly alternative. A well-stuffed amigurumi tree ensures that it stands properly and maintains its conical form.
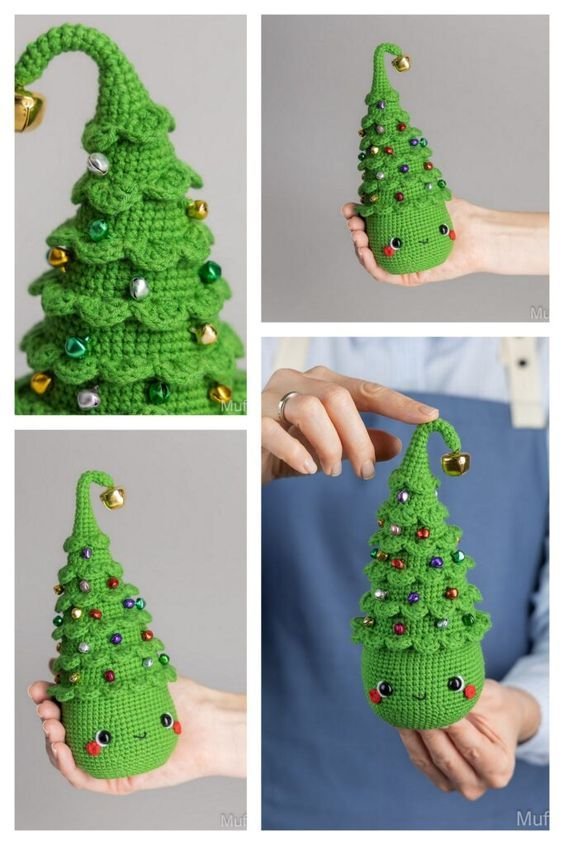
Finally, once the base structure is finished, you can move on to decorations. The Amigurumi Christmas Tree Free – TUTORIAL encourages creativity, whether you want to keep the tree minimalist or embellish it with embroidered garlands, mini beads, or tiny crocheted ornaments.
2. Materials and Tools for the Tutorial
The materials needed for the Amigurumi Christmas Tree Free – TUTORIAL are simple and affordable, making it a great project for all crafters. You’ll begin with choosing your yarn. Worst weight or DK yarn works well, but you can experiment with different fibers for varied textures. Selecting a yarn you enjoy working with will enhance the experience and final result.
Next, you’ll need a crochet hook that matches your yarn weight. For amigurumi, smaller hooks are preferred to keep stitches tight and prevent stuffing from showing through. This tight stitch structure is key to achieving a clean and polished look. Using the recommended hook size creates the right amount of tension.
A tapestry needle is another essential tool for this project, as it helps you weave ends and attach details securely. Good finishing work makes your amigurumi piece more durable and gives it a professional appearance. Even small pieces benefit from tidy sewing techniques.
Stuffing is important to create volume and form. Poly-fiberfill is the most common material, offering a soft but firm finish. If you prefer sustainable crafting, yarn scraps provide a practical alternative. The amount of stuffing needed is minimal, making this project ideal for using up leftover materials.
Safety pins or stitch markers can help you keep track of where each round begins. This prevents mistakes and ensures that the cone shape develops evenly. Tracking your rounds is especially important for amigurumi because the structure of the pattern depends on maintaining consistent stitch counts.
Lastly, you may want optional embellishments. Beads, buttons, embroidery thread, or metallic yarn can be used to add sparkle or detail to your tree. These small embellishments personalize your final piece and make each tree uniquely yours, all while staying true to the Amigurumi Christmas Tree Free – TUTORIAL.
3. Step-by-Step Process of Crocheting the Tree
The Amigurumi Christmas Tree Free – TUTORIAL usually starts by creating a magic ring. This foundational technique is widely used in amigurumi to create a tight center that prevents gaps at the top of your tree. A well-made magic ring gives your project a clean and professional beginning.
After forming the magic ring, you’ll begin working single crochet stitches in continuous rounds. Most patterns include gradual increases to widen the cone evenly. These increases create the classic Christmas tree shape, and the pattern guides you through each step.
As you progress through the rounds, you’ll see the cone structure begin to take form. Consistency in stitch tension is important to maintain a smooth surface. Taking your time during this phase ensures a polished appearance in the final result.
Near the midpoint, you’ll begin preparing to add stuffing. The best approach is to add small amounts at a time to avoid lumps. Distributing the stuffing gently with your fingers helps maintain the shape. The tree should feel firm but not overly stretched.
Once the cone reaches its full height, you will close the bottom. This may involve decreasing stitches to seal the opening. Properly closing the tree ensures that the stuffing stays secured inside and that the base has a neat finish.
The final steps include adding decorative elements. Many crafters enjoy embroidering garlands, attaching beads as ornaments, or adding a small star on top. These details elevate the simple structure into a festive and joyful holiday piece.
4. Decoration Ideas and Creative Variations
One of the most enjoyable aspects of the Amigurumi Christmas Tree Free – TUTORIAL is how customizable it is. You can create a tree that suits your personal style or matches your holiday décor theme. The freedom to experiment allows you to produce one-of-a-kind pieces.
Changing yarn color automatically transforms the look of your tree. Traditional green works beautifully, but you can try white for a snowy effect or gold for a more modern design. Variegated yarn also adds a unique, textured appearance.
Another creative idea is to add tiny crocheted ornaments. Small spheres, stars, bows, or snowflakes can be crocheted separately and attached to the tree. These additions add charm and a handmade feel to your project.
You can also decorate with embroidery. Simple stitches like chains, French knots, and running stitches can form garlands, lights, or tinsel. Embroidered details stay securely attached and offer a soft, traditional aesthetic.
Beads are a quick and effective way to add sparkle. Small pearl beads or colorful plastic beads resemble miniature ornaments. Just make sure to sew them securely, especially if the tree will be handled often.
Lastly, consider creating multiple trees in different sizes. Grouping them creates a beautiful holiday display for shelves, tables, or gift packaging. The adaptability of the Amigurumi Christmas Tree Free – TUTORIAL allows endless possibilities.
FAQ – Amigurumi Christmas Tree
1. Is the Amigurumi Christmas Tree suitable for beginners?
Yes, the pattern is beginner-friendly and relies on basic stitches such as single crochet and increases.
2. How long does it take to complete the tree?
Most crafters finish the tree in under two hours, making it a quick and satisfying project.
3. Can I use any yarn type?
You can use almost any yarn, but DK or worsted weight works best for maintaining structure.
4. Do I need safety eyes or special accessories?
No, decorations are optional. The tree looks beautiful even without added embellishments.
5. How can I make the tree bigger or smaller?
Adjusting hook size and yarn thickness will automatically change the size of the finished piece.
6. Is stuffing necessary?
Yes, stuffing gives the tree its shape and helps it stand firmly.
Conclusion
The Amigurumi Christmas Tree Free – TUTORIAL is a wonderful pattern for anyone looking to add handmade joy to their holidays. With simple materials and beginner-friendly steps, you can create charming trees that brighten any space.
From customizing colors to adding fun decorations, the possibilities are endless. I hope this article helped you understand the process clearly and inspired you to start your own festive project. Feel free to share your honest opinion and suggestions—I would love to hear your thoughts!

