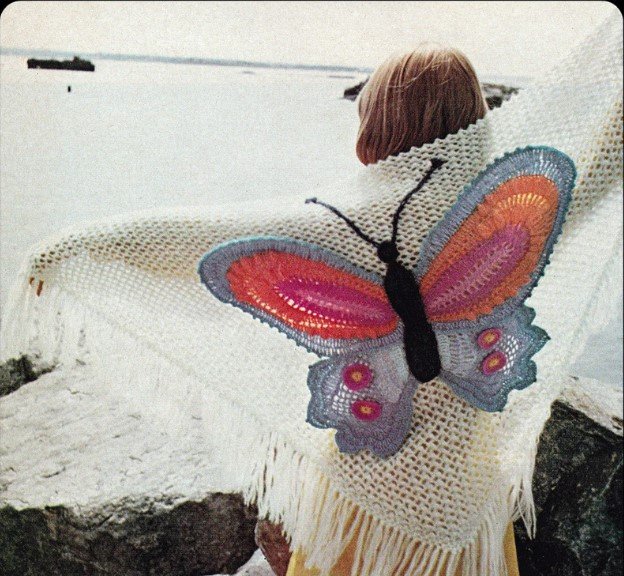
The Butterfly Shawl in Crochet – Tutorial is a breathtaking project that perfectly blends elegance, color, and creativity. Inspired by the graceful wings of a butterfly, this shawl is light, airy, and full of movement, making it a stunning addition to any wardrobe. Whether you’re crocheting it as a gift or for yourself, this pattern allows you to explore vibrant color transitions and delicate stitches that come together in a truly magical way. The beauty of this tutorial lies in how easily you can customize the design to suit your own style, using your favorite yarn shades and textures.
Working on the Butterfly Shawl in Crochet – Tutorial is more than just crafting—it’s an experience of creating wearable art. Each stitch contributes to a flowing pattern that captures the symmetry and grace of butterfly wings. With every row, you’ll see your shawl transform into something extraordinary, ideal for spring days, cool evenings, or special occasions. Even beginners can follow this project thanks to its clear structure and simple repeating patterns.
If you love projects that combine relaxation and artistic expression, this tutorial is the perfect choice. The butterfly motif brings a touch of nature to your crochet work, symbolizing renewal and transformation—making this shawl not only beautiful but also meaningful. Now let’s explore the steps and tips that will help you crochet your own Butterfly Shawl with confidence and joy.
1. Materials Needed for the Butterfly Shawl in Crochet – Tutorial
To start your Butterfly Shawl in Crochet, you’ll need to gather some key materials. The most important element is the yarn. Choose a soft and lightweight yarn that has a good drape, such as cotton, bamboo, or a light acrylic blend. For a delicate look, lace or fingering weight yarns work wonderfully. Many crocheters love using gradient yarn cakes for this project because the color transitions beautifully mimic butterfly wings.
DISCOVER MORE FREE PATTERNS HERE!
The hook size depends on your chosen yarn, but a 3.5mm to 4.5mm hook is typically ideal. Using the right hook size ensures your stitches are even and that the shawl remains soft and flexible. It’s a good idea to make a small swatch first to check your tension—this will help your finished shawl maintain the correct dimensions and texture.
You’ll also need scissors, a yarn needle for weaving in ends, and stitch markers to help you keep track of your pattern repeats. Since the shawl often includes symmetrical increases, the markers can help maintain balance as you work through the rows.
Selecting colors is one of the most enjoyable parts of this project. Try combining multiple shades of blue, purple, or pink for a truly “butterfly” effect, or keep it elegant with soft pastels or earthy tones. The yarn you choose will define the overall character of your piece.
Having all your tools prepared before you begin allows you to focus entirely on the creative process. It’s always satisfying to see your materials come together into a functional and beautiful handmade accessory.
Once your materials are ready, you’re set to start creating magic with your hook and yarn—your butterfly wings are about to take shape!
2. How to Crochet the Butterfly Shawl Step-by-Step
The Butterfly Shawl in Crochet – Tutorial is usually worked from the top down, forming a triangular or semi-circular shape that expands as you go. Begin by making a starting chain that forms the center top of the shawl, then build your stitches outward evenly on both sides.
The first few rows are foundational, helping you establish the structure and pattern increases. Be sure to follow the initial setup carefully, as these rows determine the symmetry of the shawl. Once the foundation is complete, you’ll notice the shape gradually widening, just like the open wings of a butterfly.
The body of the shawl often involves a repeating stitch pattern that combines chains, double crochets, and open spaces. This creates a lacy and delicate texture that allows light to pass through, enhancing its visual appeal. Even though it looks intricate, the repetition makes it easy to memorize after a few rows.
Continue to build your rows, keeping your stitches even and your tension consistent. It’s helpful to lay your shawl flat occasionally to ensure the sides are symmetrical. If you’re using gradient yarn, the color transitions will start to emerge beautifully as the project grows.
Once your shawl reaches the desired size, you can finish it with a decorative edge. Many crocheters love to add scallops, picots, or shell stitches to mimic the curves of butterfly wings. The edging gives your piece a polished, elegant look.
Finally, weave in all your loose ends and block the shawl gently. Blocking helps open up the lacy stitches and enhances the drape, giving your Butterfly Shawl in Crochet that professional and airy finish.
3. Tips for Perfecting Your Butterfly Shawl
While working on your Butterfly Shawl in Crochet – Tutorial, a few practical tips can make the process smoother and more enjoyable. First, maintain consistent tension throughout your work. Mohair, cotton, or blended yarns can behave differently, so try to find a balance that keeps your stitches neat but not too tight.
If you’re using gradient or variegated yarn, consider starting from the center pull of the cake. This helps control how the colors unfold and can make your finished piece more visually balanced.
Counting stitches frequently is also essential, especially during the increasing sections. Missing an increase or skipping a stitch can disrupt the shawl’s symmetry. Using stitch markers at each side can help you stay on track and make corrections early if needed.
Take regular breaks while crocheting. Projects like this are relaxing but can be detailed and time-consuming. Stretch your hands and shoulders occasionally to keep comfortable.
Don’t be afraid to experiment with the size. If you prefer a smaller neck scarf or a larger wrap, simply adjust the number of rows. The triangular shape makes it easy to modify without altering the pattern drastically.
Finally, enjoy the creative journey. Each row adds more character to your shawl, and watching the pattern unfold is one of the most rewarding parts of crocheting this design.
4. Styling and Caring for Your Butterfly Shawl
Your completed Butterfly Shawl in Crochet is not just a handmade accessory—it’s a piece of wearable art. There are many ways to style it depending on the occasion. Drape it loosely over your shoulders for a light, elegant look, or wrap it around your neck as a cozy scarf on cooler days. The delicate drape and color play make it a statement piece in any outfit.
Because this shawl is lightweight, it’s perfect for all seasons. In spring and summer, pair it with dresses or tops for a feminine touch. During fall or winter, layer it over sweaters or coats for warmth and style. Its versatility makes it a must-have accessory for every wardrobe.
When it comes to care, hand wash your shawl in cool water using a gentle detergent. Avoid wringing or twisting the fabric—just press it between towels to remove excess water. Then lay it flat on a blocking mat to dry, reshaping it to its original dimensions.
Avoid using heat sources like dryers or irons. If your shawl gets wrinkled, use a steamer at a distance to gently relax the fibers. Proper care keeps your crochet piece soft and beautiful for years.
Store your shawl in a breathable fabric bag or drawer to prevent dust accumulation. Never hang it, as the weight could stretch the fabric over time. With the right care, your Butterfly Shawl in Crochet will remain a timeless and elegant accessory.
Finally, remember that each shawl is unique. Even with the same pattern, different yarns and colors make every piece special. That’s the beauty of handmade work—it reflects your creativity and personal touch.
FAQ – Butterfly Shawl in Crochet – Tutorial
Q1: Is the Butterfly Shawl suitable for beginners?
Yes, it’s great for advanced beginners. Once you understand basic stitches and counting, the repeating pattern becomes easy to follow.
Q2: What yarn works best for the Butterfly Shawl?
Lightweight yarns such as cotton, bamboo, or acrylic blends work beautifully. Gradient yarns add an extra visual effect.
Q3: Can I make the shawl larger or smaller?
Absolutely! You can adjust the number of pattern repeats to make it the size you prefer.
Q4: How long does it take to make the Butterfly Shawl?
Depending on your speed and experience, it usually takes between a few days to a week to complete.
Q5: Can I use multiple colors instead of gradient yarn?
Yes! You can switch colors manually at intervals for a striped or ombre look.
Q6: How do I block the finished shawl?
Lay it flat on a mat, shape it gently, and pin it into place. Allow it to air dry completely before removing the pins.
Conclusion
The Butterfly Shawl in Crochet – Tutorial is more than just a crochet project—it’s an expression of creativity and grace. From the first stitch to the final block, every step brings beauty to life. You’ve learned how to select materials, crochet the pattern, customize it, and care for your handmade piece.
The result is a shawl that’s as light as air and as vibrant as a butterfly’s wings. We hope this tutorial inspires you to start your own version of the Butterfly Shawl. Leave a sincere comment sharing your experience, feedback, or any creative ideas for future projects—your opinion helps us grow and create even more beautiful crochet designs together!

