If you’re looking for a festive and creative way to decorate your home this holiday season, this Christmas Wreath – Tutorial is the perfect project for you. Making your own crochet Christmas wreath allows you to combine warmth, color, and creativity into one beautiful handmade decoration. Whether you’re an experienced crocheter or just starting out, this step-by-step Christmas Wreath – Tutorial will guide you through every part of the process, from selecting yarn to assembling the final piece.
Creating your own wreath gives you full control over colors, textures, and details. You can make it as traditional or as modern as you like, using vibrant reds and greens or soft neutrals and metallics for a more elegant touch. This Christmas Wreath – Tutorial will show you how to crochet festive motifs like holly leaves, berries, snowflakes, and even small ornaments that can be attached to your wreath for extra charm.
Handmade holiday décor adds a special touch to your celebrations. When you follow this Christmas Wreath – Tutorial, you’re not just making a decoration—you’re creating a keepsake that can be cherished for years. So grab your yarn, crochet hooks, and festive spirit, and let’s get started on your magical Christmas creation.
1. Gathering Materials and Tools
Before you start crocheting, it’s important to gather all the materials you’ll need for this Christmas Wreath – Tutorial. The main supplies include yarn in holiday colors, a crochet hook suitable for your yarn weight, a foam or wire wreath base, and decorative accessories like ribbons, bells, or miniature ornaments.
DISCOVER MORE FREE PATTERNS HERE!
For the yarn, choose medium-weight acrylic or cotton yarns. Acrylic is durable and easy to care for, while cotton offers a beautiful, clean texture. You’ll typically need red, green, white, and gold shades to create a festive look.
A wreath base can be found at most craft stores, and it comes in different sizes. You can use a smaller one for a compact door decoration or a larger one for a bold centerpiece. You can even wrap your base in yarn or fabric to give it a soft and finished appearance.
You’ll also need scissors, a yarn needle, and possibly a hot glue gun for attaching non-crochet embellishments. These small tools help you assemble everything neatly and securely.
Optional decorations include small crocheted stars, candy canes, snowflakes, and even tiny amigurumi figures like reindeer or Santa hats. These details make your wreath truly unique and add to the festive mood.
Lastly, make sure your working area is well-lit and organized. Having your yarns and tools close at hand will make the process smoother and more enjoyable.
2. Crocheting the Base Cover
The next step in this Christmas Wreath – Tutorial is creating a crochet cover for the base. This gives your wreath a soft, handmade look and serves as the foundation for adding decorations later.
Start by making a long crochet strip that wraps around the entire wreath base. You can use single crochet or half double crochet stitches, depending on the texture you prefer. If your base is large, you may need to crochet multiple strips and sew them together.
Once your strip is ready, wrap it around the wreath form snugly. Make sure there are no gaps or loose spots. Sew the ends together securely using a yarn needle to keep it in place.
If you want a colorful base, consider alternating yarn colors every few rows to create stripes. You can also make a patchwork-style base by crocheting different colored sections separately and joining them together.
Another beautiful idea is to use variegated yarn that changes color gradually, giving your wreath a smooth and elegant gradient effect. This type of yarn is perfect for beginners because it adds complexity without extra effort.
When your base cover is attached, take a moment to adjust the stitches and smooth the surface. This creates a professional look and prepares your wreath for the decorative elements.
3. Creating Crochet Decorations
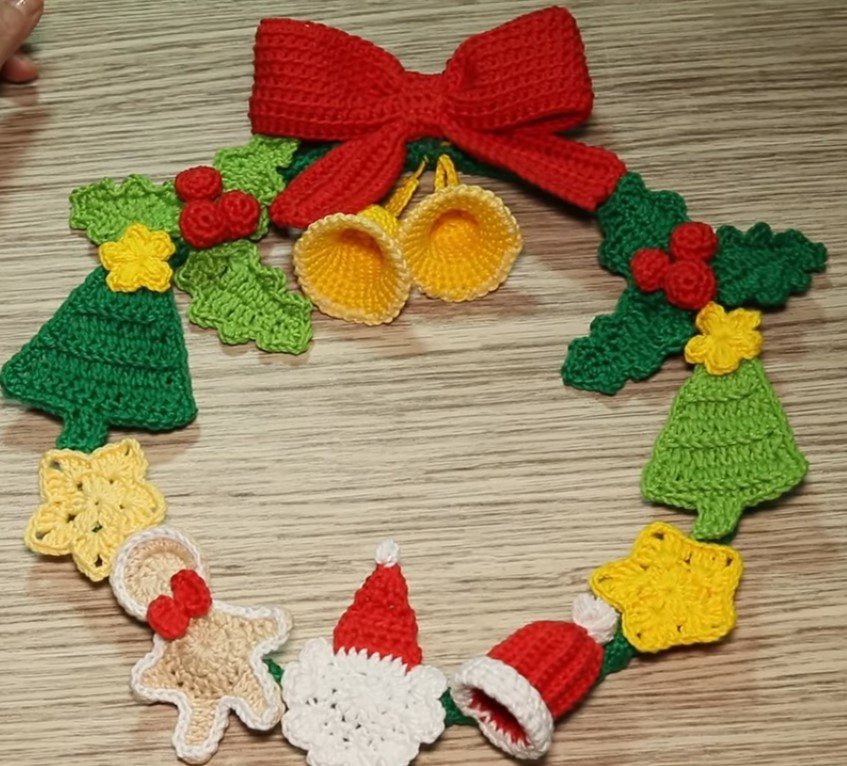
Now for the most creative part of the Christmas Wreath – Tutorial—making the decorations! You can crochet a variety of small festive motifs to attach to your wreath, depending on your theme and color palette.
Start with basic shapes like leaves and flowers. Crochet green holly leaves using single and half double crochet stitches, and add small red berries made with magic rings and tight single crochets. These are traditional symbols of Christmas and instantly recognizable.
Next, make some snowflakes using white yarn and thin hooks. Snowflake patterns are fun and delicate, and they look amazing when lightly starched to hold their shape. Attach them around your wreath for a frosty winter effect.
You can also crochet small ornaments like stars, bells, bows, or even miniature presents. Mixing different textures and shapes adds depth and makes your wreath more visually interesting.
If you enjoy amigurumi, you can add tiny characters such as Santa Claus, reindeer, snowmen, or elves. These cute figures bring your wreath to life and delight everyone who sees it.
Lastly, crochet a few chains or twisted cords to use as garlands around your wreath. This small detail ties everything together and makes your project look cohesive and festive.
4. Assembling and Finishing the Wreath
In this final stage of the Christmas Wreath – Tutorial, you’ll bring all your pieces together to create a beautiful finished wreath. Start by arranging your crochet decorations on the covered wreath base without attaching them. This helps you decide on the perfect placement.
Once you’re satisfied with the layout, use a yarn needle or hot glue to attach each decoration securely. If you prefer a clean, all-crochet finish, sew everything instead of gluing. Sewing also allows you to reposition items later if you change your mind.
When arranging your motifs, try to balance colors and shapes evenly around the wreath. Cluster larger items like flowers or bows near the bottom and scatter smaller pieces throughout for a natural look.
Add final embellishments like ribbons, metallic thread, or small bells for extra sparkle. You can tie a large bow at the top or bottom of the wreath as a centerpiece.
Attach a small loop or ribbon to the back for hanging. Make sure it’s sturdy enough to hold the weight of your finished wreath.
Finally, step back and admire your work. Your handmade crochet Christmas wreath is now ready to spread joy and warmth throughout the holiday season.
FAQ
1. What type of yarn is best for a crochet Christmas wreath?
Acrylic yarn is a great choice because it’s affordable, durable, and comes in many colors. Cotton yarn works well too if you prefer a natural texture.
2. How long does it take to make a crochet wreath?
Depending on the complexity of your decorations, it can take anywhere from a few hours to a few days.
3. Can I wash my crochet Christmas wreath?
If it’s made entirely from yarn, yes—but it’s better to hand-wash gently and air dry. Avoid soaking wreaths with glued embellishments.
4. Do I need a pattern for the decorations?
Not necessarily. You can find free patterns online for snowflakes, holly, or stars, or create your own simple designs.
5. Can I reuse my wreath base every year?
Absolutely! You can remove the crochet pieces and make new decorations each Christmas for a fresh look.
6. Is this project suitable for beginners?
Yes, this Christmas Wreath – Tutorial is perfect for beginners. It uses basic stitches and simple shapes, but the results look impressive.
Conclusion
Creating your own crochet wreath using this Christmas Wreath – Tutorial is a joyful and rewarding experience. You’ve learned how to prepare materials, crochet the base, make festive decorations, and assemble everything into a beautiful handmade piece.
PATTERN VIDEO:
A crochet Christmas wreath adds warmth, personality, and festive spirit to any space. We hope you enjoyed this tutorial! Please share your honest opinion and suggestions — your feedback helps inspire even more creative crochet projects for future holidays!

