If you’re looking for a stylish and cozy project to crochet this season, the Cowl Crochet Pattern – Tutorial is the perfect choice. A crochet cowl is not only a fashionable accessory but also a practical piece to keep you warm during chilly days. Whether you’re a beginner or an experienced crocheter, this easy-to-follow tutorial will guide you through every step to create a beautiful handmade cowl. With its soft texture and elegant design, it’s a must-have addition to your winter wardrobe or a thoughtful handmade gift for someone special.
The beauty of the Cowl Crochet Pattern lies in its versatility. You can use a variety of yarns, colors, and stitches to customize it to your personal style. From chunky wool for a snug winter piece to lightweight cotton for a breezy accessory, this tutorial offers endless possibilities. By following the instructions carefully, you’ll create a piece that looks store-bought but carries the warmth and uniqueness of something handmade.
So grab your favorite yarn, your crochet hook, and let’s begin this relaxing and rewarding project together.
1. Materials and Tools You’ll Need
Before starting your Cowl Crochet Pattern – Tutorial, gather all the materials you’ll need to make your project run smoothly. The essential supplies include:
DISCOVER MORE FREE PATTERNS HERE!
-
Yarn: Choose a soft, cozy yarn that feels comfortable against your skin. Medium-weight or bulky yarns work best for cowls since they provide warmth and texture. Acrylic or wool blends are great options, and you can experiment with multicolor or gradient yarns for added visual interest.
-
Crochet Hook: Select the hook size recommended on your yarn label. For most cowls, a 5 mm to 6.5 mm hook works perfectly.
-
Scissors and Yarn Needle: You’ll need these to cut and weave in your yarn ends neatly.
-
Measuring Tape: Helps you ensure the correct size and fit of your cowl.
Optional materials include buttons or embellishments if you’d like to give your cowl a unique touch. You can also line it with fleece for extra warmth if desired.
Having everything ready before you begin allows for a seamless crocheting experience and keeps your focus on creativity and enjoyment.
2. Getting Started: Foundation and Basic Stitches
To begin your Cowl Crochet Pattern – Tutorial, start by making a foundation chain. The length of your chain determines how loose or snug your cowl will be around your neck. For a standard adult size, chain between 80 to 100 stitches, depending on your yarn weight and personal preference.
Join the ends of the chain with a slip stitch to form a loop, making sure it’s not twisted. This will be the base of your cowl.
Now, it’s time to work the main stitch pattern. You can choose a simple half double crochet (HDC) or double crochet (DC) stitch for a classic texture. For added flair, try using a front post double crochet (FPDC) or a shell stitch pattern for a more decorative look.
Here’s a simple and cozy stitch sequence:
-
Chain 2 (counts as first stitch).
-
Work one half double crochet into each chain around.
-
Slip stitch to the top of the first chain 2 to join the round.
-
Continue repeating this process until your cowl reaches your desired height—usually 8 to 12 inches.
This simple pattern creates a soft, stretchy fabric that drapes beautifully while keeping you warm.
3. Adding Texture and Finishing Touches
One of the best parts of this Cowl Crochet Pattern – Tutorial is experimenting with textures and design variations. If you want to add more dimension, consider alternating between different stitches in each round. For example, combine a round of single crochet with a round of puff or bobble stitches. This creates a lovely pattern that stands out.
Another way to elevate your cowl is by incorporating color changes. You can use two or more shades of yarn to create stripes or a gradient effect. Simply switch colors at the beginning of a round and carry the unused yarn along the inside for a clean look.
When your cowl reaches the desired length, finish off by slip stitching the last round and cutting the yarn. Weave in all loose ends with a yarn needle for a professional finish.
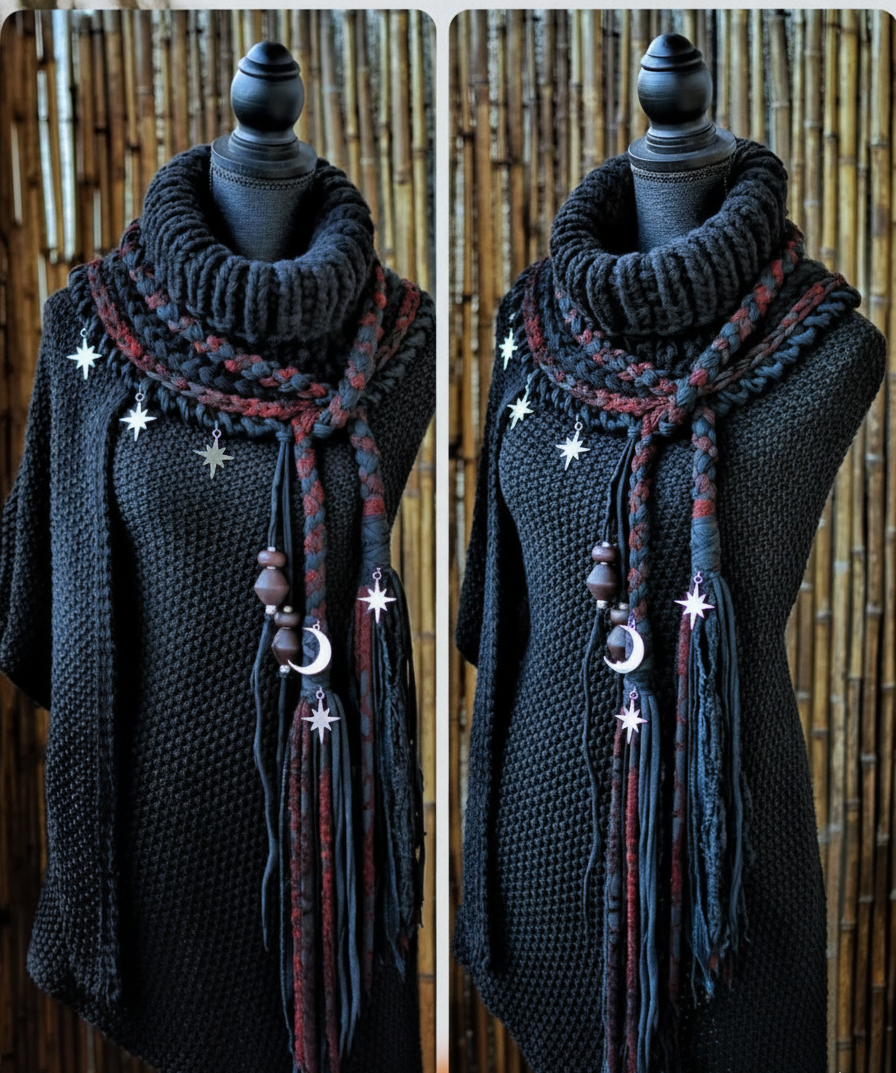
For extra flair, you can add buttons or a decorative edging. Crochet a simple scalloped edge by working [5 double crochets, skip 1 stitch, slip stitch] around the edge for a feminine touch. Or add fringe for a boho-inspired design.
Your finished cowl should feel soft, cozy, and sit comfortably around your neck. It’s the perfect piece to wear under a coat or over a sweater for added style and warmth.
4. Styling and Creative Variations
Now that your Cowl Crochet Pattern is complete, let’s talk about styling and customization. This versatile accessory can be worn in many ways, and each version you create can reflect your unique personality.
For a classic look, crochet your cowl in solid neutral tones such as beige, cream, gray, or navy. These shades go well with any outfit and exude timeless elegance.
For a modern or playful design, try bright colors or variegated yarns that shift tones as you crochet. You can also experiment with different stitch patterns, like the waffle stitch for a chunky texture or the moss stitch for a subtle woven appearance.
If you love layering, make your cowl longer and wider to double-wrap it around your neck for extra coziness. Or make a shorter neck warmer version that’s quick to complete and perfect for gifting.
Another creative idea is to add a matching hat or fingerless gloves using the same yarn and stitch pattern to create a coordinated winter set. These small touches turn your project into a thoughtful handmade gift set that anyone would love.
With this Cowl Crochet Pattern – Tutorial, you can experiment endlessly and discover how simple it is to transform yarn into something functional and beautiful.
FAQ about Cowl Crochet Pattern – Tutorial
Q: Is this project suitable for beginners?
A: Yes! The Cowl Crochet Pattern – Tutorial is perfect for beginners because it uses simple stitches and repetitive rows.
Q: What yarn type is best for cowls?
A: Soft, medium-weight yarns like acrylic or wool blends are ideal for warmth and comfort.
Q: Can I adjust the size of my cowl?
A: Absolutely! Simply increase or decrease the number of foundation chains for a looser or tighter fit.
Q: How long does it take to make a crochet cowl?
A: Depending on your speed and yarn thickness, most cowls can be finished in 2–4 hours.
Q: Can I wash my crochet cowl?
A: Yes, but always follow the washing instructions on your yarn label—some may require gentle hand washing or air drying.
Q: Can I make this cowl for kids?
A: Of course! Just reduce the foundation chain count and overall height to fit smaller neck sizes.
Conclusion
The Cowl Crochet Pattern – Tutorial is a delightful project that brings both warmth and style to your wardrobe. With its easy stitches and endless customization options, you can create unique cowls for yourself, friends, and family. From elegant neutrals to bold statement pieces, each handmade cowl carries a touch of your creativity and care.
We hope this tutorial inspires you to pick up your crochet hook and start crafting something special. Don’t forget to share your honest opinions, creative ideas, and suggestions—we’d love to hear how your cowl turned out and how you made it your own!

