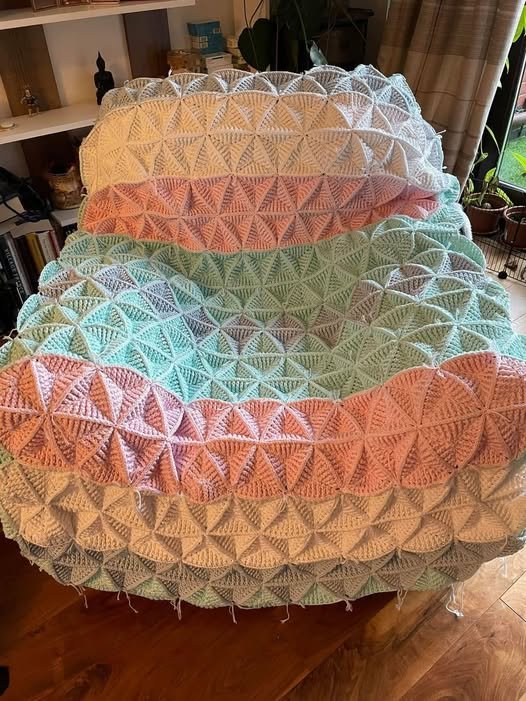
Crocheting is an incredibly versatile craft that allows you to create beautiful, intricate designs. One of the most popular and eye-catching patterns in crochet is the 3D triangle motif. This Crochet 3D Triangle Motif – PATTERN will guide you through the steps to create stunning, dimensional triangles that can be used for a variety of projects, including blankets, scarves, or even wall hangings. The 3D effect adds depth and texture to your crochet creations, making them stand out.
Crochet patterns have evolved over the years, and the 3D triangle motif is an example of how you can take a simple shape and turn it into something extraordinary. Whether you’re an experienced crocheter or just starting out, this pattern will help you master the technique and expand your crochet skills. With just a few basic stitches, you’ll be able to make these gorgeous triangles and use them in your next project.
In this tutorial, you’ll learn everything you need to know to crochet a 3D triangle motif, including stitch placement, tension, and how to incorporate these motifs into larger pieces. Whether you’re looking to add some flair to a garment or create an intricate pattern for a blanket, this is a pattern that will serve you well for many projects to come.

1. Materials Needed for the Crochet 3D Triangle Motif
Before you begin, it’s essential to gather the proper materials for your Crochet 3D Triangle Motif – PATTERN. Here’s a list of the supplies you’ll need to complete your project:
DISCOVER MORE FREE PATTERNS HERE!
- Yarn: Choose any yarn that suits your project. Medium-weight yarn (like worsted weight) works well for creating a nice texture, but you can experiment with lighter or heavier yarns depending on the look you desire.
- Crochet Hook: Use a hook size that matches your yarn. Typically, a 4mm or 5mm hook works best for medium-weight yarn.
- Scissors: You’ll need these to trim the yarn when finishing off.
- Yarn Needle: To weave in the ends once you’re finished with each triangle motif.
- Stitch Marker (optional): This can help keep track of your rounds and stitches, especially for beginners.
Now that you’ve gathered all your materials, it’s time to start crocheting your first 3D triangle motif!
2. Understanding the 3D Effect
The 3D effect of this triangle motif is created through a series of well-placed stitches that help the fabric pop outward. The key to achieving this dimensional look is to work your stitches in a way that creates space and definition between the stitches.
In the case of the triangle motif, this is typically achieved by working in rounds and using a combination of double crochet (DC) stitches, slip stitches (SL ST), and chain stitches (CH). These stitches help form the base of the triangle, while increasing and decreasing at the right points create the 3D effect.
This method allows the shape to “lift” from the fabric, giving it a textured and sculptural feel. By carefully positioning your stitches, you can create stunning geometric patterns with a tactile quality that is unique to the 3D crochet technique.
When working on your motifs, be sure to maintain an even tension throughout. Too tight or too loose of a stitch can affect the final outcome of the 3D effect, so aim for consistency as you crochet each round.
3. Step-by-Step Guide to Crocheting the 3D Triangle Motif
Now that you understand the materials and the technique, let’s walk through the Crochet 3D Triangle Motif – PATTERN step by step.
Step 1: Start with a Magic Ring
Begin by creating a magic ring to start the first round of your triangle. This is a great way to begin a project that will be worked in rounds and helps you close up the center of your motif without leaving a hole. If you’re unfamiliar with the magic ring, it’s essentially a loop that you create with your yarn, allowing you to easily tighten the center of your first round.
Step 2: Create the First Round
Once you have your magic ring, chain 3 to count as your first double crochet. Then, work 2 more double crochet stitches into the magic ring. After that, chain 2 to form the corner. Repeat this process to create the three sides of your triangle. You should have three corners formed by the chain-2 spaces.
Step 3: Second Round – Expanding the Triangle
In the second round, you’ll begin to work into the chain-2 spaces from the first round. Chain 3 to count as a double crochet and then work two more double crochet stitches into the same space. This creates a solid foundation for each corner of your triangle. Repeat this process for all three corners of the motif.
Step 4: Adding the 3D Effect
To create the 3D effect, you’ll use a combination of increases and slip stitches. For the first corner, work a double crochet stitch, chain 2, and then work a double crochet into the same space. The chain 2 will help form the “height” of your triangle. Then, in the next space, make another double crochet to form the base of the 3D effect. This combination of double crochets and chain stitches will make your triangle “pop” outward.
Step 5: Finish Off and Weave in Ends
Once you’ve completed the final round, you can finish off by trimming your yarn, leaving a long tail to weave in. Use your yarn needle to weave in the ends securely to prevent any loose threads.
4. Incorporating the 3D Triangle Motif into Your Projects
Now that you’ve mastered the Crochet 3D Triangle Motif, it’s time to incorporate these motifs into your projects! These dimensional triangles can be joined together to create larger pieces, such as blankets, throws, or shawls. The 3D effect adds depth and texture, making your finished pieces stand out.
Joining Motifs
To join your 3D triangle motifs, you can use either a whip stitch or slip stitch. The joining process can be done in any pattern you choose—whether in rows or a more creative arrangement like a circular or hexagonal pattern.
Blankets and Throws
For a blanket or throw, simply repeat the pattern multiple times and join the motifs in rows. This will allow you to create a large, cohesive piece. Using different colors for the triangles can also create a beautiful, multicolored design.
Scarves and Shawls
If you’re making a scarf or shawl, you can create a smaller number of motifs and then join them together to create a unique, textured accessory. The 3D triangles will add a stylish, modern touch to your crochet wearables.
Wall Hangings
For a more artistic project, consider creating a wall hanging with a series of 3D triangle motifs. You can arrange the motifs in various formations, such as a grid or a triangular design, and hang them up for a stunning display piece.
FAQ – Frequently Asked Questions
1. What type of yarn is best for the Crochet 3D Triangle Motif?
For best results, use medium-weight yarn (like worsted weight). It’s not too thick, allowing the 3D effect to show through, but still provides enough structure to hold its shape.
2. How do I make sure my triangle motifs are even?
Maintain even tension throughout your work. It’s helpful to use stitch markers at the beginning of each round to help keep track of your stitches. Consistent stitch placement and tension are key to achieving a uniform look.
3. Can I use different colors for each motif?
Absolutely! Using multiple colors for each triangle can create a beautiful effect. You can change colors in each round or make each motif a different color entirely to add more visual interest.
4. How do I join the triangle motifs?
You can join triangle motifs using a whip stitch or slip stitch. For a seamless look, try joining them as you go along, but you can also join them after completing all your motifs for a more organized approach.
5. Can I make larger or smaller triangles?
Yes, you can adjust the size of your triangle motifs by adding or removing rounds. To make the triangle larger, simply add more rounds of double crochet, and for a smaller triangle, reduce the number of rounds.
6. How can I use this pattern for a blanket?
To create a blanket, repeat the 3D triangle motif multiple times. You can join them together in rows or a grid pattern, depending on the design you prefer. Make sure to use a consistent color palette for a cohesive look.
The Crochet 3D Triangle Motif is a fun and creative way to add depth and texture to your crochet projects. By following this pattern, you can create stunning geometric shapes that can be used in a variety of projects, from blankets to wearables and decorative pieces. The 3D effect elevates your work, making it visually striking and unique.
We hope this tutorial has helped you understand the process of crocheting 3D triangle motifs. If you’ve enjoyed this pattern, we’d love to hear your feedback and any suggestions you may have for future tutorials. Happy crocheting!


