The Crochet Angel Curtain – Pattern is a charming and heartfelt addition to any home, blending artistry with function. Whether you’re crafting for your kitchen, nursery, or prayer room, these delicate angel-shaped motifs bring warmth, peace, and personality to your window decor. In this article, you’ll discover how to approach this beautiful crochet project step-by-step, plus creative ideas to customize it for your style.
If you’re a fan of crochet patterns that combine elegance with a touch of whimsy, the Crochet Angel Curtain – Pattern will inspire you. This project isn’t just decorative — it’s symbolic. Angels represent protection, serenity, and love, making them a meaningful motif to weave into your home. The pattern is beginner-friendly but detailed enough to keep experienced crocheters engaged.
Let’s dive into how you can create your very own crochet angel curtain, from materials to techniques, customization tips, and even common troubleshooting advice. Grab your hook, and let’s begin this cozy and creative journey.
1. Choosing the Right Yarn and Hook for the Crochet Angel Curtain
Before diving into stitches and motifs, choosing the right materials is key to achieving that soft, airy angel curtain effect.
DISCOVER MORE FREE PATTERNS HERE!
A lightweight yarn works best for the Crochet Angel Curtain – Pattern, especially if you’re aiming for a sheer, floating look. Cotton thread or lace yarn offers excellent stitch definition and a refined appearance. White or cream-colored yarns are classic for angels, though soft pastels also work beautifully.
When selecting your crochet hook, match it to your yarn’s recommended size, typically between 1.75mm and 2.5mm for lace or fine cotton thread. Using a slightly larger hook will give your curtain a looser, lacier drape, while a tighter hook yields more definition.
Don’t forget about tension. For a consistent angel motif, maintain steady hand tension throughout the project. Inconsistent tension can distort the shape, especially in the wings and halo area of your angel designs.
Experiment with a few yarn-hook combinations before starting the full curtain. Crochet one angel motif and hold it up to the light to test transparency and drape. This simple step helps ensure your curtain turns out just right.
Once you’ve settled on your tools and materials, prepare your working space with proper lighting and a comfortable chair. A good setup makes the crafting process more enjoyable and efficient.
You may also want to use a blocking board and pins to shape your angels evenly after completion. Blocking is especially important for lace patterns like this one to help define each part of the angel — head, wings, and flowing skirt.
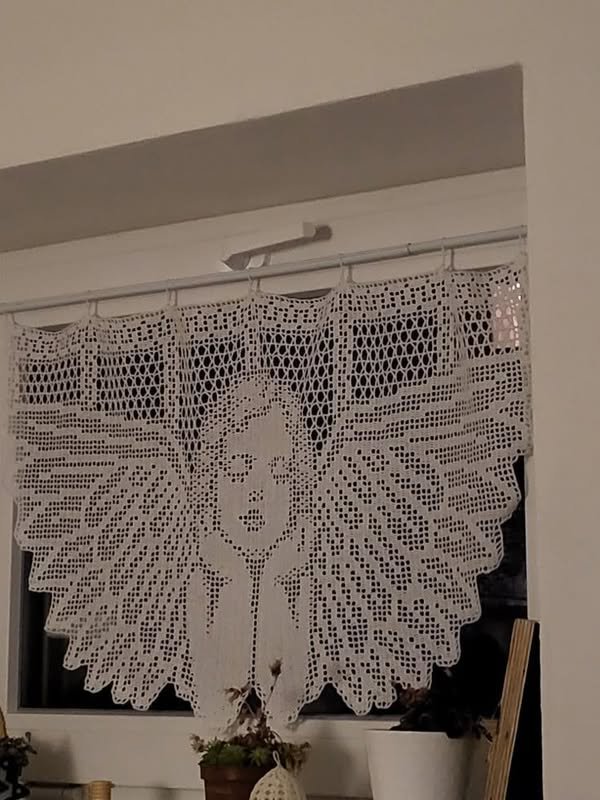
2. Understanding the Angel Motif Construction
The angel motif is at the heart of the Crochet Angel Curtain – Pattern, and understanding its structure is essential to creating a balanced and visually appealing design.
Each angel typically begins at the head, created with a magic circle or a few chain stitches joined to form a ring. This forms a sturdy base for the halo and upper body. Small picots or shell stitches are often used to create the illusion of wings on either side.
The body of the angel flows downward in a flared triangle or A-line shape. This is achieved with fan stitches, clusters, or V-stitch patterns that radiate out from the head. The result is a graceful, flowing shape that resembles a skirt or gown.
Some patterns incorporate open spaces in the body to allow light through, giving the curtain a stained-glass effect. Others use tighter stitches for a more solid look — both are beautiful, depending on your desired aesthetic.
Crocheters often link angel motifs together using chain stitches or join-as-you-go techniques. This gives the curtain a unified structure and makes the angels appear to float side by side.
In some designs, you’ll also find floral or snowflake-inspired accents between angels. These add texture and fill out the curtain while keeping with the heavenly theme.
Once your angels are completed and joined, the final step is edging. A scalloped or picot edge adds a refined touch to the bottom of the curtain and prevents curling.
3. Customizing the Angel Curtain to Fit Your Style
What makes the Crochet Angel Curtain – Pattern so versatile is how easily it can be customized to fit any home decor or personal style.
For a rustic farmhouse look, consider using a beige or natural cotton thread. Add wooden beads for halo accents or at the joining points between angels. These small details make a big impact in creating a cozy, lived-in vibe.
Want to match the curtain to a baby nursery? Use soft baby blue, pink, or mint green yarns, and sprinkle in tiny stars or hearts between angel motifs. This turns the curtain into a sweet, sentimental decoration for a newborn’s room.
Add sparkle by incorporating metallic threads like gold or silver in the halo or wings. This makes the angels shimmer in the light, perfect for holiday decor or spiritual-themed spaces.
You can also modify the size of the curtain by adjusting the number of motifs. Create a short valance by using one or two rows of angels, or go full-length with four or five rows for larger windows.
Another idea: turn individual angel motifs into matching items like doilies, bookmarks, or ornaments. This gives you a coordinated decor set that extends beyond just the curtain.
Finally, consider pairing your crochet curtain with sheer fabric panels for privacy while still letting the angel design shine. Use curtain rings or tabs sewn to the top for easy hanging.
4. Finishing Touches and Installation Tips
After completing your crochet curtain, the final steps are just as important for ensuring a polished and professional result.
Begin by blocking your entire piece. This helps define every stitch and ensures the angels lay flat. To block lace, mist it lightly with water, stretch it to the desired shape, and pin it in place. Let it dry thoroughly before removing.
Check all the joins and edges for loose ends. Weave them in securely to prevent unraveling over time, especially since curtains are often exposed to light and movement.
If your curtain has a top edge for hanging, reinforce it with extra stitches or sew it onto a fabric header. This keeps the curtain from sagging and helps it hold up to repeated use.
Install your curtain using a tension rod or curtain rings. Lightweight crochet curtains usually don’t need a heavy-duty rod, but ensure it’s secure to avoid drooping.
To keep the curtain clean, dust it regularly and gently handwash it when needed. Avoid machine washing unless your yarn label allows it — delicate thread can tangle or lose shape.
You may want to add optional embellishments like small bells, tassels, or charms at the bottom for a playful, musical effect when the curtain moves in a breeze.
FAQ – Crochet Angel Curtain Pattern
What type of yarn is best for a crochet angel curtain?
Lace weight cotton or fine crochet thread is ideal. It creates a delicate, airy finish that lets light shine through the curtain.
Is this pattern suitable for beginners?
Yes, while the design looks intricate, most crochet angel curtain patterns use basic stitches like chains, double crochets, and picots. It’s a great project to learn motif joining and blocking techniques.
How long does it take to make a crochet angel curtain?
It depends on the size and complexity, but a small window curtain can take anywhere from 1 to 2 weeks of casual crocheting.
Can I make the angel motifs separately and join them later?
Absolutely! Many crocheters prefer to create all the motifs first and then join them together, either by sewing or crocheting them in a final round.
What tools do I need besides yarn and hook?
You’ll need scissors, a yarn needle, blocking pins, a spray bottle (for blocking), and possibly stitch markers to help align motifs evenly.
How do I hang a crochet curtain securely?
Use a curtain rod with clips or sew a fabric header onto the top of the curtain. For heavier or longer curtains, reinforce the top row to prevent stretching.
Conclusion
The Crochet Angel Curtain – Pattern is more than just a DIY decor project — it’s a way to bring light, love, and handmade beauty into your home. Whether you’re an experienced crocheter or just starting out, this pattern offers endless possibilities for customization, expression, and creativity.
TUTORIAL VIDEO:
We hope this guide has inspired you to create your own angelic masterpiece. If you’ve tried this pattern or have tips to share, we’d love to hear from you! Leave a sincere opinion or suggestion in the comments to help others on their crochet journey.

