The Crochet Bag for Bottle – TUTORIAL is a fun and practical project for crochet lovers of all levels. Whether you need a reusable carrier for your water bottle, a stylish accessory for hikes, or a handmade gift, this tutorial will walk you through every detail. By following it, you’ll learn not only how to crochet a functional bag but also how to add your own creative touch.
What makes a crochet bag for bottle special is its versatility. You can adjust the size to fit small bottles for kids, medium ones for everyday use, or even large bottles for sports activities. It’s a great way to keep your drink close at hand while keeping your hands free. Plus, it’s eco-friendly because you can stop using disposable carriers and switch to a reusable handmade one.
With the Crochet Bag for Bottle – TUTORIAL, you’ll discover how simple stitches, when combined with a bit of shaping, can result in a stylish and durable bag. The best part? You don’t need to be an expert to follow along. Even beginners can complete this project while learning useful crochet techniques that can be applied to many other patterns.
1. Materials Needed for the Crochet Bag for Bottle – TUTORIAL
The first step to start the Crochet Bag for Bottle – TUTORIAL is gathering the right materials. Choosing the right yarn is essential because the bag will need to support the weight of a filled bottle. Cotton yarn is a popular choice since it’s strong, washable, and holds its shape well. You can also experiment with cotton blends or recycled yarns for an eco-friendly option.
DISCOVER MORE FREE PATTERNS HERE!
A suitable crochet hook is just as important as the yarn. Check your yarn label for the recommended hook size, but keep in mind that a slightly smaller hook can help make your stitches tighter, which adds strength to the bag. For beginners, medium-sized hooks are the easiest to handle.
You’ll also need a pair of scissors to trim your yarn and a yarn needle for weaving in ends. These simple tools will ensure your project looks neat and professional.
For extra durability, you can add a lining inside your crochet bag, though this is optional. Some crocheters prefer a raw crochet look, while others enjoy the stability of a fabric insert.
Don’t forget about the strap. You can crochet it directly as part of the bag or make a separate strap to sew on later. This allows you to customize the length, whether you want a crossbody bag or a short handle.
Finally, you can include embellishments like beads, tassels, or buttons to give your bottle bag personality. These finishing touches make your project unique and stylish.
2. Step-by-Step Instructions for the Crochet Bag for Bottle – TUTORIAL
The Crochet Bag for Bottle – TUTORIAL usually starts with creating a base. The base can be circular or oval depending on the bottle you want to fit. Start with a magic circle or chain foundation, then work in rounds while increasing stitches to form a flat bottom.
Once the base is large enough, the next step is building up the sides. This part often involves working in simple stitches like single crochet or double crochet in the round. The sides form the body of the bag and can be made as tall or short as needed.
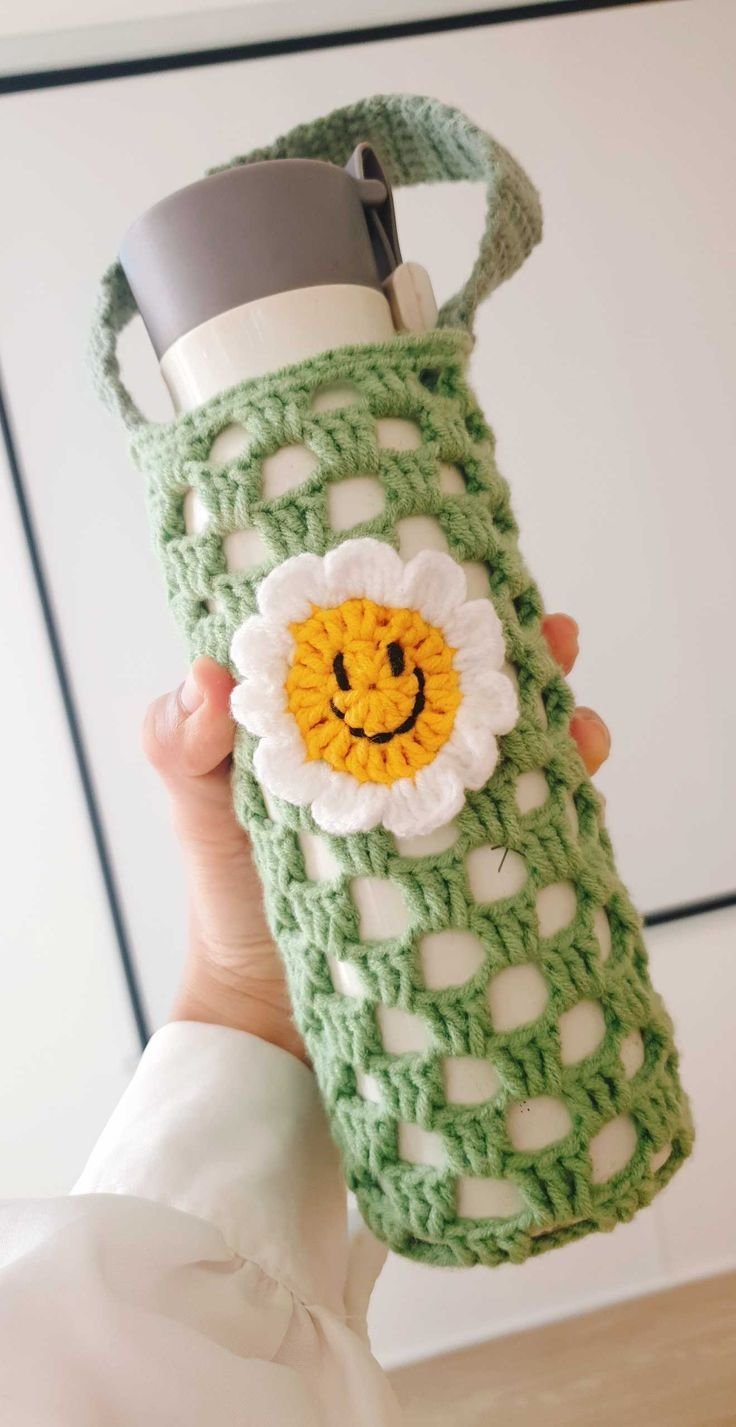
Many crocheters like to incorporate mesh stitches, such as chain spaces or trellis designs, to allow breathability and give the bag a lighter look. This not only saves yarn but also makes the project more decorative.
When the body is complete, it’s time to create the strap. You can crochet the strap in rows and attach it to opposite sides of the bag, or you can crochet it directly in the round as part of the bag itself. The strap length is up to you.
To ensure durability, it’s a good idea to reinforce the strap connection points with extra stitches. This helps prevent the strap from stretching out or breaking under weight.
Once the strap is secured, weave in any loose ends, and your crochet bag is ready to use. For a finishing touch, you can block the bag to give it a polished look.
3. Creative Variations of the Crochet Bag for Bottle – TUTORIAL
The beauty of the Crochet Bag for Bottle – TUTORIAL is that you can adapt it in endless ways. For example, you can use colorful yarns to create stripes, ombre effects, or multicolor designs that stand out.
Another fun variation is experimenting with different stitch patterns. Instead of plain stitches, try shell stitches, puff stitches, or textured designs for a unique look. Each stitch pattern changes the personality of the bag.
You can also play with strap styles. A long crossbody strap makes the bag perfect for outdoor walks, while a short handle works well for kids. You could even make adjustable straps by adding buttons or buckles.
If you enjoy eco-friendly projects, consider making the bag with recycled yarn or leftover scraps. This turns your bottle bag into a sustainable accessory while helping reduce waste.
Some crocheters also love to add decorative appliqués, like flowers, stars, or initials, to personalize the bag. This makes the project a great gift idea, since you can tailor it to the recipient’s style.
Lastly, you can make sets of bottle bags for different family members. Each person gets their own unique bag, which encourages reusable habits and reduces plastic waste.
4. Tips for Success with the Crochet Bag for Bottle – TUTORIAL
To succeed with the Crochet Bag for Bottle – TUTORIAL, one key tip is to work with consistent tension. Uneven stitches can cause the bag to stretch unevenly or lose its shape when holding weight.
Another helpful tip is to test the size of your base before moving on. Place your bottle on the base to make sure it’s wide enough. This way, you avoid surprises later in the project.
Don’t rush when making the strap. Since the strap carries all the weight, it needs to be strong. Consider doubling the yarn or using tighter stitches for extra durability.
Blocking the bag at the end can help shape it beautifully. Simply dampen the bag, stretch it gently over your bottle, and let it dry. This molds the bag perfectly to your bottle’s shape.
If you’re making the bag as a gift, consider adding decorative packaging or pairing it with a reusable water bottle. This creates a thoughtful and eco-friendly present.
Above all, remember that crochet is about creativity. Even if your first bag isn’t perfect, each attempt improves your skills and gives you confidence to try more advanced projects.
FAQ About Crochet Bag for Bottle – TUTORIAL
1. Is the Crochet Bag for Bottle – TUTORIAL suitable for beginners?
Yes, beginners can follow this tutorial easily. The stitches used are basic, and the step-by-step process is simple enough for those just starting out.
2. What type of yarn is best for a bottle bag?
Cotton yarn is the best option because it is durable, washable, and holds weight well. Blends or recycled yarns can also work.
3. Can I wash my crochet bottle bag?
Yes, most crochet bottle bags can be hand-washed or machine-washed on a gentle cycle. Be sure to follow care instructions based on the yarn used.
4. How long does it take to make a crochet bag for a bottle?
Depending on your skill level and the size of the bag, it can take anywhere from two to six hours to complete.
5. Can I adjust the size of the bag for different bottles?
Yes, simply increase or decrease the base size and adjust the height of the sides to fit your bottle perfectly.
6. Do I need to line my crochet bottle bag?
Lining is optional. While not required, adding a lining can give extra support and durability.
Conclusion
The Crochet Bag for Bottle – TUTORIAL is an enjoyable and practical project that combines creativity with functionality. By following the steps, you can craft a reusable accessory that’s both stylish and eco-friendly. From choosing the right yarn to experimenting with creative variations, this pattern gives you the freedom to personalize your bag however you like.
PATTERN VIDEO:
Now it’s your turn to give it a try! Share your results with us, leave your honest opinion, and suggest what variations or ideas you would add to the tutorial. Your feedback will inspire other crocheters to make their own crochet bottle bags and embrace sustainable handmade creations.

