Crochet Bunny Cutlery Holder – tutorial is a delightful crochet project that brings charm, creativity, and a touch of whimsy to your table setting. From the very first stitches, Crochet Bunny Cutlery Holder – tutorial invites you to create something both decorative and practical, perfect for special occasions, festive meals, or simply adding a handmade accent to everyday dining. This pattern is especially popular during spring celebrations and family gatherings, where small details make a big difference.
Working on Crochet Bunny Cutlery Holder – tutorial is a joyful experience because it combines simple crochet techniques with an adorable bunny design. The project is small, satisfying, and ideal for crocheters who enjoy quick makes that still feel meaningful. Each finished holder feels like a tiny character sitting at the table, instantly creating a warm and welcoming atmosphere.
In this article, you will learn everything about Crochet Bunny Cutlery Holder – tutorial, from understanding the idea behind the pattern to choosing materials, following the construction process, and discovering creative ways to personalize your finished pieces. This guide is written in a friendly, humanized way to help you enjoy every step of the crochet journey.
1. Understanding the Crochet Bunny Cutlery Holder Concept
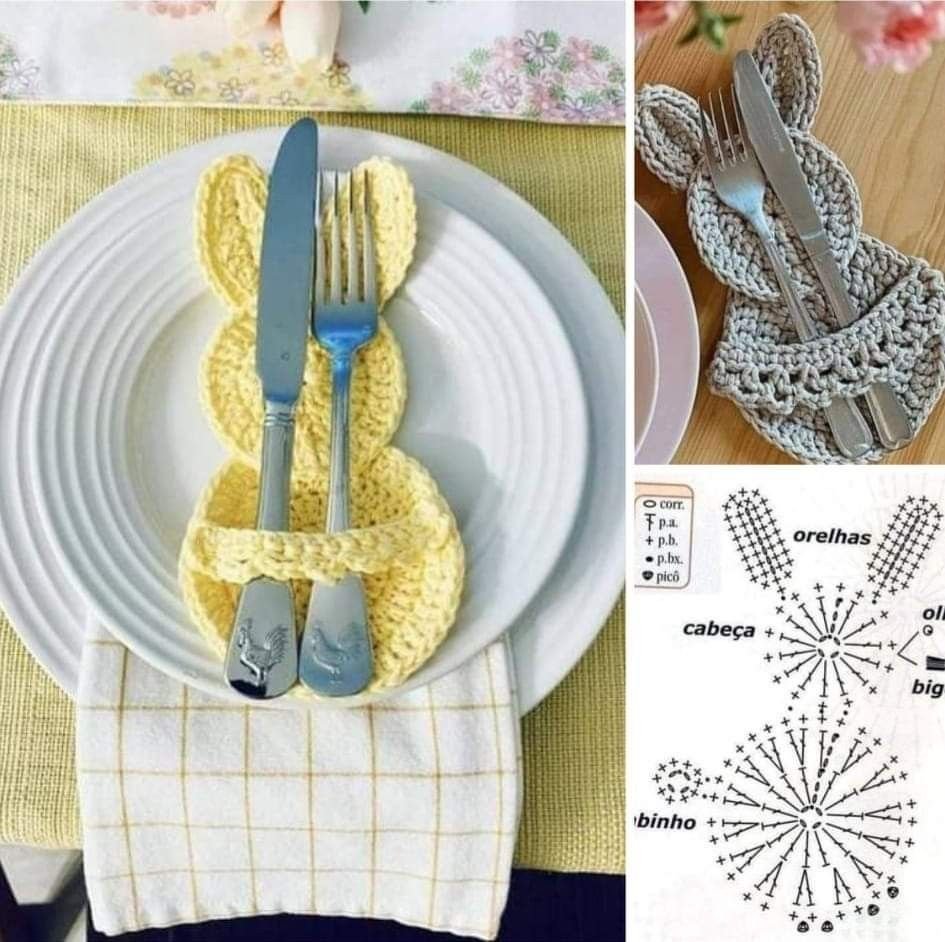
The idea behind Crochet Bunny Cutlery Holder – tutorial is to create a small crochet pouch shaped like a bunny, designed to hold forks, knives, and spoons. This combination of function and cuteness is what makes the pattern so appealing.
DISCOVER MORE FREE PATTERNS HERE!
The bunny shape usually includes a simple body with a pocket opening and two long ears that instantly identify the character. These elements work together to turn an ordinary table accessory into something playful and memorable.
Many crocheters love this pattern because it transforms everyday dining into a special experience. When guests see a handmade bunny holding their cutlery, it naturally sparks smiles and conversation.
The structure of Crochet Bunny Cutlery Holder – tutorial is typically straightforward, making it accessible even to beginners. Basic stitches form the body, while the ears add just a bit of shaping practice.
This pattern also encourages creativity. Each bunny can have a slightly different expression, color, or size, making every holder unique.
Understanding the concept behind Crochet Bunny Cutlery Holder – tutorial helps you appreciate how a simple crochet idea can bring warmth, joy, and personality to the table.
2. Materials and Preparation for the Bunny Holder
Before starting Crochet Bunny Cutlery Holder – tutorial, gathering the right materials makes the process smoother and more enjoyable. Most patterns recommend lightweight or medium-weight yarn to keep the holder flexible but sturdy.
Cotton yarn is often the top choice because it holds its shape well and feels clean and fresh for table use. Acrylic yarn can also work, especially if you prefer softer textures or brighter colors.
Choosing the correct hook size is important when following Crochet Bunny Cutlery Holder – tutorial. A slightly smaller hook helps create tight stitches, ensuring the holder keeps its form and securely holds the cutlery.
Other useful tools include a yarn needle for sewing parts together, scissors, stitch markers, and optional safety eyes or embroidery thread for facial details.
Preparing your workspace ahead of time helps you stay relaxed and focused. Good lighting and a comfortable seating position make it easier to work on small details like ears and edges.
Taking time to prepare before beginning Crochet Bunny Cutlery Holder – tutorial allows you to fully enjoy the creative process without interruptions.
3. Step-by-Step Construction of the Bunny Cutlery Holder
The construction of Crochet Bunny Cutlery Holder – tutorial usually begins with the body of the bunny. This part is often crocheted in rows or rounds to create a pouch that fits standard cutlery.
As the body takes shape, keeping even tension helps the holder look neat and professional. Watching the pouch form is one of the most satisfying moments of the project.
Once the body is complete, the bunny ears are crocheted separately. These are typically elongated shapes that give the holder its signature look and playful character.
After finishing the ears, they are sewn securely to the top of the holder. This step is where the bunny personality truly comes to life.
Some versions of Crochet Bunny Cutlery Holder – tutorial include simple facial features, such as embroidered eyes or a tiny nose. These details are optional but add extra charm.
The final steps involve weaving in loose ends and checking the fit of the cutlery. Once complete, your bunny holder is ready to decorate the table.
4. Creative Uses and Personalization Ideas
One of the most enjoyable aspects of Crochet Bunny Cutlery Holder – tutorial is the opportunity for personalization. Changing yarn colors instantly gives each bunny a unique personality.
Many crocheters create sets of bunny holders for family gatherings or holiday meals. Matching or coordinating colors can make the table look thoughtfully styled and cohesive.
Adding small embellishments, such as bows, flowers, or embroidered initials, allows you to customize each holder for specific guests.
This pattern can also be adapted in size. By adjusting stitch counts or yarn weight, you can create holders for children’s cutlery or larger utensils.
Beyond the dining table, Crochet Bunny Cutlery Holder – tutorial pieces can be used as small gift pouches for treats, notes, or party favors.
Exploring creative variations keeps the pattern exciting and allows you to express your own style through crochet.
FAQ About Crochet Bunny Cutlery Holder – tutorial
Is this pattern suitable for beginners?
Yes, it is beginner-friendly and uses basic crochet stitches with simple shaping.
How long does it take to make one holder?
Most holders can be completed in one to two hours, depending on experience.
What type of yarn works best?
Cotton yarn is often preferred for durability and structure.
Can I wash the finished holders?
Gentle hand washing is recommended to maintain shape and details.
Are these holders safe for children?
Yes, as long as small decorative parts are securely attached or embroidered.
Can I make these for gifts or events?
Absolutely, they are popular as handmade gifts and table decor for gatherings.
Conclusion
Creating Crochet Bunny Cutlery Holder – tutorial is a wonderful way to combine crochet skills with thoughtful, decorative design. Throughout this article, we explored the concept behind the pattern, material choices, construction steps, and creative ideas that make these bunny holders so special. They turn an ordinary table into a warm, inviting space filled with handmade charm.
PATTERN VIDEO:
Whether you are crocheting for a special occasion or simply for joy, this project offers a satisfying and creative experience. If you enjoyed this tutorial, feel free to leave your honest opinion and share your suggestions. Your feedback and ideas help inspire new crochet creations and bring even more warmth to handmade traditions.

