The Crochet Butterfly – TUTORIAL is a delightful and creative project that combines simplicity with beauty. Whether you’re a beginner or an experienced crocheter, this tutorial offers a charming way to enhance your projects with colorful, delicate butterflies. These handmade embellishments are perfect for accessories, home décor, clothing, and even gift wrapping.
Creating a crochet butterfly is not only fun but also therapeutic. The stitches are typically simple, and the small size of the project makes it quick to complete. Plus, the endless color combinations and personalization options make this a favorite among crafters of all levels. You’ll love seeing how just a few stitches can transform into something magical.
In this guide, we’ll walk through the full Crochet Butterfly – TUTORIAL, sharing step-by-step instructions and inspiring you with creative ideas. You’ll also find essential tips, common questions answered in the FAQ, and a summary to help you finish with confidence and joy.
1. Getting Started with the Crochet Butterfly – TUTORIAL
To begin your Crochet Butterfly – TUTORIAL, you’ll need a few basic materials. The good news is that most supplies are probably already in your yarn stash. Cotton or acrylic yarn works well, and a small crochet hook is ideal for creating a tight, neat design.
DISCOVER MORE FREE PATTERNS HERE!
Start by choosing the colors you love. Two or more contrasting shades will really make the wings pop. The body and antennae are typically worked in black or a darker tone to define the butterfly’s shape. You can also add beads or sequins for a touch of sparkle.
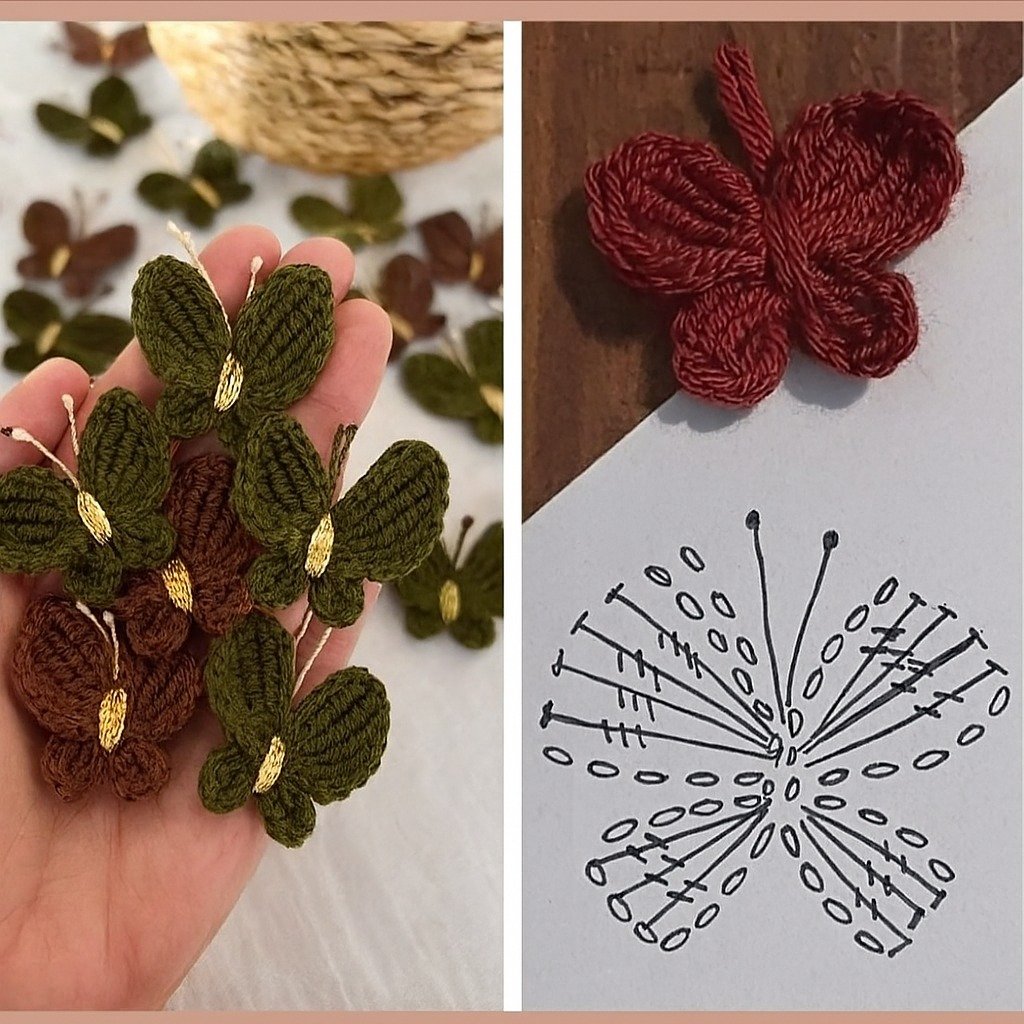
The project begins with creating a small circle, which will serve as the butterfly’s body center. You’ll then form loops on each side to mimic wings. These loops are created using a series of chain stitches, double crochets, and slip stitches, forming the top and bottom wings.
What’s great about the Crochet Butterfly – TUTORIAL is that it’s flexible. You can adjust the size by changing your yarn weight or hook size, and you can use different textures to make each butterfly unique. Try experimenting with variegated yarn for a whimsical effect.
If you’re new to crochet, this is a great pattern to practice your stitches. The repetition of basic techniques helps build confidence, while the short length of the project keeps things manageable. And even if you make a mistake, it’s quick to start over.
Make sure to block your finished butterflies to help them lay flat. This simple step gives a polished finish and makes them ready for application on cards, bags, hats, or wall art. A steam iron and a little patience are all you need to shape your masterpiece.
2. Step-by-Step Instructions for the Crochet Butterfly
Begin by making a magic ring or chain 4 and slip stitch to form a loop. This is the core where the wings will stem from. Then, crochet several double crochets into the ring to form the upper wings. Usually, you’ll make two sets of large loops, shaped like half-circles.
Next, work your way into creating the bottom wings. These are typically smaller than the upper ones and can be done using half double crochet or single crochet stitches. Repeat on the other side to create symmetrical wings.
After forming the wings, it’s time to give structure to your butterfly. Fold the piece in half vertically so that both sides mirror each other. This gives it the iconic butterfly silhouette.
For the body and antennae, use a darker yarn. Wrap it around the center a few times to cinch the wings in place, then tie a knot on top. Leave two ends to represent the antennae, and snip the excess to the desired length.
This basic form can be personalized. You can crochet around the edges using a contrasting color, add embroidery, or stitch in tiny beads to give the butterfly character and flair.
Finish by gently blocking the butterfly, especially if it’s curling. Use a damp cloth and an iron to lightly press it flat. This not only improves its appearance but ensures it stays in shape for any application you choose.
3. Creative Ways to Use Crochet Butterflies
One of the most appealing things about the Crochet Butterfly – TUTORIAL is how versatile the final product can be. These little butterflies are perfect for embellishing a wide variety of items.
You can attach them to hair clips or headbands to make adorable accessories. They also look beautiful sewn onto baby clothes, hats, and mittens, giving garments a handmade touch with personality.
Many crafters use crochet butterflies for home décor. Frame them as wall art, hang them as garlands, or attach them to throw pillows or curtains. Their lightness makes them ideal for decorating without adding bulk or weight.
Gift wrapping is another popular use. Add a handmade butterfly to a gift tag or ribbon for a unique finishing touch. It’s a simple way to make any present feel more special and personal.
Teachers and students love using crochet butterflies as bookmarks. Just attach a ribbon to the bottom and you have a thoughtful, practical handmade gift that promotes reading and creativity.
Don’t forget their potential in crafting jewelry. String a few butterflies together to create necklaces, earrings, or charm bracelets. With just a bit of imagination, these little creations become statement pieces.
4. Tips to Master the Crochet Butterfly – TUTORIAL
Start by practicing the stitch combinations used in the wings. Getting comfortable with transitions between chain, slip stitch, and double crochet will make the process much smoother and more enjoyable.
Keep your tension consistent throughout. Too loose and your butterfly may fall apart; too tight and the stitches will be hard to shape. Aim for a firm yet flexible finish for best results.
Use stitch markers if needed. They help keep track of your rounds and make folding the butterfly easier at the end. Marking the center also helps with aligning the antennae properly.
Have fun with colors. Using gradients or multiple shades in one butterfly adds vibrancy. Don’t be afraid to try metallic threads or textured yarns for a different look.
If you’re gifting or selling your butterflies, always block them and weave in ends securely. Presentation matters, and a polished finish goes a long way in showcasing your work.
Consider filming your process or taking progress photos. Sharing your Crochet Butterfly – TUTORIAL journey can inspire others and connect you with fellow crafters online.
FAQ
What kind of yarn should I use for crochet butterflies?
Cotton yarn is a great choice because it holds shape well and has a crisp finish, but you can experiment with acrylic, bamboo, or even metallic threads depending on your desired effect.
Can beginners follow this Crochet Butterfly – TUTORIAL?
Yes! This project is perfect for beginners. The stitches are basic, and the small size makes it quick and less intimidating for those just starting out.
How long does it take to make a crochet butterfly?
Most people can complete a butterfly in 15–30 minutes, depending on experience and detail level. It’s a great project for filling short crafting windows.
What size hook should I use?
A smaller hook, such as 2.5 mm to 3.5 mm, is ideal for tighter stitches and better definition. Adjust your hook size according to your yarn weight for best results.
How do I make the butterfly stiff enough to hold shape?
Blocking your butterfly is key. You can also use fabric stiffener or a mix of glue and water for a firmer finish if the butterfly is part of a display or accessory.
Can I wash items with crochet butterflies attached?
Yes, but always follow the yarn’s washing instructions. Hand-washing and laying flat to dry is safest to maintain shape and prevent damage.
Conclusion
The Crochet Butterfly – TUTORIAL is a fantastic way to combine creativity, color, and craft. From hair accessories to home décor, these small creations bring joy to any project. With just a bit of yarn and time, you can transform simple stitches into beautiful works of art.
If you enjoyed this tutorial, we’d love to hear from you. Leave a sincere opinion below and share your suggestions for future tutorials. Your feedback helps inspire more crochet magic.

