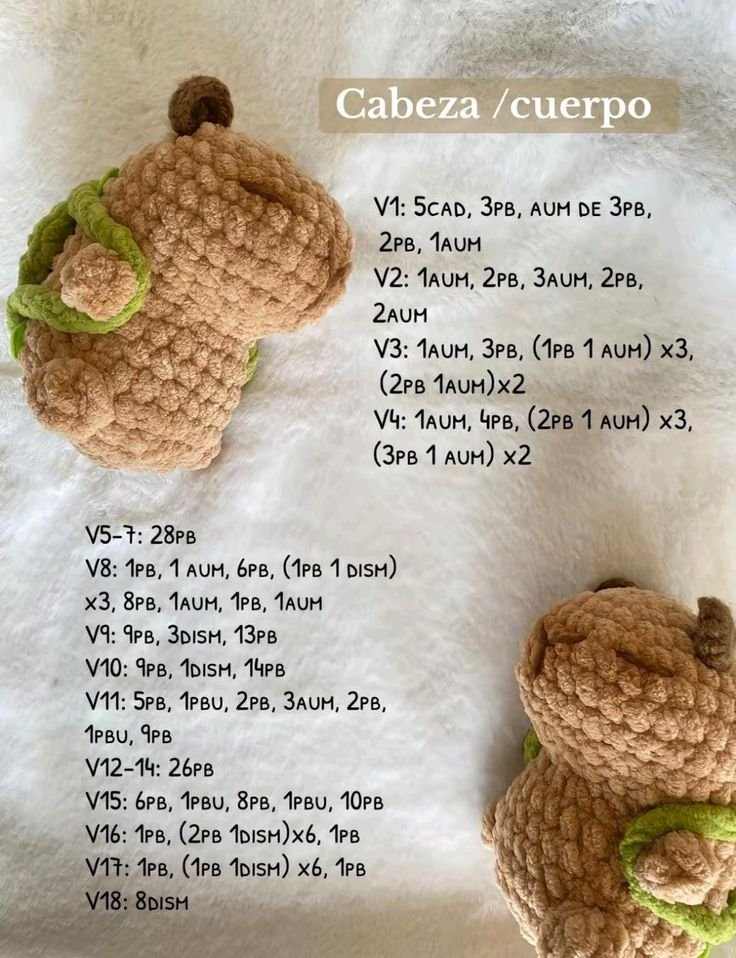
If you’ve ever wanted to crochet something utterly adorable and delightfully different, this Crochet Capybara – Tutorial is the perfect pattern to try next. The capybara, known as the world’s largest and friendliest rodent, has become a beloved internet icon. With its calm demeanor and chubby charm, it’s no surprise that crafters everywhere want to recreate one with yarn.
In this Crochet Capybara – Tutorial, you’ll learn step by step how to make your very own soft, huggable version of this peaceful animal. Whether you’re a beginner looking for a fun amigurumi project or an experienced crocheter expanding your collection of animal designs, this pattern offers a creative, joyful experience.
Let’s dive into the world of cute crafting and start stitching up your new favorite friend — the crochet capybara!

1. Why Crochet a Capybara
The Crochet Capybara – Tutorial isn’t just another amigurumi animal — it’s a unique and charming addition to your handmade toy collection. Capybaras symbolize calmness, friendship, and community, making them the perfect inspiration for a crochet project.
DISCOVER MORE FREE PATTERNS HERE!
First, it’s something different! While bears, cats, and rabbits are common amigurumi patterns, the capybara brings freshness and novelty to your crochet work. It’s a great conversation starter and gift.
Second, the body shape is beginner-friendly. With its rounded form and minimal detailing, you won’t need to fuss over complicated shaping. That makes it a relaxing and fun project to crochet.
Third, it’s perfect for personalizing. Add a tiny towel on its head (like the viral hot spring capybaras), give it a little tea cup, or make a mini hat. The possibilities are endless and adorable.
Fourth, it’s a wonderful gift. Whether for kids, animal lovers, or anyone who enjoys cozy handmade items, a crochet capybara is a cute and thoughtful present.
Fifth, it brings joy. There’s something special about crafting an animal that’s known for its kindness and calm energy. As you stitch, you’re also creating a little symbol of peace and serenity.
2. Materials and Tools You’ll Need
To follow this Crochet Capybara – Tutorial, you’ll need a few basic crochet supplies. Most of them are common in amigurumi projects, and you might already have them in your stash.
Yarn:
-
Worsted weight or DK yarn in light brown or beige (for the body)
-
Small amounts of black (for facial features)
-
Optional: white or accent colors for accessories
Hook:
-
2.5 mm to 3.5 mm crochet hook (adjust according to your yarn weight)
Notions:
-
Yarn needle for sewing pieces and weaving in ends
-
Scissors
-
Stitch marker
-
Polyfill stuffing
-
Safety eyes (6mm–9mm) or black yarn for embroidery
Optional:
-
Felt for facial accents
-
Small buttons or ribbons for accessories
Choose soft, easy-to-work-with yarn that gives your capybara a plush texture. Cotton or acrylic blends work great and hold their shape nicely when stuffed.
3. How to Crochet Your Capybara
Now it’s time to get crafting! This section of the Crochet Capybara – Tutorial walks you through the basic steps to make your plushy friend. The design is worked in separate parts and then assembled.
Step 1: Start with the body
-
Begin with a magic ring and work in continuous rounds.
-
Increase gradually until you form a rounded oval shape.
-
Work several even rounds to build the body’s length, then decrease to close.
-
Leave an opening for stuffing, then seal it shut.
Step 2: Crochet the head
-
The head is worked separately, similar to the body but slightly smaller.
-
Shape it with a rounded snout at one end, using simple increases and decreases.
-
Attach safety eyes between rounds before stuffing and closing the head.
Step 3: Create the legs and ears
-
Make four short, stubby legs by working small tubular shapes.
-
For the ears, crochet two oval flaps and sew them near the top of the head.
Step 4: Assemble the body
-
Stuff all parts firmly but not overfilled.
-
Sew the head to the body securely using a yarn needle and whip stitch.
-
Attach the legs at the bottom in a seated or laying-down position.
-
Sew the ears flat to the head.
Step 5: Add the finishing touches
-
Embroider a nose and mouth using black yarn or thread.
-
Optional: add small felt circles for cheeks, or blush with fabric paint or pastel.
-
Accessorize with a mini towel, tiny cup, flower crown, or scarf!
Take your time with assembly — careful stitching helps your crochet capybara look polished and cuddly.
4. Creative Customization Ideas
The fun doesn’t stop after finishing the basic Crochet Capybara – Tutorial. Let your creativity shine by customizing your plushie with playful and original touches.
Hot spring capybara
Make a tiny towel and place it on the head. Add a mini crochet yuzu fruit or cup for the iconic hot bath look.
Capybara family set
Crochet a few in different sizes — baby, mama, and papa capybara. Adjust the pattern by using different yarn weights or hook sizes.
Seasonal themes
Dress your capybara in a tiny Santa hat for winter, bunny ears for Easter, or sunglasses for summer.
Color variations
Try white or black yarn for albino or rare capybaras. Use fuzzy yarn for a unique textured look.
Capybara with friends
Crochet other tiny animals, like a duck or turtle, to ride on its back—just like the real viral images.
Turn it into a keychain or bag charm
Make a mini version using thinner yarn and attach a keyring or clip for an adorable accessory.
By adding these little elements, your crochet capybara becomes even more special and personalized. Don’t be afraid to get creative!
FAQ – Crochet Capybara – Tutorial
Is this a good project for beginners?
Yes! The pattern uses basic stitches like single crochet, increases, and decreases. It’s ideal for those with a little amigurumi experience, but patient beginners can absolutely make it too.
How long does it take to finish?
Depending on your speed, this project takes about 3–5 hours. It’s a great weekend project or evening hobby.
What’s the best yarn to use?
Worsted weight acrylic or cotton-blend yarns are best. They provide good stitch definition and shape, especially when stuffed.
Can I sell the capybaras I make?
Yes, you can sell the finished items (not the pattern). Always give credit to the original pattern creator if requested.
Can I make the capybara poseable?
Yes, you can insert pipe cleaners or armature wire in the legs for some flexibility. Be careful if making it for children.
Do I need safety eyes, or can I embroider them?
You can do either! Safety eyes are easier and give a polished look, but embroidery is a safe and great alternative for small children.
Conclusion
The Crochet Capybara – Tutorial offers everything a crochet lover could want—cuteness, creativity, and comfort. Whether you’re making it for yourself, gifting it to a friend, or just adding to your handmade collection, this pattern is a joyful way to bring one of nature’s gentlest animals to life.
You’ve now learned how to crochet the body, head, limbs, and how to personalize your capybara with fun accessories. It’s a pattern that invites experimentation and guarantees smiles.
PATTERN VIDEO:
Have you made your own crochet capybara? We’d love to hear from you! Share your finished projects, tag your creations on social media, and leave a comment below with your thoughts or suggestions. Your feedback helps us make even more adorable patterns for you to enjoy! 🧶🦙💛


