If you’re looking for a cozy and adorable crochet project that blends comfort with fun, this Crochet Cat Paw Gloves – TUTORIAL is exactly what you need. These gloves are not only warm and stylish, but they also add a touch of whimsy to any outfit. With paw pad details and cute feline flair, they’re perfect for cat lovers of all ages.
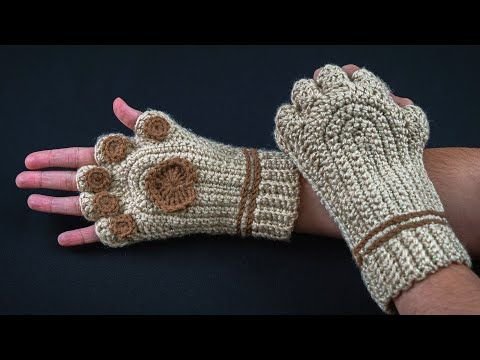
The charm of crochet cat paw gloves lies in their playful design. They mimic the appearance of a cat’s paw, complete with pads on the palm and sometimes even claws on the fingertips. These gloves are an ideal accessory for cold weather, cosplay, or simply as a cute handmade gift.
Whether you’re a crochet beginner or an experienced maker, this tutorial will walk you through the steps of crafting the purr-fect pair of cat-inspired gloves. So grab your yarn and hook—it’s time to get started on this fun and cozy project.
1. Why Crochet Cat Paw Gloves Are So Popular
There’s no denying that cats have taken over the internet and our hearts. That’s why crochet cat paw gloves are such a hit—they combine practicality with personality in a way that few accessories can.
DISCOVER MORE FREE PATTERNS HERE!
First and foremost, these gloves are warm and soft. Made with yarn that’s gentle on the skin, they help keep hands toasty while allowing for flexibility and comfort.
Next, they’re just plain cute. The little paw pads crocheted into the palm add a unique and adorable touch that sets them apart from regular gloves or mittens.
They’re also highly customizable. You can match the color of your gloves to your favorite cat breed, use pastel tones for a kawaii style, or go bold with bright yarns for a fun fashion statement.
These gloves are also loved for cosplay or Halloween costumes. They’re an easy way to turn any outfit into a feline-themed ensemble without much effort.
For gift giving, crochet cat paw gloves are thoughtful and creative. Handmade gifts carry a personal touch, and cat lovers will adore receiving something so tailored to their personality.
Last but not least, they’re a blast to make! Watching your gloves come to life with paw prints and playful features is rewarding and makes the project extra enjoyable.
2. Materials You’ll Need for Crochet Cat Paw Gloves
To get started with your Crochet Cat Paw Gloves – TUTORIAL, you’ll need to gather a few essential materials that will help you achieve the best result in comfort and design.
Start with worsted weight yarn in two or more colors—one for the main glove body and one for the paw pads. You might choose grey and pink, black and white, or even rainbow colors for a fun twist.
Use a crochet hook that matches your yarn weight. For worsted weight yarn, a 4.0 mm or 4.5 mm hook usually works well, but check your yarn label for the best fit.
You’ll also need a yarn needle or tapestry needle for sewing on the paw pads and weaving in your ends. A pair of sharp scissors will come in handy for trimming excess yarn.
Consider using stitch markers to help keep track of rounds and increases, especially if you’re working in the round for fingerless gloves or mittens.
For extra cuteness, you can use small buttons or felt pieces to add embellishments like claws or little cat noses at the wrist.
Lastly, you’ll want a measuring tape to size the gloves to your hand or the recipient’s. Getting the right fit is essential for comfort and usability.
With your supplies in hand, you’re ready to start crafting a pair of gloves that are both practical and purr-fectly adorable.
3. Step-by-Step Guide to Crocheting Cat Paw Gloves
Let’s dive into the Crochet Cat Paw Gloves – TUTORIAL step by step. These instructions can be adapted for fingerless gloves or full mittens, depending on your preference.
Start by measuring the palm circumference of the hand you’re making the gloves for. Use this measurement to create a foundation chain or magic ring that forms the glove’s base.
Work in rounds or rows, using single crochet or half double crochet stitches to build up the palm section. Make sure it’s snug but comfortable to allow for movement.
Next, shape the thumb hole by working in rows for a few rounds, then rejoining in the round. This forms the hand section of the glove and is a key step for a custom fit.
Once the glove reaches the base of the fingers, decide if you want to make it fingerless or add full finger coverage. For fingerless gloves, finish with a ribbed cuff. For full gloves, work individual finger tubes in the round.
Now, create the paw pads. These are usually small ovals or circles crocheted separately in a contrasting color. You’ll need one large pad for the center of the palm and four smaller ones for the “toes.”
Sew the paw pads onto the palm area of the glove using a yarn needle and matching thread. Make sure they are evenly spaced and securely attached.
Finish off the gloves with any extra details—embroidered claws, cat ears on the wrist, or a decorative bow—and weave in all your ends neatly.
4. Customization Ideas and Creative Variations
One of the best things about crochet cat paw gloves is how easy they are to personalize. Here are some fun ways to make your gloves stand out.
Change the color scheme. Go realistic with tabby brown and pink, or opt for fantasy with blue and silver or black and neon green.
Add a little sparkle by using glitter yarn for the paw pads or cuffs. This gives your gloves a magical or glam vibe, perfect for costume parties or playful winter fashion.
For a cozy look, line the gloves with fleece or faux fur. This not only adds warmth but makes them extra plush and luxurious.
Want to turn them into mittens? Simply adjust the top portion of the glove and close it off instead of leaving individual finger holes.
You can also crochet matching accessories—like a cat paw scarf, cat ear hat, or even a tail keychain to go along with the gloves.
If making for kids, try adding their initials in surface crochet or using variegated yarn for a fun, multicolored finish.
The possibilities are endless with crochet cat paw gloves, making each pair a one-of-a-kind creation.
FAQ – Crochet Cat Paw Gloves
Are these gloves suitable for crochet beginners?
Yes! With basic stitches and simple shaping, this is a great project for beginners. The paw pads are easy to crochet separately and sew on.
What yarn is best for these gloves?
Use soft, worsted weight yarn like cotton blends or acrylics. They’re comfortable, warm, and machine washable.
Can I make them for children?
Definitely. Just adjust the starting chain and number of stitches to fit smaller hands. Use a tape measure to get accurate sizing.
How do I attach the paw pads securely?
Use a yarn needle to whip stitch or sew the pads onto the glove’s palm, being careful not to leave loose threads that can snag.
Can I make these gloves without fingers?
Yes! Fingerless gloves are a popular option. Just stop after the hand section and finish with a ribbed edge at the fingers.
Do I need to block the gloves?
Blocking isn’t necessary, but it can help even out the stitches and give the gloves a polished finish, especially if you used wool yarn.
Conclusion
This Crochet Cat Paw Gloves – TUTORIAL gives you everything you need to create a pair of cozy, fun, and totally adorable gloves. From choosing your yarn to stitching on the paw pads, you now have all the steps to make a personalized project that brings joy and warmth.
Whether you’re crafting for yourself, your kids, or your cat-loving friends, these gloves are sure to delight anyone who receives them. The design is both practical and playful, making it a wonderful addition to any crochet collection.
VIDEO TUTORIAL:
We’d love to hear your thoughts! If you enjoyed this tutorial, leave your honest opinion in the comments below. And don’t forget to share your finished creations and any suggestions for future patterns. Happy crocheting! 🐾🧤🧶

