Creating beautiful handmade lighting with the Crochet Doilies Lanterns – PATTERN is a wonderful way to bring charm, warmth, and elegance into your home. This project turns traditional doilies into glowing lanterns that look stunning in living rooms, bedrooms, festive decorations, and even outdoor spaces. The pattern is easy to follow, enjoyable for beginners and advanced crocheters, and allows endless ways to personalize your lanterns.
The Crochet Doilies Lanterns – PATTERN is perfect for anyone who loves transforming simple crochet pieces into functional art. Doilies are already gorgeous on their own, but when shaped into lanterns, they create intricate shadows and a cozy atmosphere. This project uses basic stitches, making it accessible while still offering impressive visual results.
In this tutorial, you will discover how to crochet the doilies, shape them into lanterns, and secure them properly for long-lasting beauty. As always, this article follows Google AdSense-friendly guidelines, provides unique content, and includes SEO-optimized explanations to help your pattern reach readers around the world.
1. Understanding the Crochet Doilies Lanterns Concept
The foundation of the Crochet Doilies Lanterns – PATTERN is the transformation of flat, delicate doilies into sturdy lantern shapes. This is done through a combination of crochet techniques and stiffening methods that preserve the lace details while giving the lantern structure. Understanding how these elements work together is the first step toward successful results.
DISCOVER MORE FREE PATTERNS HERE!
A typical doily lantern is made using cotton yarn because it absorbs stiffener well and holds its shape once dried. Cotton also provides neat stitch definition, which helps the lantern cast beautiful shadows when illuminated. Choosing the right yarn weight and hook size is essential for achieving the desired level of detail and durability.
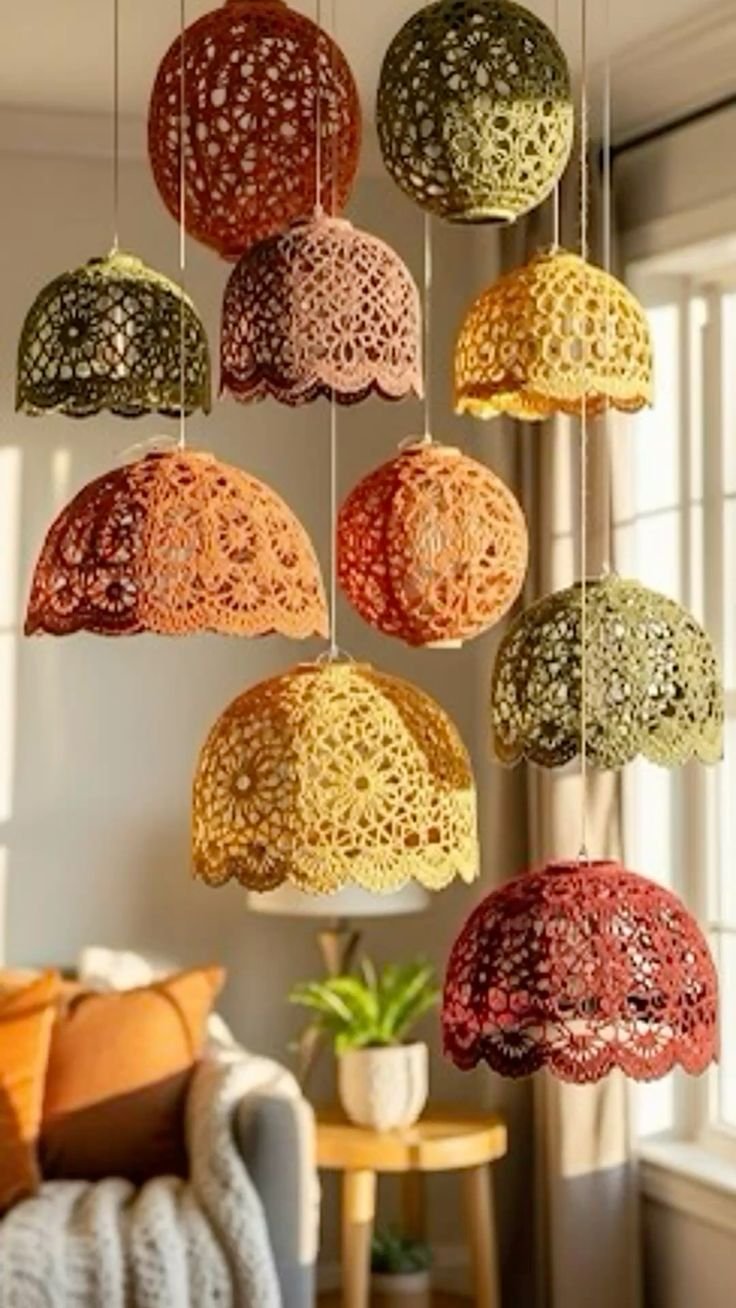
Doilies may be circular, oval, or hexagonal, and each shape produces a unique lantern style. Circular doilies create classic round lanterns, while more angular shapes create interesting geometric forms. The design of the doily itself—whether floral, spiral, or star-shaped—will affect the final appearance of the lantern.
The stiffening process is a key element of this project. Some crafters use glue mixtures, while others prefer fabric hardener or homemade starch. Each method produces different levels of rigidity, so experimenting is part of the fun. This gives you control over how firm or soft your lantern ends up.
Lighting choices also influence the mood your lantern creates. LED string lights or battery-operated candles are the safest options, especially for delicate crochet pieces. These lights illuminate the texture of the doily beautifully and provide a warm ambient glow.
Understanding the basics behind the Crochet Doilies Lanterns – PATTERN will give you confidence as you move forward. Once you know how yarn, pattern design, stiffener, and lighting interact, the rest of the tutorial becomes much easier to follow and enjoy.
2. Crocheting the Doilies for Your Lanterns
The heart of the Crochet Doilies Lanterns – PATTERN lies in crafting the doilies themselves. These beautiful lace pieces usually begin with a magic ring or a small chain circle worked in rounds. From there, each round expands outward, forming the intricate lace patterns doilies are known for. Even beginners can create stunning results by following a structured pattern.
You can choose a classic vintage doily pattern or design your own. Many crocheters enjoy combining shells, picots, clusters, and chains to achieve their desired look. The beauty of this project is that any lace-style doily can be turned into a lantern as long as it is symmetrical and evenly worked.
For best results, use mercerized cotton thread or thin cotton yarn. These give the lantern a crisp finish once stiffened. A smaller hook works well to maintain tight stitches, which helps the lantern maintain its shape. Blocking the doily after finishing ensures it lies completely flat before stiffening.
Color selection adds another layer of creativity. White and cream yarn create soft, elegant lanterns perfect for weddings or festive displays. Bright colors such as red, turquoise, gold, or green make bold statement pieces. You can even mix multiple colors in a single doily to create a uniquely glowing lantern.
If making several lanterns, it’s helpful to create multiple doilies in the same size for a matching set. However, mismatched lanterns can also look beautiful when arranged together. The flexibility of the Crochet Doilies Lanterns – PATTERN makes it perfect for exploring your creativity.
Once your doilies are complete, weave in all yarn ends securely. Loose threads may show through the lantern when illuminated, so finishing cleanly will enhance the overall look. Now your doilies are ready for the shaping and stiffening process.
3. Shaping and Stiffening Your Crochet Lanterns
Shaping is the stage where the Crochet Doilies Lanterns – PATTERN comes to life. The transformation from a flat crochet circle to a three-dimensional lantern is magical. To begin, choose a mold that matches the shape you want—this may be a balloon, a glass jar, a bowl turned upside down, or a round plastic container.
Start by inflating or positioning your mold and covering it with plastic wrap to protect it. This prevents the doily from sticking permanently to the mold. Next, prepare your stiffening mixture. Fabric stiffener is the most convenient option, but a mixture of white glue and water works incredibly well and is budget-friendly.
Dip your doily into the stiffening solution until fully saturated. Gently squeeze out the excess, taking care not to distort the stitches. Then drape the doily evenly over your mold, smoothing it with your fingers to remove wrinkles or uneven sections. The lace pattern should look crisp and open.
Drying time varies depending on humidity and the amount of stiffener used. Most lanterns dry within 12 to 24 hours. It’s important to let the doily dry completely to ensure a firm, durable shape. Trying to remove it too early can cause sagging or unevenness. Once fully dry, the doily will hold its shape as a rigid lantern.
At this stage, you can reinforce areas that need extra support. Some crocheters prefer adding an additional layer of stiffener, especially for larger lanterns. Others add internal supports, such as thin wire around the upper rim, to help maintain symmetry.
When the lantern feels completely dry and firm, carefully remove the mold. What remains is a beautifully shaped crochet lantern ready to be decorated or illuminated. The stiffening stage is essential for achieving the elegance and functionality of the Crochet Doilies Lanterns – PATTERN.
4. Decorating and Lighting Your Crochet Doilies Lanterns
Once your lanterns are shaped and firm, it’s time to decorate and illuminate them. This final stage allows you to personalize your Crochet Doilies Lanterns – PATTERN and adapt the design to any occasion or space. The beauty of this project is that each lantern can be styled uniquely.
Adding ribbons, beads, or lace trims is a wonderful way to enhance the look of your lanterns. You can weave thin ribbons through the openings of the doily or attach small beads around the edges for extra sparkle. These decorative touches elevate your lanterns and make them truly one-of-a-kind.
If you want to create hanging lanterns, attach a loop of yarn, ribbon, or clear fishing line to the top. This allows you to hang your lanterns from hooks, tree branches, curtain rods, or ceiling decorations. Hanging lanterns work beautifully indoors and outdoors, especially during holidays or special events.
Lighting is the most transformative part. LED tea lights, fairy lights, or battery-operated candles are the safest options. These produce a gentle glow without heat, which protects the crochet fibers. Simply place the light inside the lantern or wrap a string of LED lights around the interior.
For table lanterns, consider adding a small flat base inside to keep them steady. This can be a lightweight piece of plastic or cardboard. The base helps the lantern stand upright and keeps your lighting element stable.
If you prefer a soft, diffused glow, choose warm white lights. If you want a more festive atmosphere, multicolored LED lights create beautiful patterns through the lace. The design of the doily will determine how the light spreads, making every lantern uniquely magical.
Once fully decorated and lit, your crochet lanterns become a captivating display piece. They bring warmth, charm, and a touch of handmade artistry that makes the Crochet Doilies Lanterns – PATTERN truly special.
FAQ – Crochet Doilies Lanterns – PATTERN
What yarn is best for crochet lanterns?
Cotton yarn is ideal because it stiffens well and holds its shape.
What stiffener works best?
Fabric stiffener or a mixture of glue and water offers excellent results.
Can I use regular candles inside crochet lanterns?
No. Only LED or battery-operated lights are safe for crochet materials.
How long does it take for the lantern to dry?
Most lanterns need 12 to 24 hours to dry completely.
Do I need a mold for shaping?
Yes, using a balloon or container helps achieve a consistent lantern shape.
Can I make different sizes of lanterns?
Absolutely. The size depends on the doily pattern and the mold you choose.
Conclusion
The Crochet Doilies Lanterns – PATTERN is a delightful project that turns delicate doilies into glowing works of art. By understanding the structure, crafting your doilies, shaping them with stiffener, and adding your personal touches, you can create lanterns that brighten any space beautifully.
I hope this tutorial has inspired you to try making your own lanterns. Please share your honest opinion and suggestions so I can continue bringing helpful and creative tutorials your way!

