The Crochet Hat Display – TUTORIAL is a practical and creative project designed especially for crocheters who love organizing, showcasing, or even selling their handmade hats. Whether you create beanies for craft fairs, online shops, or personal use, having a beautiful and functional display can elevate your presentation instantly.
This project is perfect for makers who want a stylish way to store finished pieces while keeping them wrinkle-free and easy to access. The Crochet Hat Display – TUTORIAL combines structure, durability, and decorative charm, making it both functional and visually appealing.
In this complete guide, you’ll learn how to choose materials, construct the display base, shape and reinforce it for stability, and customize it to match your décor or brand aesthetic.
1. Materials and Planning Your Design
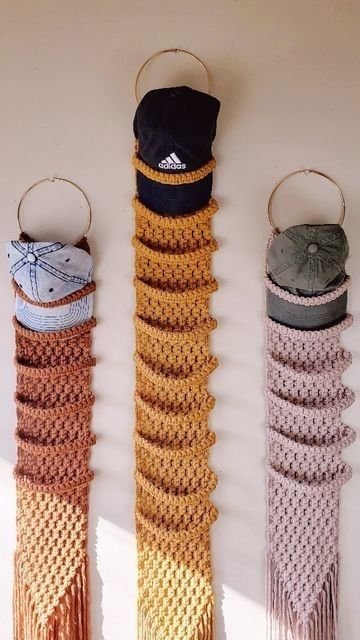
Before starting the Crochet Hat Display – TUTORIAL, decide what type of display you want to create. You can make a standing hat holder, a wall-hanging organizer, or a tiered hanging display depending on your needs.
DISCOVER MORE FREE PATTERNS HERE!
For a structured standing display, sturdy cotton yarn or a cotton-blend yarn is recommended. Cotton provides firmness and helps the piece maintain shape. If extra rigidity is needed, you can hold two strands of yarn together or use a thicker yarn.
You will need an appropriate crochet hook, typically between 4.5 mm and 6.0 mm depending on yarn weight. Additional tools include scissors, a yarn needle, stitch markers, measuring tape, and possibly a plastic or cardboard insert for added stability.
If you plan to hang your display, you may also need a wooden dowel, metal ring, or strong cord for support.
Before beginning, measure the average size of the hats you plan to display. This ensures your holder fits properly and keeps the hats in good shape.
2. Creating the Base Structure
The foundation of the Crochet Hat Display – TUTORIAL depends on the type of design you choose.
For a standing hat display, begin by crocheting a circular base using single crochet stitches in continuous rounds. Start with a magic ring and increase evenly each round to create a flat circle. Continue increasing until the base reaches your desired diameter.
Once the base is complete, stop increasing and work even rounds upward to create a cylindrical shape. This structure acts as the support column for your hats.
If making a wall-hanging display, crochet a rectangular panel using rows of single crochet or half double crochet stitches. The panel should be wide enough to support the hats without sagging.
Maintain consistent tension to ensure the structure remains firm. If needed, insert a lightweight internal support such as rolled cardboard to help maintain shape.
3. Reinforcing and Shaping the Display
A key part of the Crochet Hat Display – TUTORIAL is ensuring durability and stability.
For standing displays, you can reinforce the base by adding an extra layer of crochet or inserting a firm circle of plastic canvas inside the bottom. This helps prevent tipping when hats are placed on top.
If creating multiple tiers, attach additional circular platforms at different heights using securely stitched connectors. Ensure each tier is centered and balanced.
For wall-mounted versions, create sturdy loops at the top for hanging. Reinforce these loops with tight stitches to prevent stretching over time.
You can also add decorative edging around the base or panel using crab stitch or a simple scalloped border to give the display a finished look.
4. Customization and Creative Uses
The Crochet Hat Display – TUTORIAL can be customized in many ways to match your personal style or business branding.
For a modern minimalist look, choose neutral yarn colors such as white, beige, gray, or black. For a playful or child-focused display, use bright colors or striped patterns.
Add small decorative appliqués like stars, flowers, or tags with your brand name if you sell handmade hats. A personalized label stitched onto the display can enhance professional presentation at markets.
If space is limited, create a vertical hanging display that holds several hats in stacked sections. This works well for craft rooms or vendor booths.
You can also adapt this design to display scarves, headbands, or other crochet accessories.
Blocking the finished piece lightly can help improve structure and appearance.
Tips for Best Results
Use tight stitches to create a sturdy structure. Avoid loose tension, which may cause the display to sag.
If adding internal support, ensure it fits snugly without distorting the crochet shape.
Test the display with one hat before placing multiple items to confirm balance and stability.
For long-term use, avoid overloading the display with heavy items.
Frequently Asked Questions
Is the Crochet Hat Display – TUTORIAL beginner-friendly
Yes, confident beginners who know basic stitches and how to crochet in rounds or rows can complete this project.
How long does it take to make
Depending on size and complexity, it can take several hours to complete.
What yarn works best
Sturdy cotton or cotton-blend yarn works best for maintaining structure.
Can I wash the display
If made with cotton yarn, it can typically be hand-washed and air-dried. Remove any internal support before washing.
Can I adjust the size
Yes, simply modify the base diameter or panel width to fit your specific needs.
Conclusion
The Crochet Hat Display – TUTORIAL is a practical and stylish solution for organizing and showcasing your handmade creations. Whether you crochet for personal enjoyment or run a small handmade business, a well-designed display enhances presentation and keeps your hats in excellent condition.
With the right materials, consistent tension, and thoughtful customization, you can create a display that is both functional and visually appealing.
Have you created a crochet hat display before? Share your design ideas and creative variations in the comments. Your experience may inspire fellow crocheters to elevate their craft space or market presentation.

