Crochet Rose Keychain Pattern is a beautiful and practical crochet project that allows crafters to create a charming accessory using simple stitches and a small amount of yarn. If you enjoy handmade gifts or small decorative items, learning the Crochet Rose Keychain Pattern is a wonderful way to combine creativity with functionality. This project is especially popular among crochet lovers because it is quick to complete and perfect for using leftover yarn.
One of the most appealing aspects of the Crochet Rose Keychain Pattern is how it transforms a simple crochet strip into a delicate rose that can be attached to keys, bags, or backpacks. The design captures the elegance of a blooming flower while remaining compact and durable enough for everyday use.
In this complete Crochet Rose Keychain Pattern guide, you will learn what materials are required, how to create the rose shape step by step, and ways to personalize the keychain with creative touches. Whether you are new to crochet or already experienced with floral patterns, this tutorial will help you craft a lovely handmade accessory.
1. Materials Needed for the Crochet Rose Keychain Pattern
The first step in the Crochet Rose Keychain Pattern is gathering the materials needed for the project. Fortunately, this pattern requires only a few basic crochet supplies, making it ideal for beginners and experienced crocheters alike.
DISCOVER MORE FREE PATTERNS HERE!
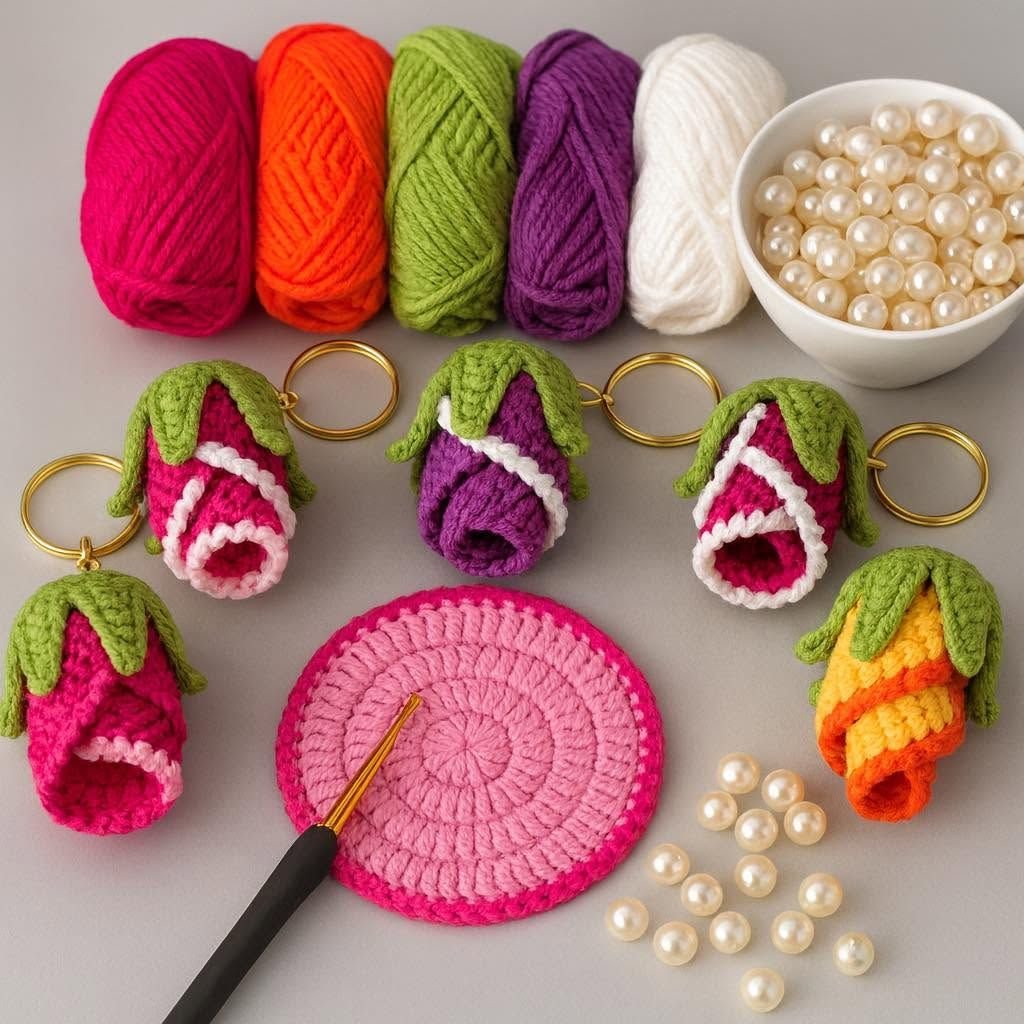
The main material required is yarn. Cotton yarn is often recommended because it holds its shape well and creates a clean, defined rose. However, acrylic yarn can also be used if you prefer a softer texture or want a wider variety of colors.
Choosing the right yarn color is an important part of the design. Classic red, pink, and rose tones create a traditional floral look, while pastel colors or multicolored yarn can give the rose a modern and playful appearance.
You will also need a crochet hook that matches the yarn weight. Most Crochet Rose Keychain Pattern projects use hooks between 2.5 mm and 4 mm depending on the yarn thickness.
A keychain ring is another essential component. The finished rose will be attached to this ring so it can be used with keys, purses, or zipper pulls.
Basic tools such as scissors and a yarn needle are required for finishing the project. The yarn needle helps weave in loose ends and secure the rose shape.
Optional materials such as beads, small leaves, or decorative charms can be added to personalize the final keychain and give it extra character.
2. Understanding the Rose Structure in Crochet
Before starting the stitches in the Crochet Rose Keychain Pattern, it is helpful to understand how the rose shape is formed. Unlike traditional crochet flowers made in rounds, this pattern usually begins with a long crocheted strip.
The strip contains repeating stitch patterns that create a scalloped or wavy edge. This edge eventually forms the petals of the rose once the strip is rolled and shaped.
Typically, the base row begins with a foundation chain. This chain determines the size of the rose and the number of petals it will have.
After the chain is completed, the next rows include stitches such as double crochet or half double crochet. These stitches create the height needed for the curved petal shapes.
The edges of the strip often use combinations of stitches like chains, slip stitches, and clusters. These details help produce the soft curves that resemble natural flower petals.
Once the crocheted strip is finished, it is rolled tightly from one end to create the spiral center of the rose. The outer layers form the larger petals.
Understanding this construction technique makes the Crochet Rose Keychain Pattern much easier to follow and allows you to adjust the size and style of the rose.
3. Step-by-Step Crochet Instructions
Now that you understand the structure of the flower, it is time to begin the actual Crochet Rose Keychain Pattern process. The project starts with creating the foundation chain that forms the base of the rose strip.
First, create a chain long enough to support several petals. The exact number of chains may vary depending on the pattern variation and the size of the rose you want to make.
In the next row, work double crochet stitches along the chain. These stitches build the body of the strip and provide the base for the petals.
The following row usually introduces the petal shapes. This may include combinations such as double crochet stitches separated by chain spaces to create curved edges.
Continue repeating the petal pattern across the entire strip. As the stitches build up, you will start to see the scalloped shapes that will become the flower petals.
After completing the strip, fasten off the yarn but leave a long tail for sewing. This tail will be used to secure the rolled flower.
Roll the strip from one end to the other, forming the spiral rose shape. Use the yarn needle to stitch through the bottom layers and hold the flower firmly together.
4. Assembling the Keychain and Adding Finishing Touches
Once the rose is complete, the final stage of the Crochet Rose Keychain Pattern is assembling the keychain and adding decorative details.
Begin by attaching the rose securely to a keychain ring. This can be done by sewing a small loop of yarn to the back of the flower and threading it through the ring.
Another method is crocheting a short chain loop and attaching it directly to the rose base. This technique provides extra strength and ensures the keychain can handle daily use.
If you want to enhance the appearance of the keychain, consider adding small crocheted leaves behind the rose. Green yarn works beautifully for creating realistic leaf accents.
Beads or pearls can also be sewn into the center of the rose for an elegant touch. These details make the Crochet Rose Keychain Pattern look even more refined.
Some crafters enjoy attaching small charms or decorative tags to the keychain ring. This transforms the project into a personalized accessory or gift.
Finally, check all stitches and attachments to ensure the rose is secure and durable. Once completed, your crochet rose keychain is ready to brighten your keys, bags, or handmade gift collections.
FAQ – Crochet Rose Keychain Pattern
Is the Crochet Rose Keychain Pattern suitable for beginners?
Yes. The Crochet Rose Keychain Pattern is often recommended for beginners because it uses basic stitches and a simple construction method.
How long does it take to make a crochet rose keychain?
Most crocheters can complete a rose keychain within one hour, making it a quick and satisfying project.
What yarn works best for this pattern?
Cotton yarn is commonly used because it creates firm petals that hold their shape well. However, acrylic yarn can also work depending on your preference.
Can I make the rose larger or smaller?
Yes. Adjusting the length of the starting chain or using thicker yarn and a larger hook can change the size of the rose.
Can this pattern be used for other projects?
Absolutely. The same rose design can be used for brooches, hair accessories, bag decorations, or even larger crochet floral arrangements.
Is the keychain durable enough for daily use?
Yes, as long as the rose is sewn securely and attached firmly to the keychain ring, it can handle everyday use.
Conclusion
The Crochet Rose Keychain Pattern is a charming and versatile crochet project that combines beauty with practicality. By using simple crochet stitches and a clever rolling technique, you can transform yarn into a delicate rose that works perfectly as a decorative keychain.
Throughout this tutorial, you learned about the materials needed, the structure of the rose design, the step-by-step crochet process, and several creative ways to personalize your keychain. These techniques allow you to create unique handmade accessories that reflect your personal style.
This project is also perfect for gifts, craft fairs, or simply using leftover yarn in a creative way. With a little practice, you can make multiple roses in different colors and designs.
If you enjoyed this tutorial, feel free to share your honest opinion and leave suggestions for future crochet patterns. Your feedback and ideas help inspire new projects and keep the creative community growing.

