Crocheting roses can be a delightful and rewarding experience, whether you’re a seasoned crocheter or just starting out.
Roses are not only beautiful but also versatile, making them perfect for embellishing hats, scarves, blankets, and more.
In this article, we will provide a beginner-friendly guide to crocheting roses, along with a free pattern to help you get started.

Getting Started with Crochet
Before diving into the crochet rose pattern, let’s go over some basics for beginners:
Materials: You will need yarn in your desired color (preferably medium-weight), a crochet hook (size recommended on the yarn label), scissors, and a yarn needle.
Basic Stitches: To crochet a rose, you’ll need to know how to make a chain stitch (ch), slip stitch (sl st), single crochet (sc), half double crochet (hdc), and double crochet (dc). These are standard stitches in crochet and are used in many patterns.
Tension: Keep your tension relaxed and even. Tension that is too tight can make it difficult to work into stitches and create a stiff, unyielding fabric.
Practice: Before starting on the rose, practice making a few chains and basic stitches to get comfortable with your yarn and hook.
Crochet Rose Pattern

Now, let’s move on to the crochet rose pattern. This pattern is beginner-friendly and can be easily adjusted to create roses of different sizes by changing the hook size or yarn weight.
Materials Needed:
– Medium-weight yarn in desired color
– Crochet hook (size recommended on yarn label)
– Scissors
– Yarn needle
Instructions:
Rose Base:
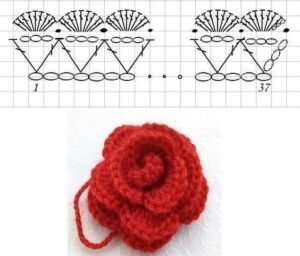
Start with a slip knot and chain 36.
Row 1: Skip the first chain, work 1 sc into the next chain, skip 1 chain. Repeat from to across the row. Turn.
Row 2: Chain 1, work 1 sc into the first sc, ch 3, skip 1 sc, 1 sc into the next sc. Repeat from to across the row. Turn.
Row 3: Work 6 dc into the ch-3 space, sl st into the next sc. Repeat from to across the row. Fasten off, leaving a long tail for sewing.

Rose Petals:
1. Start with a magic ring.
2. Round 1: Work 6 sc into the ring. Pull the tail to close the ring. Do not join.
3. Round 2: Work 2 sc into each sc around (12 sc).
4. Round 3: *Work 1 sc into the next sc, 2 sc into the next sc*. Repeat from * to * around (18 sc).
5. Rounds 4-5: Work 1 sc into each sc around (18 sc). Fasten off, leaving a long tail for sewing.
Assembly:
1. Roll the rose base tightly to form the center of the rose.
2. Using the long tail left from the base, sew the base to secure it.
3. Place the petals around the base, slightly overlapping them, and sew them in place.
Finishing Touches:
1. Weave in any remaining ends.
2. Block the rose by lightly steaming it or wetting it and shaping it to desired form. Allow it to dry completely.
Crocheting roses can be a fun and rewarding experience, and with this beginner-friendly pattern, you’ll be able to create beautiful roses in no time.
Feel free to experiment with different yarn colors and sizes to create unique roses for your projects. Happy crocheting!


