The Crochet Snow Globe Pattern – TUTORIAL is a delightful, creative, and festive project perfect for anyone who loves handmade holiday décor. Whether you’re a beginner or an experienced crocheter, this charming design brings joy, texture, and seasonal magic to your craft table. Using the Crochet Snow Globe Pattern – TUTORIAL, you can produce beautiful winter-themed scenes that work wonderfully as ornaments, home décor pieces, or heartfelt handmade gifts.
This project stands out because it blends simple stitches with a visually captivating concept. The globe effect, the miniature scenes, and the layering technique make the pattern fun and rewarding. By following the Crochet Snow Globe Pattern – TUTORIAL, you’ll learn how to create your own winter wonderland using yarn, imagination, and step-by-step instructions.
In this article, you’ll discover everything you need to complete this design, including supplies, techniques, tips for customization, and creative ways to display your finished snow globe. The goal is to help you follow the Crochet Snow Globe Pattern – TUTORIAL with clarity, confidence, and enjoyment.
1. Materials and Tools Needed for the Crochet Snow Globe Pattern – TUTORIAL
Working on the Crochet Snow Globe Pattern – TUTORIAL requires only a few simple materials, making it accessible to crocheters of all levels. Most of the items are probably already in your crafting space, which means you can get started right away. Selecting the right yarn, hook, and accessories will ensure your snow globe looks polished and festive.
DISCOVER MORE FREE PATTERNS HERE!
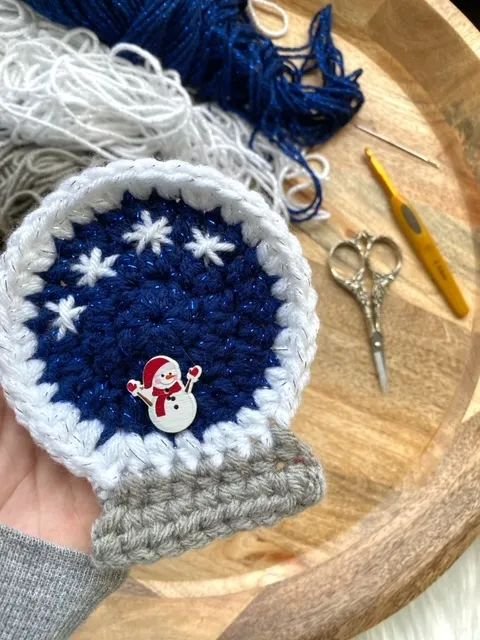
To achieve a smooth, structured shape, choosing yarn with good stitch definition is important. A medium-weight or lightweight yarn usually works best because it helps highlight the details of the miniature winter scene inside your crochet globe. Soft acrylic yarns are especially popular for this type of project.
You will also need a hook size that pairs well with your chosen yarn weight. Adjusting the hook size slightly can help tighten your stitches, giving your snow globe a more defined and polished appearance. A tighter stitch will help your snow globe maintain its round shape.
Safety eyes or small beads are often used if your scene includes characters like snowmen, animals, or tiny people. These little embellishments bring personality and dimension to the final piece. Depending on the design you choose, you might incorporate felt pieces, sequins, or embroidery thread for added detail.
Fiberfill stuffing plays an essential role as well. It helps create the round, globe-like base of the project. Without proper stuffing, the snow globe may collapse or lose its shape. Be sure to use enough, but avoid overpacking to prevent stretching the stitches.
Finally, you may want a plastic ornament cover or transparent material if you want to replicate the glass-globe effect. Some crafters prefer leaving the piece without a clear dome, while others use a half-sphere cover to create a more traditional snow globe appearance.
2. Step-by-Step Instructions for Following the Crochet Snow Globe Pattern – TUTORIAL
The Crochet Snow Globe Pattern – TUTORIAL typically begins with creating the base, which serves as the foundation for the winter scene. This often involves working in rounds using simple stitches such as single crochet. The repetitive nature of the base makes it an excellent warm-up before moving on to more detailed elements.
After finishing the base, the next step is crocheting the miniature pieces that go inside the snow globe. This may include tiny trees, snowmen, houses, or animals. Each piece is usually quick to make, allowing you to build your scene one small detail at a time. These elements are what give the snow globe its charm and personality.
Once the small pieces are ready, they are carefully stitched or glued onto the base. This step requires patience and attention to placement. The arrangement of each mini figure affects the visual balance of the entire snow globe. Using pins before final attachment can help you find the perfect composition.
You then begin forming the upper part of the globe. This part is typically crocheted in rounds and shaped using increases and decreases. The key to achieving the perfect round shape is maintaining even tension. Taking your time ensures a smooth and polished finish that resembles a classic snow globe.
Before closing the globe, you’ll need to add fiberfill stuffing. Distribute the stuffing evenly and gently to avoid bumps or lumps. A well-stuffed globe will hold its shape beautifully, making the finished product look professionally made.
For those who choose to use a transparent dome or ornament cover, the globe’s upper part may be worked separately and then attached. This adds a fun twist to the traditional crocheted version and makes the snow globe appear even more realistic.
3. Tips for Customizing Your Crochet Snow Globe Pattern – TUTORIAL
One of the most exciting aspects of the Crochet Snow Globe Pattern – TUTORIAL is the opportunity to personalize it. You can customize every part of the project, from colors to characters, ensuring your snow globe suits your holiday décor or personal taste.
If you prefer a classic winter scene, traditional blues, whites, greens, and reds work beautifully. For a more whimsical design, consider bright pastels or metallic thread accents. The color palette plays a huge role in the overall mood of the finished snow globe.
Experimenting with different characters can make each snow globe unique. For example, instead of a snowman, you can crochet a tiny elf, a reindeer, or a gingerbread figure. Each variation transforms the globe and makes it more fun and personal.
Texture is another great customization element. Adding embroidered snowflakes, crocheted stars, or tiny beads that resemble falling snow can elevate the design. These small touches add depth and dimension, making your snow globe stand out.
If you’re creating the snow globe as a gift, consider incorporating initials, dates, or special symbols. These little details turn a simple crochet project into a meaningful keepsake that loved ones will treasure for years.
Finally, you can customize how the snow globe is displayed. Some crafters attach a string to turn it into a hanging ornament, while others prefer placing it on a small decorative base. Each choice gives the snow globe a different function and style.
4. Creative Uses for the Crochet Snow Globe Pattern – TUTORIAL
Once completed, the Crochet Snow Globe Pattern – TUTORIAL can be used in many delightful ways. One of the most popular uses is as a Christmas tree ornament. Its compact size and festive design make it a perfect addition to holiday décor.
Another creative idea is to use the snow globe as part of a table centerpiece. Placing several snow globes together creates a magical winter landscape that guests will admire. Each one can represent a different scene or theme, adding charm and variety.
You can also use the snow globe as a gift topper. Attaching it to a wrapped present makes your gift extra special, adding a handmade touch that store-bought decorations simply cannot match.
Some crafters enjoy making snow globes as keepsakes for children. Because the design is soft and safe, it makes a lovely decorative item for a child’s room during the holidays. Kids especially enjoy the tiny characters and scenes inside the globe.
In addition, the snow globe can be used as part of a holiday garland. Combining several globes along a string or ribbon creates a festive, handcrafted decoration that looks stunning on walls, mantels, or doorways.
Lastly, you can sell finished snow globes or patterns if you enjoy crafting for income. Handmade winter decorations are always in demand, and the uniqueness of each snow globe makes them appealing to buyers.
FAQ – Crochet Snow Globe Pattern – TUTORIAL
1. Is the Crochet Snow Globe Pattern – TUTORIAL suitable for beginners?
Yes. Despite the detailed look, most steps use beginner-friendly stitches.
2. How long does it take to complete one snow globe?
Most crafters finish one in a few hours, depending on scene complexity.
3. What yarn works best for this pattern?
Medium-weight acrylic yarn typically gives the best stability and stitch definition.
4. Can I wash the finished snow globe?
Spot cleaning is best to maintain shape and avoid damage to small details.
5. Do I need a transparent dome?
No. The project looks beautiful with or without a clear cover.
6. Can I create my own scene instead of following the tutorial exactly?
Absolutely. The pattern is very customizable, allowing endless creativity.
7. Is fiberfill necessary?
Yes. It helps maintain the round, globe-like shape.
8. Can I sell items made from this pattern?
In most cases, yes—if the original pattern allows it. Always credit the designer.
Conclusion
The Crochet Snow Globe Pattern – TUTORIAL is a fun, festive, and creative project that allows crocheters to express their imagination while making something charming and meaningful.
Throughout this article, you learned about materials, instructions, customization ideas, and the many ways to use and display your snow globe. If you decide to try this pattern, I’d love to hear your honest opinion and any suggestions you may have to improve future tutorials.

