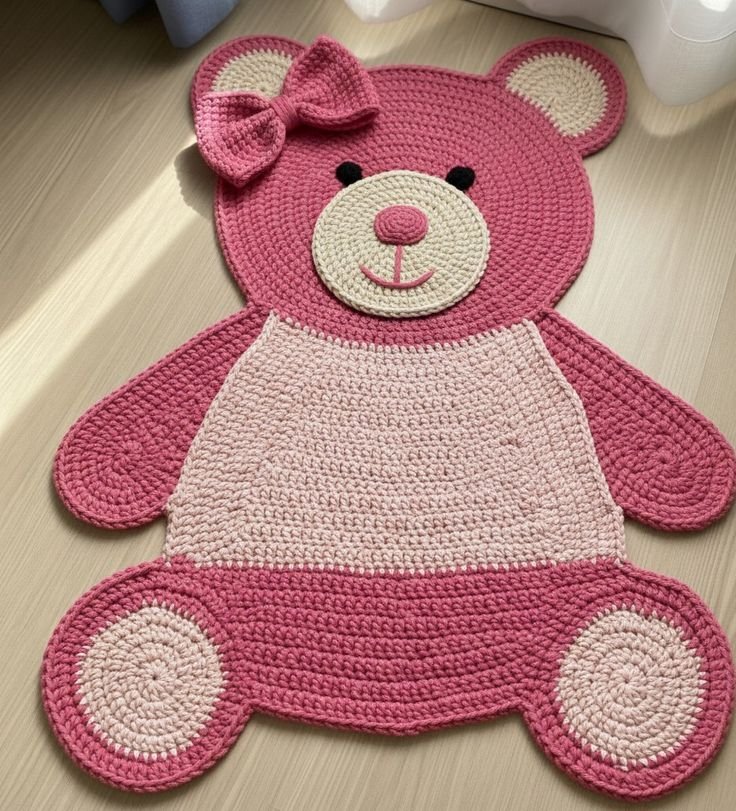
Crocheted Bear Rug – TUTORIAL is a cozy and adorable crochet project that combines comfort with creative design. Learning the Crocheted Bear Rug – TUTORIAL allows you to craft a soft and decorative rug shaped like a bear, perfect for nurseries, children’s rooms, or any cozy corner of your home. This project is both functional and playful, making it a favorite among crochet enthusiasts.
One of the most appealing aspects of the Crocheted Bear Rug – TUTORIAL is its versatility. You can customize the size, colors, and facial features of the bear to suit your personal style or match your home décor. Whether you prefer a realistic look or a cute, cartoon-inspired design, this project offers endless creative possibilities.
In this complete Crocheted Bear Rug – TUTORIAL, you will learn how to choose materials, crochet the main rug base, create the bear’s features, and assemble everything into a beautiful finished piece. This guide is suitable for intermediate crocheters but can also be attempted by beginners who are ready for a fun challenge.
1. Materials Needed for Crocheted Bear Rug
The first step in the Crocheted Bear Rug – TUTORIAL is gathering all the materials required for the project. Proper preparation ensures a smoother and more enjoyable experience.
DISCOVER MORE FREE PATTERNS HERE!
Chunky yarn is highly recommended for this project, as it creates a thick and soft rug.
Cotton yarn can also be used if you prefer a more structured and durable finish.
A large crochet hook is essential when working with thick yarn to maintain even stitches.
You will need scissors and a yarn needle for finishing and assembling the pieces.
Stitch markers can help keep track of rounds, especially when working in large circular shapes.
A non-slip backing material is optional but useful for keeping the rug securely in place.
2. Crocheting the Rug Base
The base is the foundation of the Crocheted Bear Rug – TUTORIAL, and it determines the overall size and shape of the rug.
Start with a magic ring to create the center of the rug.
Work in continuous rounds, increasing stitches evenly to form a large circle or oval.
In the Crocheted Bear Rug – TUTORIAL, maintaining consistent tension is important for a smooth and even surface.
Continue increasing until the base reaches your desired size.
Use simple stitches such as single crochet or half double crochet for a sturdy texture.
Make sure the base lies flat without curling or buckling.
3. Creating the Bear Features
The next step in the Crocheted Bear Rug – TUTORIAL is making the bear’s facial features and details.
Crochet separate pieces for the ears, snout, and optional paws.
The ears are usually small circles that are slightly folded to create dimension.
The snout can be made as a rounded shape and sewn onto the center of the rug.
In the Crocheted Bear Rug – TUTORIAL, facial features can be customized using embroidery or safety eyes.
You can add a nose and mouth using simple stitching techniques.
These elements bring the bear design to life and give it personality.
4. Assembling and Finishing the Rug
The final stage of the Crocheted Bear Rug – TUTORIAL is assembling all parts and adding finishing touches.
Attach the ears and snout securely to the rug base using a yarn needle.
Make sure all pieces are positioned symmetrically for a balanced look.
Weave in all loose ends carefully to prevent unraveling.
In the Crocheted Bear Rug – TUTORIAL, finishing details are essential for durability and appearance.
You can add a border around the rug for extra strength and decoration.
If desired, attach a non-slip backing to make the rug safer for everyday use.
FAQ – Crocheted Bear Rug – TUTORIAL
Is this project suitable for beginners?
The Crocheted Bear Rug – TUTORIAL is better suited for intermediate crocheters, but beginners can try it with patience.
What yarn is best for a rug?
Chunky yarn is ideal because it creates a thick, soft, and durable rug.
How long does it take to complete?
Depending on the size, this project can take several hours to a few days.
Can I customize the design?
Yes, you can change colors, sizes, and facial features to create your own version.
Do I need a non-slip backing?
It is optional but recommended for safety, especially on smooth floors.
Can I wash the rug?
Yes, but follow the yarn care instructions to maintain its quality.
Conclusion
The Crocheted Bear Rug – TUTORIAL is a fun and rewarding crochet project that combines creativity with practicality. It allows you to create a soft and decorative rug that adds warmth and personality to any space.
In this tutorial, you learned how to select materials, crochet the rug base, create the bear’s features, and assemble everything into a finished piece. Each step contributes to a unique and charming result.
Projects like the Crocheted Bear Rug – TUTORIAL highlight how crochet can be used to create both functional and artistic items. This rug is perfect for home décor or as a thoughtful handmade gift.
PATTERN VIDEO:
If you enjoyed this tutorial, feel free to leave your honest opinion and share your suggestions. Your feedback helps inspire more creative crochet ideas and tutorials.

