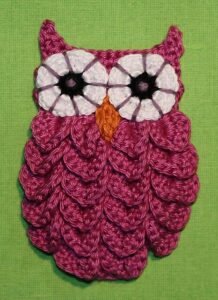
Creating a Crocodile Stitch Owl is a fun and engaging crochet project that combines the intricacy of the crocodile stitch with the whimsical charm of an owl.
This tutorial will guide you through the entire process, from gathering materials to finishing touches, ensuring that even beginners can enjoy making this adorable creature.
With clear instructions and detailed steps, you’ll soon have a delightful crochet owl to showcase or gift to a loved one.

Understanding the Crocodile Stitch
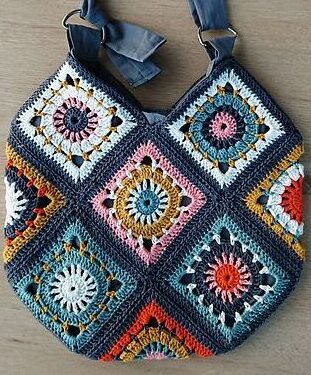
The crocodile stitch is a unique and textured stitch that resembles the scales of a crocodile. It adds a dimensional quality to any crochet project, making it perfect for items like bags, blankets, and, of course, cute owls. This stitch consists of clusters of double crochets, which create a layered effect that is both visually appealing and tactile.
To master the crocodile stitch, you’ll need to be comfortable with basic crochet techniques, including chaining, double crocheting, and slip stitching. Once you get the hang of it, you can use this stitch in various projects beyond the owl, allowing you to expand your crochet patterns repertoire. The crocodile stitch can be adapted for many shapes and sizes, making it a versatile addition to your crochet skills.
In this tutorial, we will walk you through the steps to create a charming crocodile stitch owl, complete with all the necessary details to help you along the way.
Materials Needed
Before you begin your crochet owl project, gather all the necessary materials. Having everything ready will streamline the process and enhance your crochet experience. Here’s a list of what you’ll need:
- Yarn: Choose a medium-weight yarn in various colors for your owl. Typically, you will need a main color for the body, a contrasting color for the wings, and additional colors for the eyes and beak. A worsted weight yarn (size 4) works well for this project.
- Crochet Hook: Use a crochet hook that matches your yarn weight. A size H (5.0 mm) or I (5.5 mm) hook is recommended for worsted weight yarn. The hook size can impact the tightness of your stitches, so choose accordingly.
- Accessories: You’ll also need a yarn needle for weaving in ends, scissors for cutting yarn, and optionally, safety eyes for the owl’s eyes. If you want to give your owl a bit more character, consider adding embellishments like buttons or felt for the wings.
Starting Your Crocodile Stitch Owl
Now that you have your materials ready, it’s time to start crocheting your owl. This process will involve creating the body first, followed by the wings, eyes, and beak. Let’s begin with the body:
- Creating the Base: Start by making a magic ring (or a slip knot) to form the base of your owl. Chain two (ch 2) and then work 12 double crochets (dc) into the ring. Pull the ring tight to close it, and join the round with a slip stitch (sl st) to the first double crochet.
- Increasing the Base: For the second round, you will work two double crochets in each stitch around. This will increase your stitch count to 24. Join with a slip stitch to the first double crochet to complete the round. Be sure to maintain a loose tension to avoid curling.
- Continuing the Body: For the next few rounds, you’ll crochet in a combination of single and double crochets to create the shape of the owl’s body. Follow the pattern closely, ensuring that your stitches remain consistent. Aim for about six to eight rounds, depending on how tall you want your owl to be.
Working the Crocodile Stitch
With the body of your owl complete, it’s time to incorporate the crocodile stitch. This stitch will form the owl’s feathers and give it that distinctive look. Here’s how to do it:
- Forming the Feathers: To start the crocodile stitch, you will create a foundation row on the body. Work a series of double crochets across the row. The number of stitches may vary based on the size of your owl, but aim for about 10-12 double crochets.
- Creating the Crocodile Stitch: For the crocodile stitch, you will work in clusters. Yarn over, insert your hook into the stitch, yarn over again, and pull through (you should have three loops on your hook). Yarn over and pull through the first two loops, then yarn over and pull through the remaining two loops to complete a double crochet. Repeat this process to create a cluster of three double crochets in the same stitch.
- Layering the Stitches: After forming the first cluster, skip the next stitch and work another cluster into the following stitch. Continue this process across the row until you reach the end, creating a series of layered clusters that resemble feathers. Each new cluster will sit on top of the previous one, giving the owl its textured appearance.
Adding Eyes and Beak
Now that your owl has its lovely feathers, it’s time to bring it to life with eyes and a beak. This step is essential for adding personality to your crochet owl:
- Creating the Eyes: Using your chosen color for the eyes, make two small circles. You can use a simple circle pattern, starting with a magic ring and working in single crochet rounds until you achieve the desired size. If using safety eyes, insert them securely into the owl’s head.
- Attaching the Eyes: Once your eye pieces are ready, attach them to the owl’s body. Position them on the head, ensuring they are evenly spaced. You can sew them on with a yarn needle or use fabric glue for added security.
- Making the Beak: For the beak, create a small triangle using your chosen color. You can use the same crochet techniques to make a small piece, typically three to four rows high. Once completed, sew the beak in place, right below the eyes, to give your owl a charming expression.
DISCOVER MORE FREE PATTERNS HERE!
Crafting the Wings
With the face complete, it’s time to create the wings of your owl. The wings will complement the body and add to the overall design. Here’s how to make them:
- Starting the Wings: For each wing, chain six stitches. In the second chain from the hook, work a single crochet, followed by a double crochet in the next chain. In the next two chains, work one double crochet in each.
- Shaping the Wing: In the last chain, create three double crochets to form the tip of the wing. Now, work back down the chain, creating one double crochet in each of the last two chains and a single crochet in the last chain. This creates a rounded wing shape.
- Attaching the Wings: Once you have made two wings, attach them to the sides of the owl’s body. Position them slightly below the head and sew them securely with a yarn needle. Adjust their placement as needed to achieve your desired look.
Finishing Touches
Now that your owl is taking shape, it’s time to add the finishing touches that will make your creation truly special. Here are some ideas to complete your crochet owl:
- Weaving in Ends: Make sure to weave in any loose ends using a yarn needle. This step is crucial for giving your owl a neat appearance. Take the time to tuck in all ends from the body, wings, eyes, and beak.
- Adding Details: Consider adding extra embellishments to your owl. You could use embroidery to add patterns to the wings or embellish the body with small beads or buttons. This personal touch can make your owl truly unique.
- Blocking the Owl: To give your owl a polished finish, you can block it. Lightly dampen the piece and pin it to a flat surface, shaping the wings and body as desired. Let it dry completely before displaying or gifting your new crochet owl.
Displaying Your Crocodile Stitch Owl
Once your crocodile stitch owl is complete, you’ll want to show it off! Here are some creative ways to display your new creation:
- Home Décor: Use your owl as a decorative piece in your home. It can sit on a shelf, be placed in a nursery, or hang from a wall. Consider making a small crochet nest for it to sit in, adding to its charm.
- Gift Giving: A crochet owl makes a lovely handmade gift for friends and family. Wrap it up as a present for a baby shower, birthday, or any special occasion. Handmade items are always cherished, and your owl will be no exception.
- Craft Shows and Sales: If you enjoy crocheting as a hobby, consider making multiple owls for craft shows or local markets. They can attract attention due to their whimsical design and the intricate crocodile stitch. They are sure to delight customers of all ages.
Troubleshooting Common Issues
As with any crochet project, you may encounter challenges along the way. Here are some common issues and how to resolve them:
- Uneven Stitches: If your stitches appear uneven or your owl looks lopsided, check your tension. Consistent tension is key to achieving a uniform look. Practice on scrap yarn if necessary to improve your stitch consistency.
- Curling Edges: If the edges of your owl are curling, it may be due to tight stitches. Consider loosening your tension or using a larger hook size. Blocking the finished piece can also help flatten any curled areas.
- Finishing Details: If you struggle with attaching eyes or wings, take your time and adjust the positioning before securing them. Use pins to hold pieces in place while you decide on the final look, ensuring everything
Conclusion
The Crocodile Stitch Owl is a delightful crochet project that combines skill, creativity, and charm. By following this tutorial, you’ve learned how to create a whimsical owl using the intricate crocodile stitch. From the body to the wings, eyes, and beak, each step adds character and personality to your finished piece.
As you continue your crochet journey, feel free to experiment with different colors, sizes, and embellishments. The skills you’ve gained through this project will serve you well in future crochet patterns. Whether you choose to display your owl or gift it to someone special, your handcrafted creation is sure to bring joy and warmth to any space. Happy crocheting!


