If you’re looking for an adorable and practical crochet project, the Cute Kitty Bag Crochet – TUTORIAL is just what you need. This charming accessory combines the love for cats with the joy of handmade crafts. Whether for a child’s accessory, a fun handbag, or a sweet gift, this kitty-shaped bag brings a smile to everyone who sees it.
The Cute Kitty Bag Crochet pattern is ideal for beginners and advanced crafters alike. It offers a simple structure, creative possibilities, and a great opportunity to play with colors and textures. You don’t need advanced skills to make something that looks delightful and unique.
In this tutorial, we’ll walk you through everything: from materials and stitches to step-by-step instructions and creative finishing touches. So grab your hook and yarn—it’s time to create your own purr-fect kitty bag!
1. Why the Cute Kitty Bag Is the Perfect Crochet Project
The Cute Kitty Bag Crochet – TUTORIAL is more than just a pattern—it’s an invitation to have fun while making something functional and irresistibly cute.
DISCOVER MORE FREE PATTERNS HERE!
First, it’s an excellent starter project. The bag’s construction is straightforward, typically made of two crocheted circles or rectangles stitched together. You’ll mainly use basic stitches like single crochet, double crochet, and slip stitch.
Second, it’s a project that sparks creativity. You can choose your favorite yarn colors to personalize your kitty. Add bows, whiskers, eyes, or even tiny paws. Each bag can be completely different, depending on the maker’s vision.
Third, it’s perfect for gifts. A handmade kitty bag makes a fantastic present for kids, cat lovers, or anyone who enjoys playful fashion. Add a lining, zipper, or drawstring to make it even more functional.
Another benefit is that the bag is small and quick to complete. It’s a satisfying project that doesn’t require weeks of commitment. You can easily make one in a weekend or even an afternoon if you’re experienced.
Lastly, it’s environmentally friendly. Handmade reusable bags reduce plastic use, and you can even upcycle leftover yarn from previous projects.
The Cute Kitty Bag Crochet – TUTORIAL gives you the freedom to mix cuteness with creativity while making something useful and heartfelt.
2. Materials and Tools for Your Kitty Crochet Bag
Before starting the Cute Kitty Bag Crochet – TUTORIAL, gather your supplies and plan out your kitty’s features. You won’t need a lot of materials, which makes this a great low-cost project.
Basic Materials:
-
Worsted weight yarn (2–3 colors: base, ears, accents)
-
Crochet hook (size 4mm–5mm, depending on your yarn)
-
Tapestry needle for sewing and weaving ends
-
Scissors
-
Stitch markers (optional)
Optional Materials:
-
Safety eyes or buttons for eyes
-
Embroidery floss or black yarn for facial details
-
Small bow, ribbon, or charm
-
Lining fabric (for a more durable inside)
-
Zipper or drawstring
-
Keychain clip (if making a mini bag or pouch)
Yarn recommendations:
Choose soft, durable yarns like cotton or acrylic. Cotton gives a neat, firm look, while acrylic offers a soft, stretchy feel. You can even use faux fur or velvet yarn for a fuzzy kitty effect.
Color ideas:
-
Classic kitty: gray or white with pink accents
-
Cartoon-inspired: bright pastel or rainbow colors
-
Realistic tones: black, brown, or cream with contrasting facial features
Once your materials are ready, it’s time to begin crocheting the base of your bag!
3. How to Crochet the Cute Kitty Bag Step-by-Step
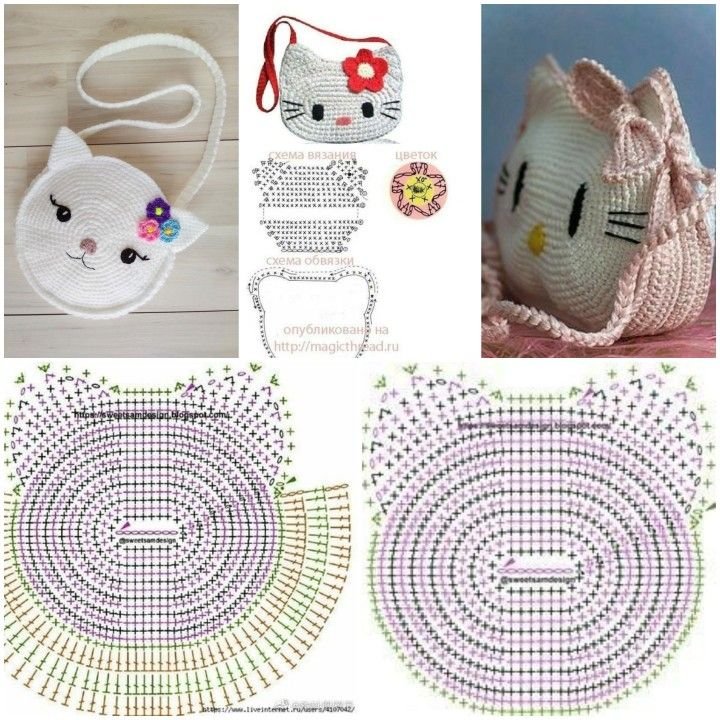
The Cute Kitty Bag Crochet – TUTORIAL typically uses basic shapes and stitches, making it accessible even if you’re new to crochet. Below is a simple method using a circular base.
Step 1: Crochet the bag’s front and back
-
Start with a magic ring.
-
Round 1: Chain 2, make 12 double crochet (dc) into the ring. Join with slip stitch.
-
Round 2: Chain 2, 2 dc in each stitch around (24).
-
Round 3: (1 dc, 2 dc in next) repeat around. Continue increasing evenly until your circle reaches your desired diameter (e.g., 6–8 inches for a child-sized bag).
Step 2: Make the ears
-
On the top of the front piece, mark where you want the ears to be.
-
Attach yarn and make small triangles with single crochet rows.
-
Chain 1, work decreasing rows of single crochet to shape ears.
Step 3: Create the kitty’s face
-
Sew on safety eyes or crochet small circles for eyes.
-
Embroider a nose, mouth, and whiskers using black yarn or floss.
-
Add a bow or embellishment between the ears.
Step 4: Join the two sides
-
Place front and back circles together, wrong sides facing in.
-
Single crochet around the edge to join, leaving a gap at the top.
-
If desired, insert lining or a small zipper before joining completely.
Step 5: Add strap or handle
-
Chain a strap of desired length or crochet an i-cord.
-
Attach it securely to each side of the opening.
-
You can also use a ribbon, chain strap, or fabric belt for variety.
Bonus Step: Personalize!
-
Add a tail, initials, or a tag.
-
Make matching accessories like a coin pouch or pencil case.
This method gives you a basic kitty bag that’s adorable and functional—and totally one-of-a-kind!
4. Creative Ways to Use and Gift the Cute Kitty Crochet Bag
One of the highlights of the Cute Kitty Bag Crochet – TUTORIAL is its flexibility in size and purpose. You can tailor this project for many different uses or occasions.
Mini crossbody bag
Perfect for kids or a playful accessory for adults. Add a snap or zipper closure and wear it on the go.
Coin purse or pouch
Make a smaller version with a drawstring. Use it to store earbuds, cash, or small treasures.
Gift bag alternative
Crochet a kitty bag instead of using wrapping paper. Fill it with treats, cosmetics, or toys. The bag becomes part of the gift!
Decorative wall hanging
Turn the front of the kitty bag into a decorative piece. Hang it on a child’s room wall with added flowers or name embroidery.
Party favor
Make mini versions and fill them with candies or trinkets. Perfect for birthdays or themed parties.
Craft fair item or donation
These bags sell well at markets and fairs. They’re also great donations for children’s charities or hospital gift drives.
No matter how you use it, this bag is sure to spread smiles. And each one you make becomes its own little piece of art.
FAQ – Cute Kitty Bag Crochet – TUTORIAL
Is this pattern suitable for beginners?
Yes! The pattern mainly uses basic stitches like single and double crochet. It’s a great learning project for new crocheters.
How long does it take to make the kitty bag?
Depending on your skill level, the bag can be completed in 2–4 hours. Adding details or lining may take longer.
Can I make it in different sizes?
Absolutely. Just crochet more rounds to enlarge the bag, or fewer for a mini version. Adjust the strap accordingly.
What’s the best yarn to use?
Cotton is ideal for structure, while acrylic is soft and colorful. Choose based on your desired texture and use.
Do I need to line the bag?
It’s optional but helpful if you want the bag to be more durable or hold small items securely. A simple fabric lining works great.
How can I wash the kitty bag?
Use gentle handwashing, especially if it has safety eyes or embroidery. Let it air dry flat to maintain shape.
Conclusion
The Cute Kitty Bag Crochet – TUTORIAL is a delightful project that blends creativity, functionality, and charm. It’s simple enough for beginners, yet flexible enough for seasoned crafters to personalize and expand. Whether you’re gifting it, using it daily, or making it for a craft fair, this little kitty bag is guaranteed to bring smiles.
We hope this tutorial has inspired you to grab your yarn and hook and bring your own kitty creation to life. If you’ve made this pattern, we’d love to hear from you! Share your thoughts, tips, or photos in the comments and let us know how your kitty bag turned out. Your creativity can inspire others too! 🧶🐱👜

