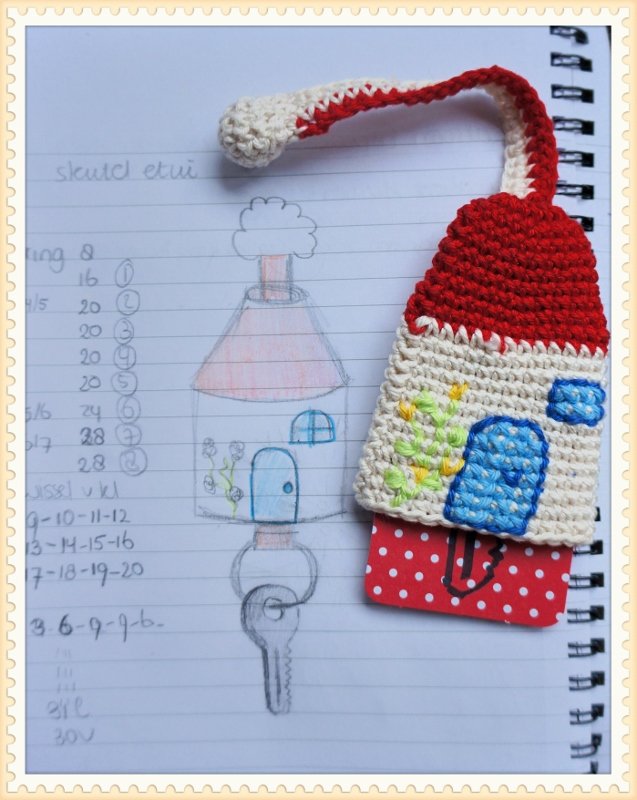
If you’re looking for a quick and practical project that’s as stylish as it is functional, this Easy and Beautiful Key Case crochet tutorial is exactly what you need. Whether you’re a beginner or an experienced crocheter, making a crochet key case is a fun way to create a charming accessory while keeping your keys safe and easy to find. In this article, you’ll learn step-by-step how to create your own key case using simple stitches and creative embellishments.
Crochet key cases are perfect for personal use, thoughtful gifts, or even selling at craft fairs. These small yet mighty accessories can be customized with colors, patterns, and appliqués to match any personality or season. They help prevent keys from scratching the inside of your bag and add a handmade touch to everyday life.
By following this easy and beautiful key case crochet tutorial, you’ll gain a new go-to project that’s useful, quick to finish, and rewarding to make. Let’s explore the best materials, techniques, and ideas to inspire your own handmade key case.
1. Choosing the Right Materials
The first step in your crochet journey is picking the perfect yarn and hook size. For an easy and beautiful key case, it’s important to use a durable yarn that can withstand frequent handling and daily use. Cotton yarn is the top choice because it’s strong, holds its shape, and has a neat finish.
DISCOVER MORE FREE PATTERNS HERE!
You’ll also want a crochet hook that suits the thickness of your yarn—typically, a 3.5 mm to 4.5 mm hook works well with worsted weight or DK yarns. The right hook will make your stitches even and your project more enjoyable.
Next, gather your notions. You’ll need a key ring, a button or snap for closure, and perhaps a small piece of felt for lining, depending on the design. Decorative items like appliqués, embroidery floss, or beads can be added for extra flair.
Having your materials ready before you begin ensures a smoother crafting process. A yarn needle, scissors, and stitch markers will also be helpful as you go.
Consider choosing colors that reflect your personal style or the theme of the key case. For example, soft pastels for spring, vibrant hues for summer, or classic neutrals for everyday use.
If you’re making several key cases as gifts or products, organizing your materials in advance helps with faster and more efficient batch crafting.
2. Basic Pattern and Stitch Guide
This easy and beautiful key case uses beginner-friendly stitches that still look polished and professional. The main body of the case is typically worked in single crochet or half-double crochet for a tight, sturdy fabric.
To start, you’ll chain a foundation row that matches the width of your finished case. Then, you’ll work back and forth in rows to build up the rectangle that will be folded and sewn into shape.
Simple increases or decreases can be used to taper the flap or add shaping. Don’t worry if you’re new to shaping—this pattern keeps it minimal and manageable.
Once the main rectangle is finished, fold it into a pouch shape and seam the sides using a whip stitch or slip stitch. Attach your closure at the top center of the flap.
To finish, sew in the ends neatly and attach the key ring securely. Your crochet key case is now complete and ready to use or gift!
Optional edging, like picot or crab stitch, can be added to give a more decorative look. This is a great way to elevate the design without adding complexity.
3. Design Variations and Personalization
One of the best things about this crochet key case tutorial is how customizable the project is. With just a few tweaks, you can make each case unique.
Try using a two-color design with stripes or color blocks. Variegated yarns can also add beautiful patterns effortlessly. Use leftover yarn scraps to create a patchwork-style case for a sustainable option.
Adding appliqués—like flowers, hearts, stars, or initials—makes your key case truly personal. These small details show off your creativity and give your work a signature touch.
Another way to personalize your key case is by changing the shape. Instead of a rectangle, you can round the corners, create a flap with a point, or add a drawstring closure instead of a button.
For a more playful design, consider turning the key case into an animal or character. Add eyes, ears, or a smile for a fun twist—perfect for kids or playful adults.
You can also add utility by including a pocket or card slot inside the case, making it a mini-wallet for quick errands. Experiment and have fun while learning new techniques.
4. Tips for Beginners and Common Mistakes
If you’re new to crocheting, this easy and beautiful key case is an ideal project to start with. The size is manageable, the stitches are simple, and the final result is useful and satisfying.
Make sure to keep your tension consistent throughout the project. Uneven tension can cause the case to warp or stretch awkwardly. Practicing on a swatch can help you get comfortable.
Don’t skip the blocking step, even for small projects. Light blocking helps the case hold its shape better and gives it a clean, finished look.
When adding the button or snap, take extra care to measure and center it correctly. This small detail can greatly affect the usability and appearance of the finished case.
Always weave in ends securely. Since the key case will be handled often, loose ends can come undone easily. Use a yarn needle to tuck them in firmly along the stitches.
And finally, be patient with yourself! If it doesn’t look perfect the first time, don’t worry. Every project is an opportunity to learn and improve your skills.
FAQ – Easy and Beautiful Key Case Crochet Tutorial
What yarn is best for a crochet key case?
Cotton yarn is ideal because it’s durable, maintains shape well, and provides a clean finish. It also resists pilling and wear from frequent handling.
Can beginners make this project?
Yes! This pattern is beginner-friendly and only uses basic stitches. It’s a great project to build confidence while creating something useful.
How long does it take to complete one key case?
Most crocheters can complete a single case in about 1 to 2 hours, making it a quick project perfect for gifting or selling at markets.
Can I wash my crochet key case?
Absolutely. If you use cotton yarn, the key case can be hand-washed or gently machine-washed. Avoid hot water or harsh detergents to keep it looking new.
What closure should I use?
Buttons and snaps are the most popular. Choose one that complements your design and is secure enough to keep your keys in place.
Can I sell key cases made from this pattern?
Yes, handmade key cases are popular items at craft fairs and online shops. Just be sure to credit any designer if you use their exact pattern.
Conclusion
Creating your own Easy and Beautiful Key Case through crochet is a wonderful way to blend creativity and practicality. In this tutorial, we explored the best materials, step-by-step construction, ways to personalize your design, and tips for avoiding common mistakes. It’s a perfect project for beginners and seasoned crafters alike.
We hope this guide inspires you to try your hand at making a unique and functional key case. If you enjoyed this tutorial, please leave a comment with your thoughts, experiences, or suggestions. We’d love to hear how your key case turned out and what you’d like to see next! 🧶✨

