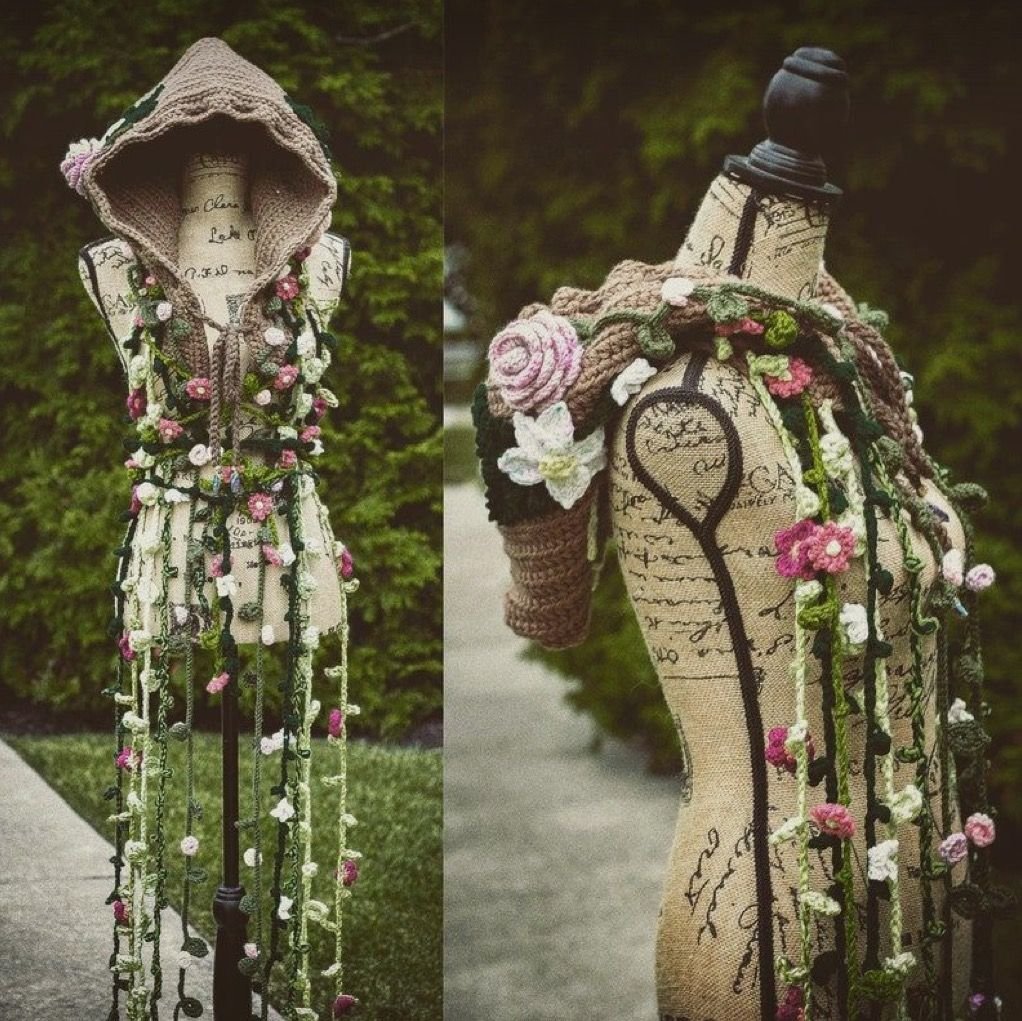
If you love cozy crochet projects with a touch of nature’s charm, this Flower Garden Hood – Pattern is the perfect creation for you. Designed to keep you warm while adding a whimsical floral flair to your outfit, this crochet hood combines comfort, creativity, and timeless beauty. Whether you’re an experienced crocheter or a beginner ready to take on something new, this Flower Garden Hood – Pattern will walk you through each step to help you craft a stunning accessory that feels as beautiful as it looks.
This project is especially appealing because it brings together two favorite crochet themes — florals and functionality. With its garden-inspired design and colorful blooms, this hood transforms an ordinary winter piece into a true work of art. The Flower Garden Hood – Pattern allows you to play with colors, yarn textures, and flower shapes to make your version uniquely yours. It’s a joyful project that celebrates both creativity and warmth.
Perfect for chilly days, festivals, or simply adding a handmade touch to your wardrobe, this Flower Garden Hood – Pattern will quickly become one of your most loved crochet pieces. By the time you finish, you’ll not only have a cozy, stylish hood but also a deeper appreciation for the art of crochet and how it connects imagination with craftsmanship.
1. Choosing Materials and Colors
Before you begin your Flower Garden Hood – Pattern, it’s essential to gather the right materials. The beauty of this design lies in its use of vibrant yarns and varied textures, so choose your supplies carefully for the best results.
DISCOVER MORE FREE PATTERNS HERE!
You’ll need medium-weight yarn (worsted weight) in several colors: one or two for the base of the hood and several bright shades for the flowers and leaves. Acrylic or wool blends work beautifully, providing both warmth and durability. Soft yarn ensures the hood feels comfortable against your skin.
For this project, you’ll also need a crochet hook that matches your yarn’s thickness — usually a 5mm (H/8) hook works well. You’ll also need scissors, a yarn needle for sewing the flowers, and stitch markers to help you keep track of your work.
Choosing colors is where your creativity truly shines. You can go with traditional flower shades like pink, yellow, and lavender, or try a bold mix of deep reds and blues for a dramatic garden effect. The Flower Garden Hood – Pattern is all about personal expression through color.
It’s also helpful to have a few small buttons or ties if you want to add a fastening option to your hood. These details not only make your hood practical but also add a polished touch to your finished piece.
Lastly, make sure to test your gauge with a small swatch. Consistent tension ensures that your hood fits comfortably without being too tight or loose. Taking a few minutes to check this step will save you time later.
2. Crocheting the Hood Base
Now that you’ve chosen your materials, it’s time to start the base of your Flower Garden Hood – Pattern. The hood is worked as a simple rectangle that’s later folded and stitched to form its shape. This makes it an accessible pattern even for beginners.
Begin by creating a foundation chain long enough to cover the back of your head and part of your neck. For an average adult size, a chain of about 60–70 stitches is a good starting point, but you can adjust according to your measurements.
Work in half double crochet (hdc) or double crochet (dc) stitches across each row to create a soft and flexible texture. Continue crocheting rows until the piece measures the desired depth from forehead to back. The result should resemble a wide scarf.
Once you’ve reached the right size, fold the piece in half and sew or slip stitch along the top edge to form the hood shape. Leave the front open — this will frame your face beautifully when worn.
You can also add a border around the hood using single crochet stitches in a contrasting color to give it a clean, defined edge. This small detail enhances the look and adds stability to the fabric.
At this stage, your hood is functional but still plain — now comes the fun part! The next section of the Flower Garden Hood – Pattern focuses on decorating it with an array of crocheted flowers and leaves that bring the “garden” to life.
3. Creating and Attaching the Flowers
The floral embellishments are what make the Flower Garden Hood – Pattern truly special. These crochet flowers transform a simple hood into a wearable bouquet of creativity. You can mix and match flower types, sizes, and colors for a natural, blooming effect.
Start by crocheting individual flowers. A basic flower pattern usually begins with a magic ring, then a round of single crochets followed by petals made from chains and double crochets. Varying the number of petals and colors keeps your design lively and organic.
For leaves, crochet small green shapes using chains and slip stitches. They don’t have to be identical — nature isn’t perfect, and this adds charm to your piece. You can also make vines or small stems to weave between flowers for extra detail.
Once your flowers and leaves are ready, arrange them along the edges and sides of your hood. Lay them out first to visualize your design before sewing them on permanently. You can cluster them at the sides or scatter them throughout for a full garden effect.
Use your yarn needle to carefully stitch each flower and leaf in place. Be sure to secure them tightly so they stay put with wear and washing.
If you want to add dimension, layer smaller flowers on top of larger ones or attach small beads or buttons to the centers. These finishing touches make your Flower Garden Hood – Pattern stand out and reflect your personal style.
4. Adding Details and Personal Touches
To complete your Flower Garden Hood – Pattern, it’s time to add the final decorative and functional elements that will make your piece uniquely yours.
One popular option is to crochet a tie or drawstring along the neckline of the hood. This helps keep it snug around your face during colder weather. You can make the ties from simple chains or braided yarn strands finished with tassels or pom-poms.
Consider edging your hood with a scalloped or picot border to enhance its feminine and floral theme. A delicate border ties the design together beautifully.
If you’d like your hood to have a vintage touch, try sewing small lace or fabric details inside the hood or around the edges. These delicate accents create a stunning blend of textures that elevate the design.
Another creative idea is to line the inside of your hood with soft fleece or lightweight fabric for added warmth. This works especially well if you live in a colder climate and want a cozier finish.
Don’t forget to block your hood once it’s done. Gently steam or wet block it to even out the stitches and help the flowers lay flat. This final step gives your crochet work a professional look.
When finished, you’ll have a one-of-a-kind hood that feels like a piece of wearable art — a true celebration of crochet craftsmanship and creativity through the Flower Garden Hood – Pattern.
FAQ
1. What skill level is needed for the Flower Garden Hood – Pattern?
This pattern is beginner-friendly. The stitches are simple, and the assembly process is easy to follow.
2. How long does it take to make the hood?
Depending on your crochet speed, it can take anywhere from a few evenings to a weekend to complete.
3. Can I use chunky yarn instead of medium weight?
Yes, but keep in mind that chunky yarn will make the hood heavier and warmer. Adjust your hook size accordingly.
4. How do I wash my Flower Garden Hood?
Hand wash gently in cool water with mild soap, then lay flat to dry to keep the flowers and shape intact.
5. Can I make this for a child?
Absolutely! Just reduce the number of stitches and rows to create a smaller version that fits perfectly.
6. Can I sell hoods made from this pattern?
Yes, as long as you credit the Flower Garden Hood – Pattern source, selling your handmade creations is encouraged.
Conclusion
The Flower Garden Hood – Pattern is more than just a crochet project — it’s a creative journey that combines warmth, artistry, and personal style. Through this tutorial, you learned how to crochet the hood base, make and attach flowers, and add beautiful finishing touches.
The result is a handmade masterpiece that’s as practical as it is enchanting. If you enjoyed this project, please share your honest opinion and suggestions below — your feedback helps inspire even more beautiful crochet creations for the community!

