Starting a project with the Granny Square Crochet Tutorial for Beginners is the perfect way to dive into the world of crochet. The granny square is one of the most iconic and beloved crochet patterns ever created. Its simple yet beautiful design allows beginners to practice basic stitches while creating something colorful and functional. From blankets and scarves to bags and clothing, the possibilities with granny squares are endless.
This Granny Square Crochet Tutorial for Beginners introduces a timeless pattern that is easy to learn, quick to complete, and endlessly customizable. Many crocheters begin their journey with the granny square because it teaches essential techniques like working in the round, changing colors, and joining motifs. With just a hook, some yarn, and patience, anyone can make their first granny square and soon be creating beautiful crochet projects.
Whether you want to make a classic multicolored blanket or modern minimalist designs, this Granny Square Crochet Tutorial for Beginners will guide you step by step. It focuses on the basic granny square pattern, offering helpful tips for choosing yarn, mastering the stitches, and joining your squares together. Let’s begin your crochet journey with one of the most rewarding and relaxing crafts around.
1. Materials and Tools You Need
Before starting your Granny Square Crochet Tutorial for Beginners, it’s essential to have the right materials. The good news is that granny squares don’t require special tools or expensive supplies. You only need a crochet hook, yarn, scissors, and a yarn needle for weaving in ends. These basic items are enough to get started and enjoy crocheting.
DISCOVER MORE FREE PATTERNS HERE!
Choosing the right yarn is important for beginners. Medium-weight acrylic or cotton yarn works best because it’s easy to handle and provides consistent stitches. Light-colored yarns are ideal when learning because they make it easier to see your stitches. As you gain experience, you can experiment with textured or multicolored yarns for creative results.
The crochet hook size depends on your yarn’s weight. For medium yarn, a 5mm (H-8) hook is a good starting point. Beginners should choose an ergonomic hook if possible—it makes crocheting more comfortable and helps prevent hand fatigue during longer sessions.
You’ll also need scissors to cut yarn and a yarn needle for finishing. Stitch markers are optional but useful for marking the start of each round, especially if you’re new to crocheting in circles. Keeping your tools organized in a small pouch or basket will make the process smoother.
A comfortable workspace with good lighting is another helpful tip. Crocheting requires concentration, and seeing your stitches clearly makes the experience much more enjoyable. Once everything is ready, it’s time to learn the basic stitches used in the granny square.
Having a few different yarn colors is also a fun idea for your Granny Square Crochet Tutorial for Beginners. Granny squares are known for their bright and cheerful color combinations, so don’t be afraid to mix shades and experiment with your creativity.
2. Learning the Basic Crochet Stitches
The Granny Square Crochet Tutorial for Beginners uses simple stitches that form the foundation of many crochet patterns. The main stitches you’ll need to know are the chain stitch, slip stitch, and double crochet stitch. Once you master these, you’ll be able to create the classic granny square with ease.
Start with a slip knot on your hook. This is the first step of nearly every crochet project. Next, make a series of chain stitches—these are loops pulled through each other that form the foundation chain. For a traditional granny square, you’ll make four chain stitches and join them into a small ring with a slip stitch.
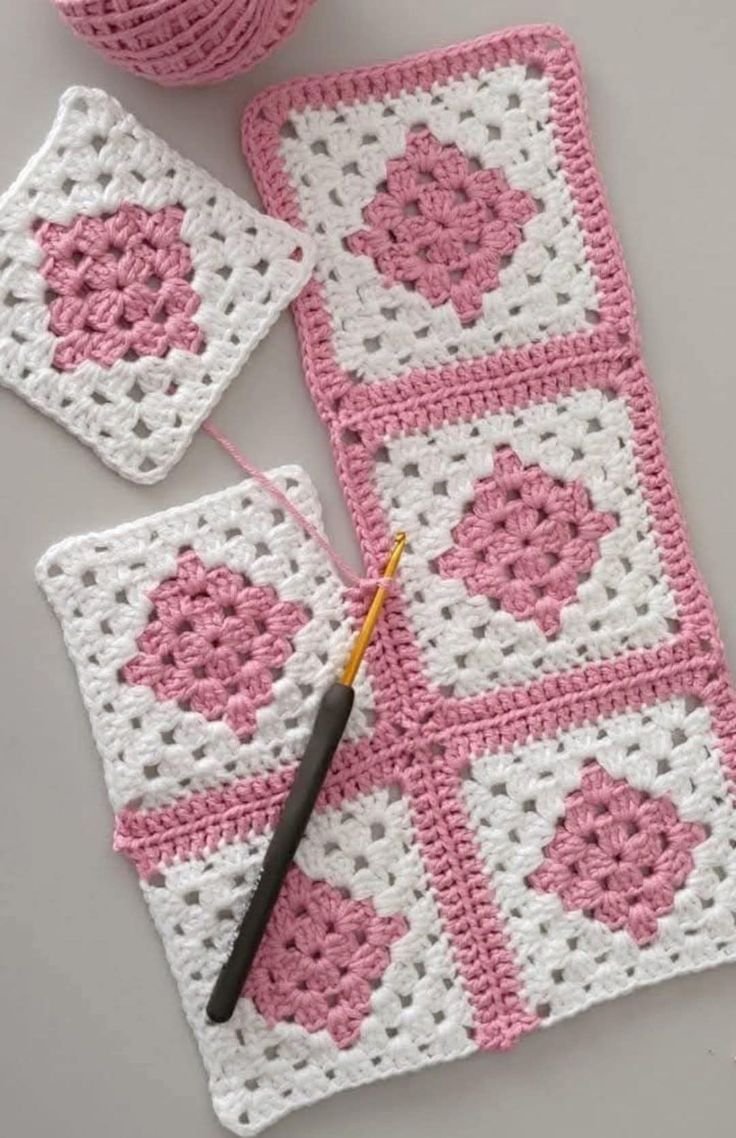
From this ring, you’ll work in rounds. The first round typically begins with three chain stitches (which count as your first double crochet), followed by two double crochets, then a chain space. You’ll repeat this pattern to form the four corners of your square. The result will look like a small flower or wheel when finished.
Once you’ve completed the first round, you’ll start building outward. Each new round adds more groups of double crochets separated by chain spaces. Corners are formed by working multiple double crochets and chains in the same space. This is what gives the granny square its distinct geometric pattern.
Changing colors is one of the most enjoyable parts of the Granny Square Crochet Tutorial for Beginners. At the end of a round, cut your yarn, tie on a new color, and start the next round in one of the corner spaces. This technique allows you to create colorful designs without complicated patterns.
If you’re new to crocheting, don’t worry about perfection. Even if your stitches are uneven at first, practice will quickly improve your consistency. The granny square is very forgiving, making it the perfect learning project for beginners.
3. Assembling and Joining Granny Squares
After you’ve made a few squares using this Granny Square Crochet Tutorial for Beginners, you’ll probably want to connect them into a larger project. Joining granny squares is simple and can be done in several ways, depending on your preference and skill level.
The easiest method is sewing the squares together with a yarn needle. Lay your squares flat and align their edges. Use the whip stitch or mattress stitch to join them neatly. This technique creates a nearly invisible seam and keeps the squares flat.
Another popular method is crocheting the squares together. With the right sides facing up, use slip stitches or single crochet along the edges to connect them. This creates a decorative ridge between squares and adds texture to your project. Many crocheters love this look for blankets and scarves.
If you want to add a border, it’s best to do so after joining all your squares. A simple single crochet or scalloped edge adds a finished, professional touch. Borders not only enhance appearance but also help keep your work flat and prevent curling.
Assembling granny squares allows you to create endless designs. You can arrange them randomly for a patchwork look or plan color schemes for a modern aesthetic. This is where creativity truly shines—each arrangement gives your crochet project a unique identity.
Keep in mind that blocking your granny squares before joining can improve the overall appearance. Lightly wet the squares, shape them into perfect squares, and let them dry flat. This step helps align the stitches and gives your finished project a polished look.
Once your granny squares are assembled, you’ll have a beautiful handmade creation that can be used as a blanket, cushion cover, or decorative throw. The possibilities are only limited by your imagination.
4. Creative Ideas and Tips for Beginners
The Granny Square Crochet Tutorial for Beginners opens the door to endless creative opportunities. Once you’re comfortable making basic squares, you can explore variations in patterns, colors, and textures. Crocheters love this flexibility—it’s what keeps the granny square timeless.
You can create larger projects like afghans, bedspreads, or ponchos simply by joining more squares together. Small projects, such as coasters or potholders, are perfect for practicing and using leftover yarn. Each piece you make builds your confidence and skill.
Experimenting with colors is one of the most enjoyable parts of granny square crochet. Try using three or more colors in each square for a vibrant, retro look. Or stick with neutral tones for a minimalist, modern style. Changing yarn colors in each round creates beautiful contrasts.
Another tip is to mix yarn textures. Combining cotton with soft acrylic or wool blends adds depth to your project. Just be sure to check that all yarns have similar thickness so your stitches remain even.
For beginners, joining a crochet community online can be helpful. Watching tutorials, sharing photos, and asking questions can make learning faster and more enjoyable. Crochet is not just a hobby—it’s a creative and social experience that connects people worldwide.
Finally, remember that practice is the key to improvement. Every granny square you make brings you closer to mastering the art of crochet. Over time, you’ll develop your own techniques and preferences, making each project uniquely yours.
FAQ about Granny Square Crochet Tutorial for Beginners
1. Is the granny square suitable for complete beginners?
Yes, the Granny Square Crochet Tutorial for Beginners is ideal for anyone just starting. It teaches basic stitches and techniques in a simple, repetitive way.
2. What type of yarn is best for granny squares?
Medium-weight acrylic or cotton yarn is perfect for beginners. It’s easy to work with and comes in many colors.
3. How long does it take to make one granny square?
A small granny square can take 20–40 minutes, depending on your speed and stitch tightness.
4. Can I make a blanket using only granny squares?
Absolutely! Granny squares are perfect for making blankets, throws, and bedspreads by joining multiple squares together.
5. How do I prevent my granny square from curling?
Make sure your tension is consistent and block your squares after finishing. This helps them stay flat.
6. What’s the easiest way to join granny squares?
Beginners often prefer sewing with a yarn needle, but crocheting them together with slip stitches also works beautifully.
Conclusion
In this Granny Square Crochet Tutorial for Beginners, we explored everything from materials and stitches to assembly and creative ideas. The granny square is a timeless pattern that allows you to practice essential crochet techniques while creating colorful and useful projects.
PATTERN VIDEO:
Whether you make a cozy blanket or a simple coaster, every square reflects your creativity and effort. I’d love to hear your opinion and suggestions—share your experiences and let me know how your granny squares turned out!

