The Happy and Cad Clown Patch is a unique and exciting addition to any collection of patches, whether for jackets, backpacks, or other personal items. In this tutorial, we will guide you step by step through the process of creating and customizing your very own Happy and Cad Clown Patch. This detailed guide is designed to ensure that you not only learn the techniques but also understand the significance of each element in the creation process. Whether you’re a seasoned enthusiast or a beginner in patch-making, this tutorial will help you produce a professional-looking patch.
Patches are a fun and creative way to express your personality or interests, and the Happy and Cad Clown Patch is one that stands out for its colorful design and bold appeal. By following this tutorial, you’ll learn how to properly design, assemble, and attach your patch, making it a memorable addition to your collection. We will also discuss some of the materials needed, tips on design, and how to best showcase your final product.
As you move through the steps, you’ll gain a deeper understanding of how each piece of the patch fits together, both creatively and technically. The Happy and Cad Clown Patch is not just an accessory; it’s a way to express individuality and craftsmanship. Let’s dive into the world of patch-making, where your creativity can truly shine.
1. Materials Needed for the Happy and Cad Clown Patch
To begin making your Happy and Cad Clown Patch, you’ll need a few essential materials. The quality of your patch depends significantly on the tools and materials you use, so make sure you gather the right items before starting.
DISCOVER MORE FREE PATTERNS HERE!
Firstly, you’ll need a patch base, which can be a piece of fabric like cotton, denim, or even felt. This will be the foundation upon which you create the design of the Happy and Cad Clown Patch. You can purchase pre-made patch bases or cut your own to the desired size.
Next, gather your embroidery threads. The design of the Happy and Cad Clown Patch typically features bold, colorful designs, so having a variety of vibrant threads in different colors is key. Make sure you choose high-quality threads that will withstand wear and tear.
You will also need needles specifically designed for embroidery work. The size of the needle should match the type of thread you are using. For example, if you’re using thick threads, a larger needle might be necessary.
A scissors set for precise cutting, pins to hold the fabric in place, and a fabric marker to sketch out the design are all essential for creating a clean, professional-looking patch.
Finally, having an iron and fusible webbing can help you attach the patch to clothing once it’s finished. The fusible webbing ensures that the patch stays secure without the need for sewing.
2. Designing Your Happy and Cad Clown Patch
Designing a patch is a crucial step in creating a piece that reflects your personal style. The Happy and Cad Clown Patch design will require you to consider several elements, such as color choices, patch size, and the overall aesthetic. You can either sketch out your design by hand or use a computer program to create it.
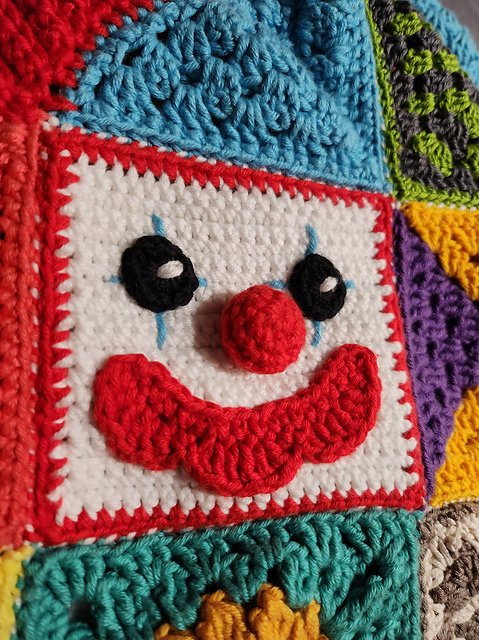
One important aspect of the Happy and Cad Clown Patch design is the balance between the clown elements and the surrounding details. This patch often includes a smiling clown face, perhaps with exaggerated features like a large nose or brightly colored hair, all of which contribute to the “happy” aspect of the design. Additionally, there might be elements such as balloons, confetti, or stars surrounding the clown to add extra flair.
The cad in the name might refer to a specific style or character that adds a sense of playfulness or even a slightly quirky or mischievous tone to the design. Don’t be afraid to mix playful elements with more serious ones to create contrast and interest in the design.
Once you’ve decided on your design concept, sketch it lightly onto your patch base using a fabric marker. Make sure to leave enough space around the edges to prevent overcrowding the patch. You can always adjust the design as you go.
If you’re unsure about your design, it’s a good idea to experiment with different shapes, sizes, and colors until you feel satisfied with the result. Remember, the goal is to create a patch that captures attention but also stays true to the theme of the Happy and Cad Clown Patch.
3. Embroidering Your Happy and Cad Clown Patch
Once you’ve settled on the design, it’s time to start embroidering your Happy and Cad Clown Patch. Start by threading your needle with your chosen embroidery thread. A basic backstitch is often the easiest stitch to use for outlining your design, but you can also experiment with other stitches like satin stitch or French knots to add texture and dimension to your patch.
Begin by carefully stitching along the outlines of your design. This will serve as the framework for your patch. Use small, even stitches to ensure that the lines are smooth and consistent. Pay attention to the tension of the thread; if it’s too tight, it may cause the fabric to pucker, while too loose can lead to a sloppy appearance.
Once the outlines are complete, fill in the larger areas of the patch with different colored threads. Be sure to work in small sections, using different stitches for texture or effect. For example, use satin stitch for solid areas and French knots for small details like eyes or freckles on the clown’s face.
For the clown’s face, you can use a variety of colors to make it stand out. Bright reds, yellows, and blues work particularly well for creating a vibrant, cheerful look. Keep in mind that embroidery takes time and patience, so take your time to ensure each stitch is perfect.
As you near the end of your patch, add any finishing touches, such as additional details in the background or extra elements like stars or balloons. These small touches will help bring the design to life and give it that extra flair that makes the Happy and Cad Clown Patch so special.
4. Attaching Your Happy and Cad Clown Patch to Clothing
The final step in creating your Happy and Cad Clown Patch is to attach it to your clothing or other fabric items. There are two main methods for attaching your patch: sewing and iron-on.
For sewing, simply place the patch on the desired location and secure it with pins. Using a needle and thread, sew around the edges of the patch to attach it securely to the fabric. For added durability, consider using a straight stitch or a zigzag stitch along the edges of the patch. This will help prevent the patch from coming loose over time.
Alternatively, you can use fusible webbing to create an iron-on patch. This method involves placing the fusible webbing between the patch and the fabric and then applying heat from an iron. The heat will activate the webbing, bonding the patch to the fabric without the need for sewing.
Make sure to follow the manufacturer’s instructions for the fusible webbing and iron carefully to avoid damaging the fabric or the patch. Once the patch is securely attached, you can give it a final press with the iron to ensure it stays in place.
No matter which method you choose, your Happy and Cad Clown Patch is now ready to be proudly worn or displayed. The best part is that you can create as many patches as you like and attach them to different clothing items, bags, or even hats!
FAQ
1. How do I make sure my patch is durable?
To make your patch last longer, use high-quality materials like strong embroidery thread and fabric. Also, when attaching the patch, sew around the edges to secure it firmly.
2. Can I create my own design for the Happy and Cad Clown Patch?
Yes! You can create your own unique design by sketching out your idea first and then transferring it to fabric. This allows for total customization.
3. How do I iron on the patch?
Place the patch where you want it, cover it with a cloth to protect the fabric, and apply heat with an iron according to the fusible webbing’s instructions. Press firmly for 15-30 seconds.
4. What kind of fabric should I use for making a patch?
Cotton, felt, and denim are all good choices for patch-making. Choose a fabric that is sturdy enough to hold up to wear and tear.
5. Can I wash clothes with iron-on patches?
Yes, but it’s important to wash them in cold water and avoid using a dryer. Handwashing is best to preserve the patch’s integrity.
Conclusion
In this tutorial, we explored the steps needed to create your own Happy and Cad Clown Patch, from gathering materials to designing, embroidering, and attaching the patch. We covered all the necessary details to ensure you can make a patch that stands out and reflects your unique style. Whether you’re making the patch for yourself or as a gift, the process is rewarding and fun.
We encourage you to give it a try and share your experiences with us! Please leave a sincere opinion or any suggestions in the comments below. We’d love to hear how your patch turned out and if you have any additional tips to share.


