The How to Make a 3D Bag – TUTORIAL is an exciting and creative project that allows crafters to transform yarn into a stylish and functional accessory. From the very first stitches, the How to Make a 3D Bag – TUTORIAL demonstrates how crochet techniques can be used to build structure, depth, and dimension in handmade items. This project is ideal for anyone who wants to create a unique bag that stands out while also being practical for everyday use.
Many crochet enthusiasts enjoy projects that combine beauty with functionality. The How to Make a 3D Bag – TUTORIAL is a perfect example of this balance. Instead of a flat crochet bag, this pattern focuses on building a three-dimensional structure that gives the bag more space, stability, and visual appeal.
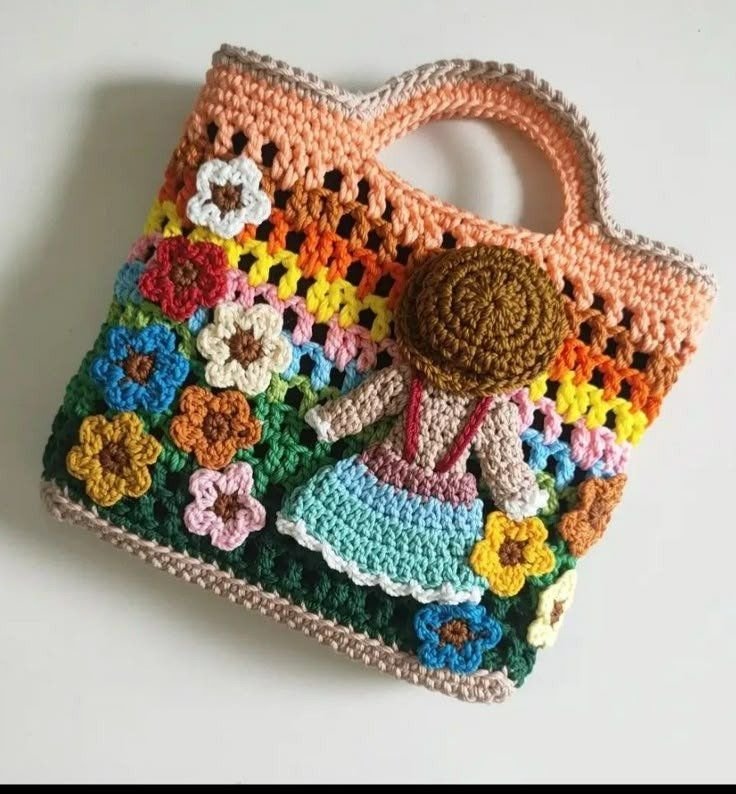
Another reason why the How to Make a 3D Bag – TUTORIAL has become popular among crocheters is the freedom to customize the design. From color choices to handle styles and decorative elements, every crafter can personalize their bag. Whether used as a casual handbag, a small storage basket, or a fashionable accessory, the How to Make a 3D Bag – TUTORIAL offers endless creative possibilities.
1. Understanding the Concept Behind a 3D Crochet Bag
The How to Make a 3D Bag – TUTORIAL focuses on creating depth and structure within a crochet project. Unlike flat crochet pieces, a 3D bag uses shaping techniques to form sides, base panels, and structured edges.
DISCOVER MORE FREE PATTERNS HERE!
One of the key features of the How to Make a 3D Bag – TUTORIAL is the dimensional shape. By carefully working stitches and increasing or decreasing at certain points, crocheters can build a bag that holds its form.
Many crocheters appreciate the practicality of a structured bag. The How to Make a 3D Bag – TUTORIAL produces a design that is sturdy enough to hold everyday items such as phones, wallets, books, or craft supplies.
Texture can also play an important role in the appearance of the bag. Different stitches may be used in the How to Make a 3D Bag – TUTORIAL to create visual interest and reinforce the fabric.
Another benefit of this type of project is durability. Because the How to Make a 3D Bag – TUTORIAL includes multiple layers or dense stitches, the finished bag often becomes stronger than typical crochet accessories.
By understanding the structure behind the How to Make a 3D Bag – TUTORIAL, crocheters can appreciate how simple stitches can be transformed into a functional three-dimensional object.
2. Materials and Tools Needed for the Tutorial
Before starting the How to Make a 3D Bag – TUTORIAL, gathering the right materials will help ensure a successful project.
One of the most important materials is yarn. Many crocheters prefer cotton yarn for the How to Make a 3D Bag – TUTORIAL because it provides strength and structure, making the bag more durable.
Color selection is another exciting part of the process. Some crafters choose neutral tones for a classic style, while others prefer vibrant colors that make the bag stand out.
A crochet hook that matches the yarn weight is essential for achieving consistent stitches. For many versions of the How to Make a 3D Bag – TUTORIAL, hooks between 4 mm and 6 mm are commonly used.
Additional tools such as scissors, stitch markers, and a yarn needle will also be necessary. These tools help maintain stitch accuracy and create a clean finish.
Some versions of the How to Make a 3D Bag – TUTORIAL include optional materials such as lining fabric, buttons, or zippers to enhance the functionality of the bag.
With these materials ready, crocheters can begin building their unique three-dimensional bag.
3. Step-by-Step Overview of the 3D Bag Creation
The How to Make a 3D Bag – TUTORIAL usually begins with crocheting the base of the bag. This foundation determines the overall size and stability of the final project.
The base is often worked in rows or rounds using tight stitches that provide strength and durability.
Once the base is complete, the next stage in the How to Make a 3D Bag – TUTORIAL involves building the side walls. These rows are typically worked without increases so that the fabric naturally rises upward.
As the bag grows, the three-dimensional structure begins to take shape. This is the stage where the How to Make a 3D Bag – TUTORIAL becomes especially rewarding.
Handles or straps are usually added after the body of the bag is finished. These can be crocheted separately or integrated directly into the top edge of the bag.
Some crocheters also reinforce the handles to ensure durability, especially if the bag will carry heavier items.
The final step in the How to Make a 3D Bag – TUTORIAL includes weaving in loose ends and adding optional decorative elements such as buttons, tassels, or lining.
4. Creative Customization Ideas for Your 3D Crochet Bag
One of the most enjoyable aspects of the How to Make a 3D Bag – TUTORIAL is the freedom to customize the final design.
Crocheters can experiment with different stitch patterns to create unique textures on the surface of the bag.
Color combinations are another way to personalize the How to Make a 3D Bag – TUTORIAL. Stripes, color blocks, or gradient yarns can transform the appearance of the bag.
Some crafters add decorative details such as crochet flowers, embroidered designs, or small appliqués.
The size of the bag can also be adjusted. By modifying the base dimensions, the How to Make a 3D Bag – TUTORIAL can produce anything from a compact handbag to a spacious tote.
Adding a fabric lining can improve the durability and structure of the bag while giving it a professional finish.
With creativity and experimentation, every version of the How to Make a 3D Bag – TUTORIAL can become a unique handmade accessory.
FAQ – How to Make a 3D Bag – TUTORIAL
Is the How to Make a 3D Bag – TUTORIAL suitable for beginners?
Yes, many versions of the How to Make a 3D Bag – TUTORIAL are beginner-friendly, especially if the crocheter is comfortable with basic stitches.
What yarn works best for a crochet bag?
Cotton yarn is often recommended for the How to Make a 3D Bag – TUTORIAL because it provides durability and structure.
Can the bag be lined with fabric?
Yes, adding a fabric lining can make the bag stronger and help it keep its shape.
How long does it take to complete the project?
The time needed for the How to Make a 3D Bag – TUTORIAL depends on the size and complexity of the design, but many crocheters complete it within a few crafting sessions.
Can I add a zipper or buttons to the bag?
Absolutely. Many crocheters add closures such as zippers, buttons, or magnetic snaps for extra functionality.
Can the bag be resized?
Yes, the How to Make a 3D Bag – TUTORIAL can easily be adjusted by changing the base size or the number of rows.
Conclusion
The How to Make a 3D Bag – TUTORIAL is a creative and practical crochet project that allows crafters to build a stylish accessory using simple techniques. By combining structure, texture, and creativity, this tutorial demonstrates how crochet can be used to produce functional and fashionable items.
Throughout this article, we explored the concept behind the How to Make a 3D Bag – TUTORIAL, the materials needed to begin the project, the basic steps for constructing the bag, and several ways to customize the final design.
This project is perfect for crocheters who want to expand their skills while creating something useful and visually appealing. With patience and creativity, the How to Make a 3D Bag – TUTORIAL can become a favorite project for many crafters.
PATTERN VIDEO:
Now we would love to hear from you. What do you think about the How to Make a 3D Bag – TUTORIAL? Share your honest opinion, ideas, and suggestions. Your feedback can inspire other crocheters and help grow the crafting community.

