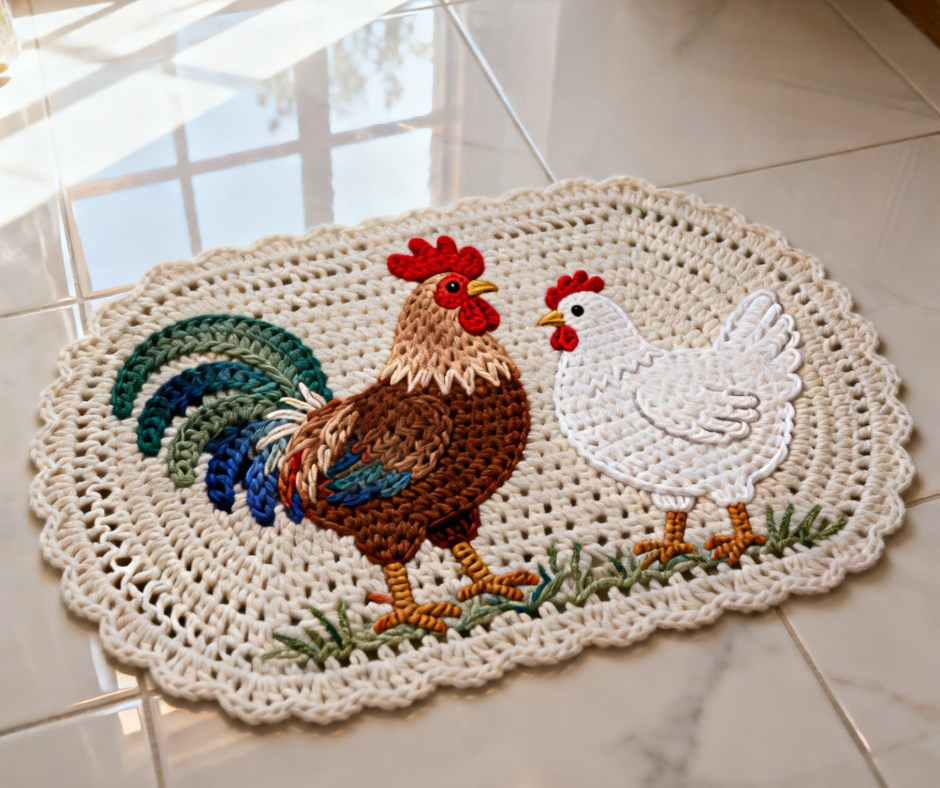
Oval Rooster and Hen Rug – Tutorial brings a charming farmhouse touch to any kitchen or living space with this delightful crochet project. This Oval Rooster and Hen Rug – Tutorial guides you through creating a sturdy, eye-catching rug featuring a classic rooster and hen design worked in an oval shape. Perfect for beginners who want to practice oval techniques while adding rustic farm animal charm to home decor.
Crochet rugs like this one are incredibly versatile, offering warmth underfoot, protection for floors, and a handmade aesthetic that store-bought items simply cannot match. The rooster and hen motif evokes countryside vibes, making it ideal for country-style kitchens, cozy entryways, or even as a thoughtful gift for farm-loving friends.
In this step-by-step Oval Rooster and Hen Rug – Tutorial, you will learn how to build a strong oval base, incorporate colorful sections for the birds, add fun details like combs and beaks, and finish with durable edging. Using basic stitches and affordable yarn, this project is both accessible and rewarding. Grab your hook and let’s get started on your very own crochet rooster and hen rug!
1. Gathering Your Materials for the Oval Rug
Thick yarn or fabric strips work best for a durable oval rooster and hen rug, providing the structure needed to withstand daily foot traffic. Choose cotton or a cotton blend in farm-inspired colors like red, white, brown, yellow, and black for authentic rooster and hen details.
DISCOVER MORE FREE PATTERNS HERE!
A large crochet hook, such as 8mm to 10mm, ensures loose, quick stitches that create a thick, cushioned rug. This size prevents the piece from curling and makes the project move faster for satisfying progress.
Scissors, yarn needle, and stitch markers keep your work organized throughout the Oval Rooster and Hen Rug – Tutorial. Markers help track increases at the ends of the oval so your shape stays even and professional-looking.
Optional non-slip rug backing or fabric glue adds safety if placing the finished rug in high-traffic areas. This simple addition turns your handmade crochet rug into a practical household essential.
Gather extra yarn in contrasting shades for embroidering eyes, beaks, and feather accents later. Having everything ready from the start makes the creative parts of the rooster and hen design flow smoothly without interruptions.
Finally, prepare a flat surface or blocking mat for shaping the oval as it grows. Proper blocking ensures your oval rooster and hen rug lies perfectly flat and looks polished when complete.
2. Creating the Perfect Oval Base Foundation
Start with a long foundation chain, typically 20-40 chains depending on desired rug length, then work single crochets along both sides plus extra increases at each end. This classic method forms the elongated center of any oval rug and sets up balanced growth.
Place 3 single crochets in the last chain to turn the corner smoothly without puckering. These increases create the rounded ends essential for a true oval shape in your crochet rooster and hen rug.
Work single crochets down the opposite side of the chain, adding 3 stitches in the first chain to complete the loop. Consistent tension here prevents wavy edges and keeps the base symmetrical.
Continue increasing by placing extra stitches only at the curved ends in subsequent rounds. Follow the rule of adding stitches proportionally to maintain flatness throughout the Oval Rooster and Hen Rug – Tutorial.
Switch colors gradually when ready to introduce the rooster and hen sections, carrying unused yarn along the back. This technique keeps the underside neat while building the farm animal theme seamlessly.
Check frequently that the oval lies flat; if it cups, add fewer increases or loosen tension slightly. Adjusting early ensures your final crochet oval rug stays beautiful and functional.
3. Adding the Rooster and Hen Design Elements
Use surface crochet or applique techniques to outline and fill in the rooster and hen shapes on the oval base. Start with the bodies in white or light brown yarn for contrast against a darker background.
Crochet small separate pieces for combs, wattles, beaks, and wings, then sew them securely onto the main rug. Red yarn works wonderfully for the rooster’s vibrant comb and wattle details.
Embroider black French knots for eyes and yellow chains for beaks to bring personality to your rooster and hen. These simple stitches add character without overwhelming the overall design.
Create tail feathers for the rooster using looped chains or fringe in multiple colors. Attach them at one end of the oval for a lively, dimensional effect in the crochet rug.
Position the hen slightly offset from the rooster for a natural paired look, perhaps with tiny chicks nearby using small circles. Layering elements like this makes the oval rooster and hen rug feel like a charming farm scene.
Weave in all ends meticulously as you go to keep the back tidy and prevent snags during use of your finished handmade rug.
4. Finishing and Edging the Completed Rug
Work a border round of single crochets or half double crochets around the entire edge for a clean, professional finish. This step reinforces the rug and prevents stretching over time.
Add a scalloped or picot edging in a contrasting color to highlight the rustic charm of the rooster and hen design. Simple decorative borders elevate the project from basic to beautiful.
Block the rug by wetting it lightly, shaping it flat, and letting it dry completely pinned in place. Blocking sets the stitches and ensures the oval stays perfectly proportioned.
Apply non-slip backing if desired by gluing or sewing a rug pad underneath. This practical touch makes your crochet oval rug safer on hardwood or tile floors.
Trim any stray threads and give the surface a gentle steam if needed to smooth minor bumps. Your Oval Rooster and Hen Rug – Tutorial creation is now ready to display proudly.
Share photos of your finished rug with friends or online communities to inspire others. Seeing the joy your handmade crochet rooster and hen rug brings makes every stitch worthwhile.
FAQ
What yarn weight is ideal for an oval rooster and hen rug? Bulky or super bulky yarn, or even t-shirt yarn/fabric strips, creates a thick, durable rug suitable for floor use. Thinner yarns work for smaller decorative versions but may require more rounds.
How do I keep the oval from curling while crocheting? Maintain even tension and increase stitches correctly at the ends—usually 2-3 extra per end per round. If curling occurs, loosen your grip or add an extra increase occasionally.
Can beginners make this rooster and hen design? Yes! Start with basic oval shaping using single crochet, then add simple sewn-on details for the animals. Practice the oval base first if needed before incorporating the farm theme.
How large should I make the oval base? Aim for 30-40 inches long by 20-24 inches wide for a standard kitchen mat. Adjust the starting chain length to control size—longer chain means longer rug.
Is it possible to make the rug washable? Absolutely. Use 100% cotton yarn and machine-wash on gentle cycle in cold water. Air dry flat to preserve shape and vibrant colors of the rooster and hen.
What if my increases make the rug wavy? Too many increases cause waves; reduce by skipping an increase every few rounds until flat. Test on a small swatch to find the perfect increase rate for your yarn and hook.
Can I use this technique for other animal designs? Definitely. The oval base works for pigs, cows, sheep, or any farm theme—just change colors and applique shapes accordingly for endless variations.
How long does it take to complete the rug? With bulky yarn and a large hook, expect 8-15 hours depending on size and experience. Breaking it into sessions makes the Oval Rooster and Hen Rug – Tutorial enjoyable.
In this Oval Rooster and Hen Rug – Tutorial, we explored gathering the right materials, mastering the oval foundation, incorporating adorable rooster and hen details, and applying a strong finishing border. You now possess the skills to crochet a unique, durable rug that adds warmth and personality to your home while showcasing classic farmyard charm.
Give this project a try and share your honest thoughts in the comments below. Did the oval shaping turn out flat? What colors or tweaks would you suggest? Your feedback helps refine the guide and inspires fellow crocheters. Happy hooking and enjoy your beautiful new crochet rug!

