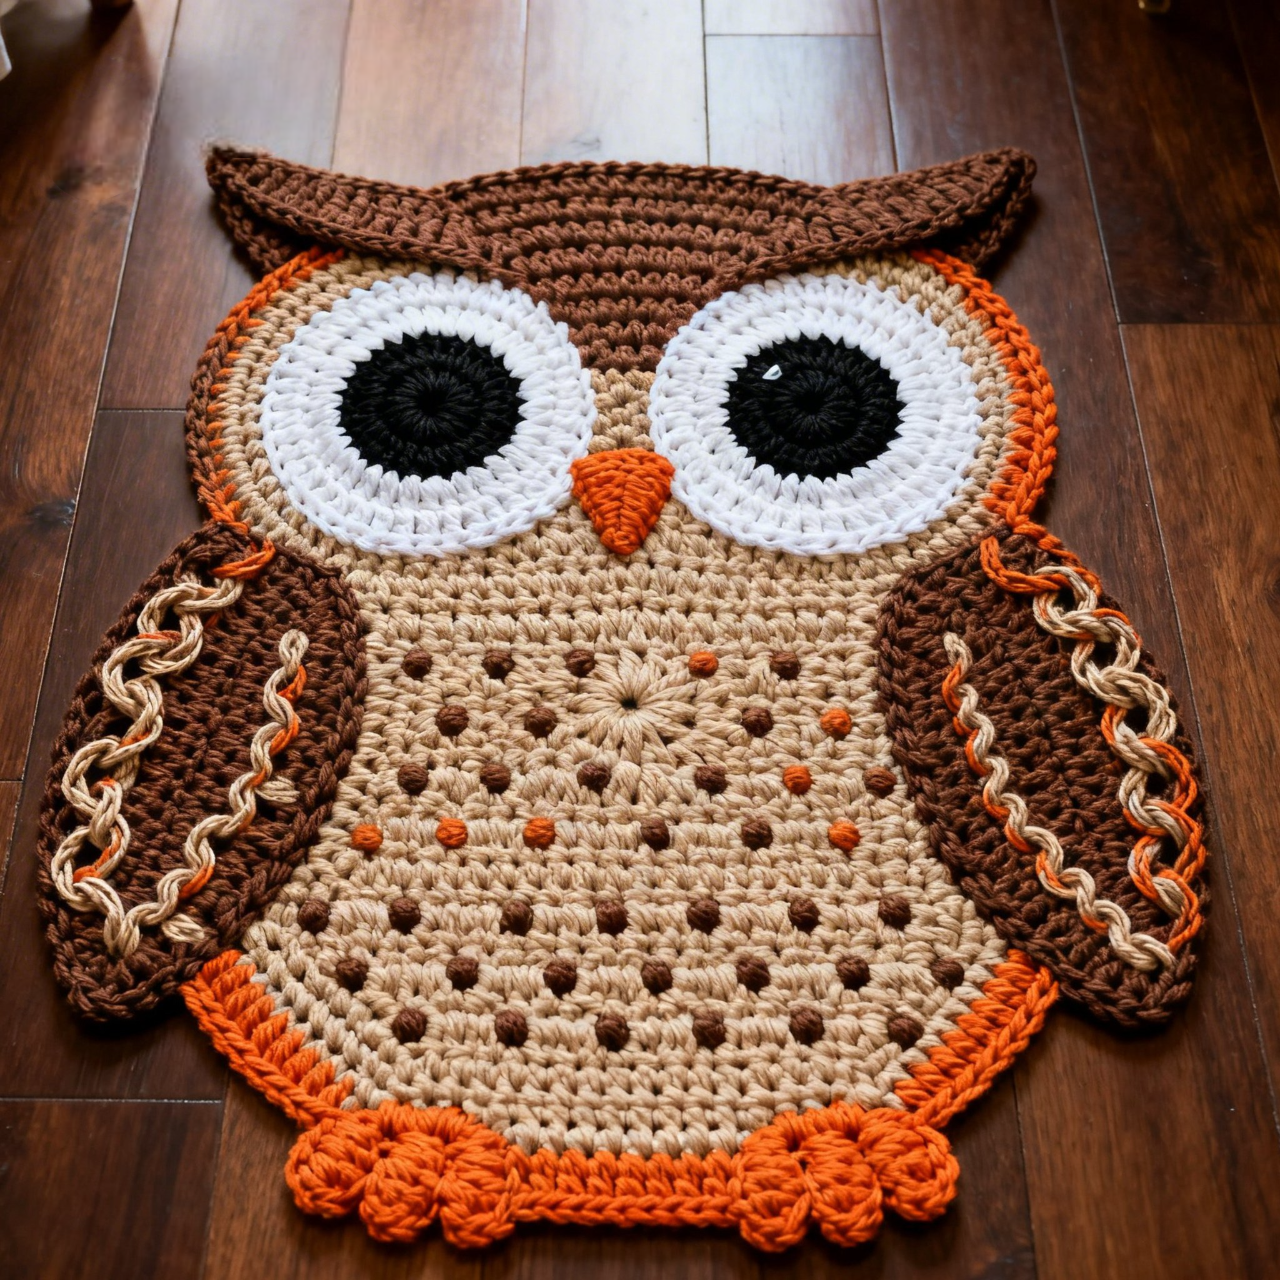
The Lucky Owl Rug – Tutorial is a creative and eye-catching crochet project that combines charm, symbolism, and functionality. Owls are often associated with wisdom, protection, and good luck, making this rug not only a decorative piece but also a meaningful addition to your home.
Whether placed in a nursery, living room, reading corner, or bedroom, the Lucky Owl Rug – Tutorial allows you to transform simple stitches into a bold statement piece. With thoughtful color choices and structured construction, this crochet rug can become a cozy and durable accent for any space.
In this complete guide, you’ll learn how to choose sturdy materials, shape the owl design, add expressive details, and finish your rug with professional touches.
1 Choosing Yarn and Materials for Durability
Because this project is meant to be walked on, the Lucky Owl Rug – Tutorial requires strong and durable materials.
DISCOVER MORE FREE PATTERNS HERE!
Cotton yarn is highly recommended for rugs because it is sturdy, holds shape well, and is easy to clean. T-shirt yarn or bulky recycled yarn can also provide extra thickness and durability.
Recommended materials:
Bulky cotton or T-shirt yarn
Large crochet hook suitable for thick yarn
Yarn needle
Scissors
Stitch markers
Optional: non-slip rug backing
Using a large hook helps maintain flexibility while still creating a dense fabric. Tight stitches are important to ensure the rug remains stable and long-lasting.
Color selection is where the owl truly comes to life. Traditional owl shades include brown, cream, gray, and beige. However, playful versions can incorporate pastel tones or bold, modern color combinations.
2 Creating the Owl Base Shape
The foundation of the Lucky Owl Rug – Tutorial typically begins with a large oval or circular base that forms the owl’s body.
Start by chaining the desired width and working in rounds or rows to create a flat, even shape. Increases must be placed evenly to prevent curling.
Consistency in tension ensures the rug lies flat on the floor. If the edges begin to ripple, adjust your stitch count slightly.
Once the main body is complete, you can begin shaping the head by extending the top portion slightly upward or by crocheting separate ear tufts that will be attached later.
Measuring your space beforehand helps determine the ideal rug size. Smaller versions are perfect for nurseries, while larger rugs make bold decorative statements.
3 Adding Eyes, Wings, and Details
The personality of the Lucky Owl Rug – Tutorial comes from its expressive features.
Large circular eyes are a signature element. These can be crocheted separately in contrasting colors and sewn securely onto the base. Layered circles create depth and dimension.
Wings are typically made as flat oval or teardrop shapes and attached to the sides of the body. For added texture, consider using puff stitches or bobble stitches to mimic feathers.
Other details may include:
A small triangular beak
Decorative stitched eyelashes
Textured feather patterns
Layered color transitions
Ensure all pieces are securely stitched, especially since the rug will experience regular use.
If creating the rug for a child’s room, avoid loose embellishments for safety.
4 Finishing and Stabilizing the Rug
The finishing stage of the Lucky Owl Rug – Tutorial ensures your project remains durable and polished.
Add a firm border around the entire rug using single crochet or reverse single crochet for a clean edge.
For additional stability:
Use non-slip rug backing
Apply fabric paint dots underneath
Insert a thin anti-slip mat
Blocking is especially helpful for larger rugs. Light steam blocking can help flatten edges and define the owl shape.
If your yarn allows, gently press the rug to smooth any uneven sections.
Customization Ideas
The Lucky Owl Rug – Tutorial offers endless opportunities for personalization.
Try:
Pastel nursery-themed owls
Earth-tone rustic versions
Rainbow owl designs
Seasonal color variations
Oversized statement rugs
You can also adjust facial expressions to create sleepy, cheerful, or curious owls.
Matching the rug to existing décor creates a cohesive look in your space.
Care Instructions
Most cotton or T-shirt yarn rugs can be machine washed on a gentle cycle. However, due to size, hand washing or spot cleaning is often recommended.
Lay flat to dry and reshape while damp to maintain structure.
Regular shaking or vacuuming helps remove dust and maintain cleanliness.
Frequently Asked Questions
Is the Lucky Owl Rug – Tutorial beginner-friendly
Confident beginners familiar with basic stitches and working in rounds can complete this project successfully.
How large should the rug be
Common sizes range from 24 to 40 inches, depending on preference and room size.
What yarn works best for durability
Bulky cotton or T-shirt yarn is ideal for long-lasting results.
Can I make a smaller version
Yes. Simply reduce the starting chain and total rounds.
Can I sell finished owl rugs
If using a purchased pattern, check the designer’s terms before selling finished items.
Conclusion
The Lucky Owl Rug – Tutorial is a delightful crochet project that blends creativity with functionality. With sturdy yarn, bold features, and thoughtful finishing, you can create a statement rug that adds warmth and personality to any room.
Whether you’re designing for a nursery, crafting a handmade gift, or adding charm to your home décor, this owl-inspired rug offers both beauty and practicality.
Have you made crochet rugs before? Share your favorite yarn choices and design ideas — your creativity may inspire others to bring their own lucky owl to life.

