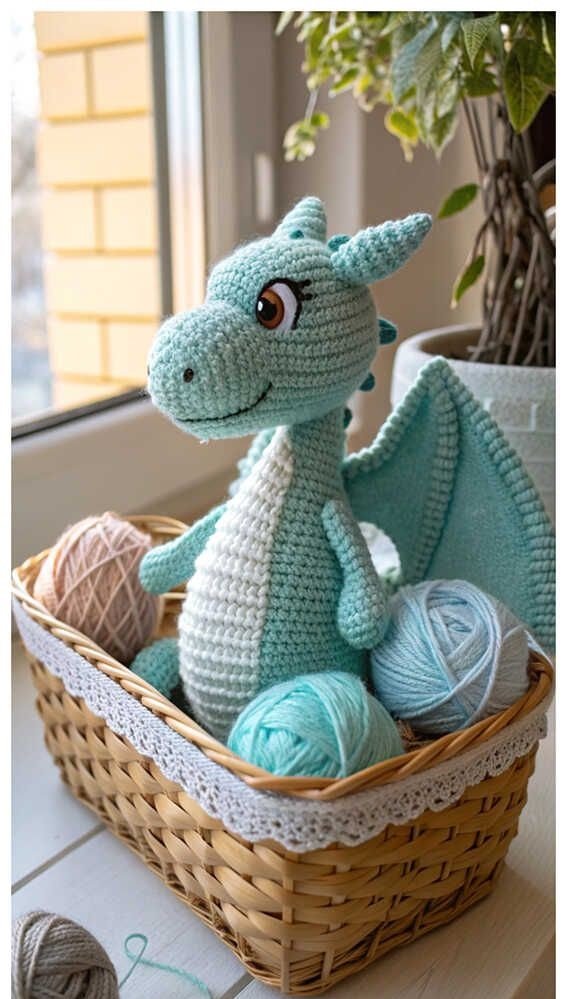
The Magical Amigurumi Crochet Dragon – Tutorial is a whimsical and rewarding project that brings fantasy to life through yarn and creativity. Dragons have long symbolized strength, wisdom, mystery, and magic — and now you can craft your very own soft, handmade version using classic amigurumi techniques.
Whether you are creating a special gift, adding a fantasy piece to your collection, or challenging yourself with a detailed project, this dragon pattern offers the perfect balance between structure and imagination. With sculpted features, textured wings, and customizable details, the Magical Amigurumi Crochet Dragon becomes a one-of-a-kind creation every time.
In this complete guide, you’ll learn about the design structure, materials, step-by-step construction, customization ideas, and finishing touches to help you confidently bring your dragon to life.
1. Understanding the Magical Amigurumi Crochet Dragon Design
The beauty of the Magical Amigurumi Crochet Dragon – Tutorial lies in its combination of strong body shaping and delicate fantasy details.
DISCOVER MORE FREE PATTERNS HERE!
A typical amigurumi dragon includes:
Rounded head with snout
Oval or elongated body
Four small legs or two back legs with front arms
Large textured wings
Curved tail
Optional horns, spikes, or ridges
The structure is usually worked in continuous rounds using tight single crochet stitches to create a firm and stable toy.
Key techniques often used:
Magic ring start
Single crochet stitches
Increase and invisible decrease
Slip stitches for shaping
Chain spaces for wings
Back loop only stitches for texture
The dragon’s personality comes from the details — expressive eyes, curved horns, and carefully shaped wings give it a magical and lifelike appearance.
2. Materials and Yarn Selection for a Magical Finish
Selecting the right materials will enhance both structure and appearance.
Essential Materials
Worsted or DK weight yarn
Crochet hook (usually 0.5–1 mm smaller than yarn label suggests)
Fiberfill stuffing
Safety eyes or embroidery thread
Yarn needle
Stitch marker
Scissors
Yarn Recommendations
Acrylic yarn is durable and beginner-friendly.
Cotton yarn offers excellent stitch definition.
Velvet yarn creates a soft, plush dragon.
Gradient yarn adds a magical color transition.
Color Ideas
Classic dragon green
Deep red with black accents
Pastel rainbow for a fantasy vibe
Midnight blue with silver highlights
Lavender or teal for a mystical look
You can also use contrasting yarn for wings, belly panel, and spikes to create depth and dimension.
3. Step-by-Step Construction of the Amigurumi Dragon
Before beginning, decide on your finished size. Most dragons range from 8 to 14 inches tall depending on yarn weight and hook size.
Step 1: Crochet the Head
Start with a magic ring.
Work single crochet increases to form a round shape.
Insert safety eyes between rounds before closing.
Shape the snout by extending rounds slightly forward.
Stuff firmly and continue shaping with decreases.
Optional: Add nostrils with embroidery.
Step 2: Create the Body
Begin with a magic ring.
Increase gradually to form an oval base.
Work even rounds to build height.
Add a contrasting belly panel if desired using color changes.
Stuff as you go for firmness.
Attach head securely to body using strong stitching.
Step 3: Make the Legs and Arms
Crochet small cylinders in continuous rounds.
Lightly stuff the lower half.
Flatten top slightly before sewing onto body.
Position legs evenly to maintain balance.
Step 4: Crochet the Tail
Start with a small magic ring.
Increase slightly at base.
Gradually decrease toward tip for a tapered shape.
Add stuffing lightly to maintain flexibility.
You can curve the tail slightly while stitching it in place.
Step 5: Create the Wings
Wings give the dragon its magical presence.
Chain a base row.
Work double and treble crochet stitches to create wing height.
Use increases along edges for dramatic shaping.
Repeat for second wing.
For a webbed look, use chain spaces between tall stitches.
Attach wings securely to the back.
Step 6: Add Horns and Spikes
Crochet small cones for horns.
Attach along head or spine.
Use back loop stitches to create ridge texture along the back.
These small details add character and uniqueness.
4. Customization Ideas and Creative Variations
The Magical Amigurumi Crochet Dragon – Tutorial allows endless personalization.
Creative Variations
Add glitter yarn for sparkle
Use felt for wing membranes
Create baby dragons in smaller sizes
Add tiny accessories like crowns or scarves
Embroider magical symbols on wings
Fantasy Themes
Fire dragon in red and orange
Ice dragon in white and blue
Forest dragon in moss green
Celestial dragon in navy and silver
Gift Ideas
Fantasy-themed birthday gift
Nursery décor
Collectible display piece
Handmade keepsake
For extra personality, slightly tilt the head while attaching to create an expressive look.
FAQ – Magical Amigurumi Crochet Dragon
Is this pattern beginner-friendly?
Confident beginners familiar with amigurumi basics can complete it. Some details may require intermediate skills.
How long does it take to make?
Typically 6 to 12 hours depending on size and detail level.
Can I make it larger?
Yes. Use thicker yarn and a larger hook to scale up.
How do I keep wings from flopping?
Use tighter stitches at the base and secure firmly when attaching.
Is it safe for small children?
Use embroidered eyes instead of safety eyes for child-safe versions.
Conclusion
The Magical Amigurumi Crochet Dragon – Tutorial is a delightful project that blends structure, creativity, and imagination. From shaping the body to crafting flowing wings and tiny horns, every step allows you to build a character full of personality and charm.
Whether you create a fierce guardian dragon or a soft pastel fantasy friend, this pattern invites you to explore color, texture, and storytelling through crochet.
If you enjoyed this tutorial, share your finished dragon, leave your feedback, and tell us which magical theme you chose. Your handmade dragon might inspire others to start their own fantasy crochet adventure.

