The Mini Butterflies pattern is a charming and versatile crochet project that has captivated crafters of all skill levels. Right from the first line, it’s important to mention the Mini Butterflies design because it’s the centerpiece of this tutorial. This delicate and playful pattern can be used to decorate home décor, accessories, gift wraps, clothing, and so much more. Its simplicity and beauty make it a perfect project for beginners, while more experienced crocheters enjoy exploring its creative possibilities.
Working with Mini Butterflies is not only fun, but it also provides a satisfying way to use leftover yarn. These tiny creations require only a small amount of material, making them an excellent eco-friendly project. Whether you want to brighten up your crochet collection or add a special handmade touch to your crafts, this tutorial will show you how easy it is to bring these butterflies to life.
In this article, you will learn how to create the Mini Butterflies step-by-step, understand the materials required, discover helpful tips, and see how these small pieces can be incorporated into various projects. The intention is to guide you through a simple yet delightful crochet experience, fully aligned with Google AdSense content policies and optimized for SEO while keeping a natural, humanized tone.
1. Understanding the Mini Butterflies Pattern
Creating the Mini Butterflies begins with understanding its basic structure. These tiny motifs are typically crafted using simple stitches, which makes them perfect for beginners. The charm of this pattern comes from its simplicity and the beautiful shape that forms quickly with just a few rounds.
DISCOVER MORE FREE PATTERNS HERE!
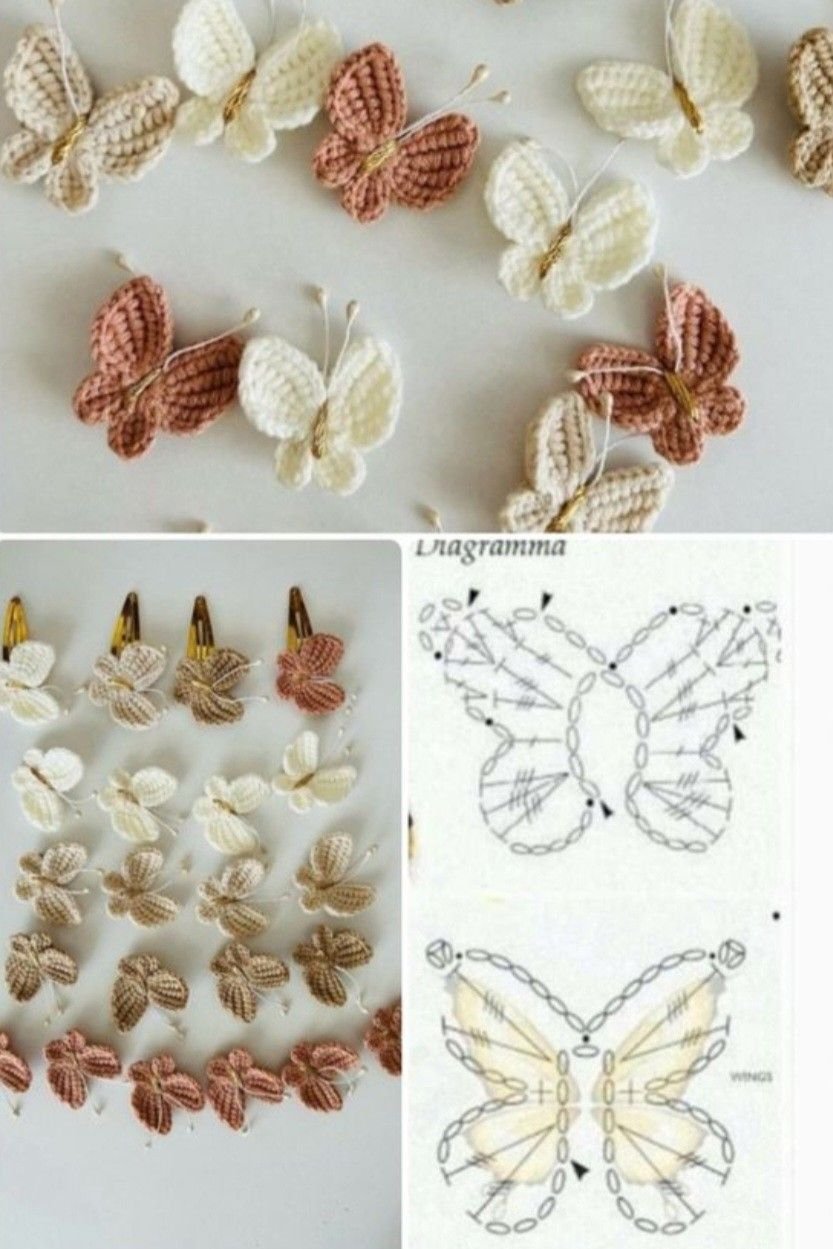
The heart of the design involves forming two pairs of wings. This is usually done by creating looped stitches that naturally shape themselves into butterfly wings once tightened. With practice, you will be able to finish one butterfly in just a few minutes, making this an ideal project for batch crafting.
When learning the Mini Butterflies pattern, it’s essential to follow the instructions closely during the first few attempts. Each stitch has a purpose, and even small variations may change the overall shape. Once the basic structure feels comfortable, you can start experimenting with different yarn weights and hook sizes.
Another exciting part of working with this pattern is choosing colors. Bright and contrasting hues give the butterflies a vibrant look, while pastel tones produce a soft, delicate appearance. Color choice is an excellent opportunity to express creativity and personalize the final result.
The Mini Butterflies pattern is also highly adaptable. Some crafters enjoy adding beads, embroidery, or attaching the butterflies to other projects. Their versatility is one of the many reasons this pattern is so popular among crocheters.
Finally, remember that mastering this pattern builds essential skills you can use in future projects. Understanding tension, spacing, and stitch consistency will make your crafting journey even more enjoyable.
2. Materials You Need for the Mini Butterflies
To begin creating the Mini Butterflies, you only need a few basic materials. Because the pattern is small and simple, this makes it an excellent project for using leftover yarn scraps from previous creations.
Many crocheters prefer using lightweight yarn for this project. Yarn categories such as fingering, sport, or DK weight work especially well. These lighter fibers help define the shape without bulk, giving the butterflies a delicate and refined look.
For the hook size, a smaller crochet hook is typically recommended. Hooks ranging from 2.5 mm to 4.0 mm are ideal, depending on your yarn thickness. Using the correct hook size ensures your stitches remain tight and your butterfly holds its structure.
Another useful item is a yarn needle. This tool helps secure the yarn ends after completing each butterfly. Because the project is tiny, finishing touches make a big difference in the final appearance.
Some crafters enjoy adding embellishments to their Mini Butterflies. Small beads, sequins, or glitter thread can enhance their visual appeal, especially if you plan to use the butterflies for decorations or gift wrapping.
Finally, consider preparing multiple colors of yarn before starting. Having different shades accessible encourages creativity and makes it easier to produce dozens of butterflies in one crafting session.
3. Step-by-Step Tutorial for Mini Butterflies
To begin your Mini Butterflies, start by creating a magic ring. This foundation allows the stitches to form a smooth, circular shape, which is essential for the wings. Gently tighten the ring as you work to maintain clean structure.
The first set of wings is usually formed from a sequence of basic stitches such as double crochets or trebles, depending on the pattern variation. These stitches work together to build the upper wings. Once completed, a small chain or slip stitch helps secure the shape.
Next, you will create another series of stitches to form the lower wings. These are usually shorter and smaller than the upper wings, giving the butterfly a realistic and proportional look. Careful stitch placement is important to maintain symmetry.
After completing the four wings, pull the center yarn tail tightly. This action gathers the wings together, forming the classic butterfly silhouette. Knot the center to secure the shape, and adjust the wings gently until they look even and balanced.
Once the body is formed, you can use the yarn tails to create antennae. Simply pulling the yarn through the top and trimming it to the desired length forms a charming finishing touch.
After completing your first butterfly, repeat the process and experiment with different color combinations. You will find that the more you practice, the faster and more enjoyable the pattern becomes.
4. Creative Ways to Use Mini Butterflies
One of the best things about the Mini Butterflies pattern is that it can be used in countless creative ways. These small motifs add personality, charm, and a touch of handmade beauty wherever they are placed.
Many crafters enjoy attaching mini butterflies to hats, scarves, and bags. The motifs act as decorative accents and instantly upgrade any crochet accessory. Just a few butterflies can completely transform the look of a simple item.
Another popular use is home décor. Mini butterflies make wonderful additions to wall hangings, garlands, wreaths, and picture frames. You can arrange them in patterns, cluster them together, or spread them evenly for a whimsical effect.
Gift wrapping becomes extraordinary with the addition of a handmade butterfly. Attaching one to a ribbon or card adds a thoughtful and personal touch that recipients truly appreciate.
Mini butterflies are also fantastic for children’s crafts. You can attach them to hair clips, headbands, or even turn them into playful jewelry. Their fun shape and bright colors make them especially appealing to kids.
Scrapbookers and journal enthusiasts love using these crocheted motifs as unique embellishments. They add texture and charm to any paper craft project.
Finally, the Mini Butterflies pattern makes a wonderful seasonal decoration. Use them for spring themes, garden displays, or festive arrangements to bring handmade warmth into any celebration.
FAQ – Frequently Asked Questions
1. Are Mini Butterflies suitable for beginners?
Yes. The Mini Butterflies pattern is ideal for beginners because it uses simple stitches and works up quickly.
2. What yarn works best for this pattern?
Lightweight yarns such as fingering, sport, or DK produce the best shape and appearance.
3. How long does it take to complete one butterfly?
Many crocheters can finish one in 5–10 minutes once familiar with the pattern.
4. Can I use cotton yarn instead of acrylic?
Absolutely. Cotton yarn provides great stitch definition and is perfect for small motifs.
5. What can I do with Mini Butterflies?
You can use them for home décor, clothing accents, gift wrapping, accessories, scrapbooking, and more.
6. Can I make the butterflies larger?
Yes. Using thicker yarn and a larger hook will create a bigger butterfly while keeping the same pattern structure.
Conclusion
The Mini Butterflies crochet pattern is a delightful and versatile project suitable for all creativity levels. In this article, you learned how to make these charming motifs, the materials needed, step-by-step instructions, and plenty of ideas for using them creatively.
PATTERN VIDEO:
Whether you are a beginner or an experienced crocheter, this pattern provides endless joy and inspiration. If you enjoyed this tutorial, feel free to leave your honest opinion and any suggestions for future patterns—you’re always welcome here!

