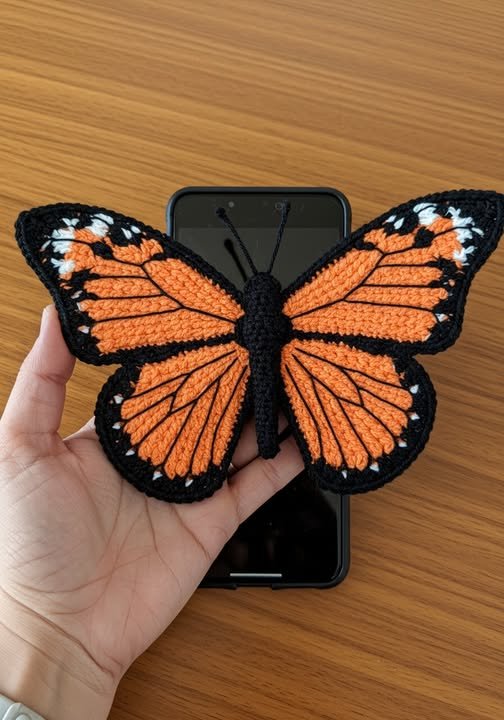
The Monarch Butterfly – Crochet Pattern is a stunning and elegant design that captures the delicate beauty of one of nature’s most beloved creatures. Known for its vibrant orange wings, detailed black outlines, and graceful patterns, the monarch butterfly symbolizes transformation, hope, and renewal. This crochet pattern allows crafters to recreate that same natural wonder using just yarn and a hook, resulting in a piece that’s both artistic and deeply meaningful. Whether you plan to use it as an appliqué, decoration, or wearable art, this pattern is a must-try for crochet enthusiasts who love intricate and colorful projects.
Creating a Monarch Butterfly through crochet is an enjoyable experience for both beginners and advanced crocheters. It involves simple stitches arranged in creative ways to form the wings, body, and antennae, giving life to a realistic and textured design. The finished butterfly can be used in multiple ways—attach it to hats, bags, shawls, or even create a garland or wall hanging. Its versatility and aesthetic appeal make it one of the most loved crochet motifs for nature-inspired designs.
This Monarch Butterfly – Crochet Pattern brings together color blending, stitch precision, and creativity in a relaxing, meditative project. With this tutorial, you’ll learn step-by-step how to choose the right yarns, shape the wings, and assemble your butterfly with perfect balance. By the end, you’ll have a beautiful piece that can be cherished for years or gifted to someone special who loves the elegance of butterflies.
1. Materials and Preparation for the Monarch Butterfly Crochet Pattern
Before beginning your Monarch Butterfly – Crochet Pattern, it’s important to gather all necessary materials. The most vital part of the project is the choice of yarn. Opt for fine or medium-weight cotton or acrylic yarns in shades of orange, black, and white. These colors represent the true beauty of the monarch butterfly and help highlight its natural contrast. You can also experiment with metallic or gradient yarns for a more artistic touch.
DISCOVER MORE FREE PATTERNS HERE!
A small crochet hook—typically between 2.5 mm and 3.5 mm—is ideal for achieving detailed stitches and sharp edges on the wings. Keep a yarn needle handy for sewing and weaving in ends, along with scissors for trimming. You might also want to use blocking pins and a foam mat to shape your butterfly once it’s complete, ensuring that the wings lay flat and symmetrical.
If you prefer a sturdier butterfly, especially for home décor or accessories, you can stiffen your finished piece with fabric starch or diluted glue. This gives the butterfly structure and durability without sacrificing its delicate appearance.
Before starting the actual crochet, take a few minutes to look at reference images of real monarch butterflies. Studying their patterns helps you understand where the color transitions should occur, making your crochet version more realistic.
It’s also helpful to create a small color chart or sketch before beginning. This visual guide can help you remember where to place black lines or white dots while crocheting, ensuring accuracy in your design.
Lastly, prepare your workspace with good lighting and all materials within reach. A calm, organized environment enhances focus and makes the creative process much more enjoyable.
2. Crocheting the Wings
The wings are the highlight of the Monarch Butterfly – Crochet Pattern and where the beauty of the design truly shines. Begin by crocheting the upper wings first. Using orange yarn, start with a magic ring and work a few rounds of double crochet or treble crochet stitches, increasing gradually to form a semi-oval shape. This base will serve as the main body of color.
Once the orange section is complete, switch to black yarn to crochet the outer edge. This contrasting border gives the wings definition and mimics the look of the real monarch butterfly. Pay close attention to stitch placement—clean, even stitches create the striking symmetry that makes the butterfly so mesmerizing.
Next, crochet the lower wings. These are usually smaller and slightly rounded compared to the upper wings. Use the same method: an orange base followed by a black outline. Join the upper and lower wings together using a few stitches in the middle, leaving space for the butterfly’s body.
For added realism, use white yarn or embroidery thread to create the tiny white dots along the black border of the wings. These details bring authenticity to your design and make it stand out beautifully.
You can also experiment with subtle variations in the orange shade, blending two tones for a gradient effect. This gives the illusion of depth and light reflection, making your crochet butterfly appear even more lifelike.
Take your time during this step—precision is key. The wings are what everyone notices first, so ensure they are symmetrical, neat, and carefully stitched together before moving on to the next stage.
3. Making the Body and Antennae
Now that the wings are complete, it’s time to create the butterfly’s body in the Monarch Butterfly – Crochet Pattern. Use black yarn to crochet a narrow tube or oval shape that tapers slightly at the ends. This body should be proportionate to the wings—typically about one-third of the total width of the butterfly.
Work in tight single crochet stitches to give the body firmness and texture. Once finished, lightly stuff it with fiberfill if you want it to have a 3D look, or leave it flat for appliqué use. Use a yarn needle to attach the body to the center of your wings, sewing it securely in place.
For the antennae, cut two short strands of black yarn or thread and tie them to the top of the body. You can stiffen them slightly using glue or hairspray so they hold their shape. If you’re feeling creative, add tiny white beads or embroidery thread to the tips for extra charm.
After attaching the body and antennae, check the symmetry of the entire butterfly. Adjust the wings if necessary to ensure they are balanced and evenly spread.
This step is also a great opportunity to personalize your butterfly. Some crocheters like to add a small glitter detail to the wings or use metallic thread along the borders to make them sparkle under light.
Finally, weave in all loose ends neatly on the back. You can secure the butterfly further by lightly pressing it with a warm iron under a cloth or blocking it again to perfect its shape.
4. Creative Ways to Use Your Monarch Butterfly Crochet Piece
Once you’ve completed your Monarch Butterfly – Crochet Pattern, the possibilities for how to use it are endless. One of the most popular uses is as an appliqué. You can sew it onto hats, scarves, tote bags, or even clothing items to add a handmade, nature-inspired touch.
Another beautiful idea is to attach your butterflies to a string or ribbon to create a garland. This makes a stunning wall decoration, especially in craft rooms, nurseries, or garden-themed spaces. You can crochet multiple butterflies in different sizes for added visual interest.
If you love making jewelry, consider turning your butterfly into a brooch or hair accessory. Simply attach a pin or clip to the back, and you’ll have a one-of-a-kind fashion statement.
You can also create a framed crochet artwork by mounting your butterfly on a piece of neutral fabric and placing it in a decorative frame. It’s a lovely way to display your craftsmanship and bring a bit of nature into your home décor.
For gifting purposes, pair your butterfly with a handwritten note about what it symbolizes—transformation, growth, and beauty. Handmade gifts like these carry a deep emotional value and are always appreciated.
Lastly, remember that you can adapt this pattern to represent different butterfly species by changing the colors and patterns. Once you’ve mastered the Monarch Butterfly – Crochet Pattern, you can explore countless creative variations.
FAQ
Q: Is the Monarch Butterfly pattern suitable for beginners?
A: Yes! The Monarch Butterfly – Crochet Pattern uses basic stitches and clear instructions, making it great for beginners who want to improve their detailing skills.
Q: What yarn type should I use?
A: Cotton yarn is best for crisp definition, but acrylic works well for softer, flexible butterflies.
Q: How can I make the butterfly hold its shape?
A: You can stiffen it using a mix of water and fabric glue, or by lightly starching it after blocking.
Q: Can I use this butterfly outdoors?
A: Yes, but use waterproof glue and acrylic yarn to prevent damage from moisture and sunlight.
Q: How long does it take to make one butterfly?
A: On average, it takes about 1–2 hours, depending on your crochet speed and detailing.
Conclusion
The Monarch Butterfly – Crochet Pattern is more than just a project—it’s a creative expression of beauty, patience, and transformation. From the graceful wings to the detailed body, every stitch captures the elegance of this iconic insect.
Whether you’re making it for decoration, gifting, or personal joy, this pattern offers endless ways to showcase your crochet talent. So pick up your hook, bring your butterfly to life, and share your experience in the comments below. Your feedback and suggestions help inspire others to spread their wings in creativity, just like the monarch itself.

