The Peacock Coat – Crochet Tutorial is a breathtaking design that turns heads and captures hearts. Inspired by the bold and elegant plumage of a peacock, this crochet pattern allows crafters to express creativity through color, texture, and structure. Whether you’re crocheting for fashion, self-expression, or pure joy, this project delivers a wearable piece of art that radiates personality.
This stylish coat brings together intricate motifs, vibrant yarns, and flowing construction to mimic the feathers of a peacock. It’s not just a garment—it’s a statement piece that you can customize with your favorite yarns and color palette. Plus, it’s much easier than it looks when you follow the Peacock Coat – Crochet Tutorial step by step.
Perfect for cooler seasons, music festivals, or unique everyday fashion, this coat is both cozy and dramatic. The Peacock Coat – Crochet Tutorial is ideal for experienced beginners ready for a challenge or intermediate crocheters looking to take their skills to the next level.
With the right instructions, tools, and yarn, you’ll soon be creating a beautiful coat that will leave everyone asking where you got it—and you can proudly say, “I made it!”
DISCOVER MORE FREE PATTERNS HERE!
1. Introduction to the Peacock Coat – Crochet Tutorial
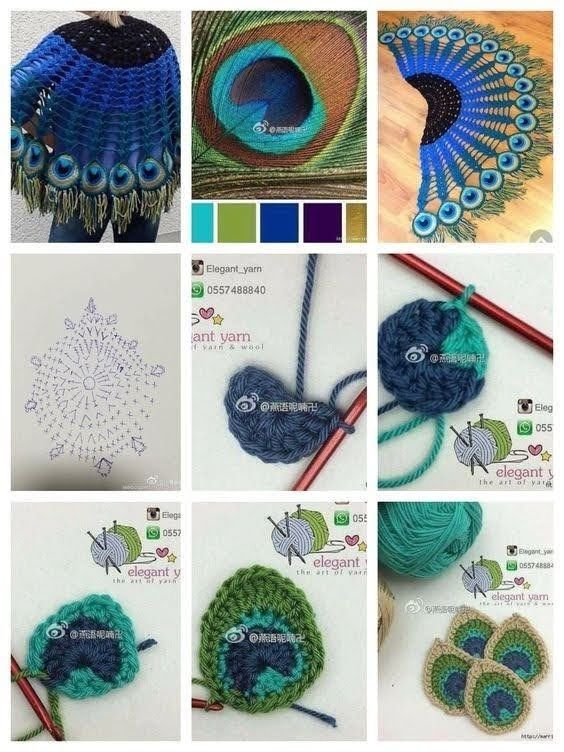
The Peacock Coat – Crochet Tutorial blends bold aesthetics with detailed technique, creating a masterpiece in wearable crochet fashion. The name comes from the fanned tail feathers of the peacock, often reflected in the coat’s circular or scalloped motifs.
This design typically features a mandala or circular center on the back, expanding outward with intricate, colorful rows that form the body of the coat.
The sleeves and hem are built around the core motif, often using shell stitches, fans, or lacy openwork patterns to mimic natural feathering.
Because the coat involves motif shaping and possibly multiple panels, it helps to have a solid grasp of reading crochet patterns or charts.
You can adapt the coat’s length—making it hip-length, knee-length, or longer—depending on your style and yarn availability.
Color plays a huge role. While traditional versions use peacock blues, greens, and purples, you can personalize your coat with earthy tones or pastels for a different effect.
2. Materials Needed for the Peacock Coat – Crochet Tutorial
To start your Peacock Coat – Crochet Tutorial, gathering the right materials is essential for both comfort and style. The yarn choice and hook size will directly affect the drape and feel of your finished coat.
Yarn: Choose lightweight or medium-weight yarn for good drape. Blends like wool-acrylic or bamboo-cotton offer flexibility and warmth.
Colors: At least three to five complementary colors work best for the full peacock effect. Think of gradients, jewel tones, or ombré transitions.
Hook: Use the hook size recommended on your yarn label, or go up one size for more flow. Generally, a 4.5mm to 5.5mm hook works well.
Stitch markers: These are helpful for marking key transition points between panels or tracking increases and decreases.
Tapestry needle: A must for weaving in ends and connecting sections neatly.
Optional: A lightweight lining fabric and a button or clasp if you want to add a closure to your finished coat.
3. Step-by-Step Instructions – Peacock Coat – Crochet Tutorial
Ready to begin? The Peacock Coat – Crochet Tutorial generally starts with a large circular motif and works outward to form the body of the coat. Here’s a simplified breakdown of the process.
Start by creating the central mandala on the back. This often includes double crochets, chain spaces, and shell stitches to form the expanding circle.
Once the mandala is complete, begin adding rows that form the shoulder and body area, using consistent stitch patterns to maintain symmetry.
You’ll crochet the sleeves separately or directly into armhole openings, depending on the design. Often, shell stitch or open lacy patterns are used for a feathered effect.
Color changes are crucial. Switch shades every few rows or use gradient yarns for seamless transitions. Always fasten off securely when changing colors.
Create two front panels that connect to the mandala’s sides, allowing the coat to drape open naturally.
Finally, edge the entire coat with a solid border or decorative scallop edging to give it a polished, unified finish.
4. Styling and Customization Tips
The Peacock Coat – Crochet Tutorial is more than a pattern—it’s a canvas for personal expression. You can adapt and customize your coat in several exciting ways.
Experiment with color. Use bright peacock hues, muted naturals, or even monochrome shades for a minimalist look.
Play with length. Make a cropped bolero version or go for a dramatic ankle-length duster depending on how much yarn and time you have.
Add fringe or tassels to the hemline or sleeves for extra movement and flair, especially for festival or boho fashion.
Use buttons or toggle closures to cinch the front or leave it open for a flowy, kimono-like effect.
Incorporate metallic or shimmer yarn for added glamor. It reflects beautifully in the light and adds to the peacock-inspired beauty.
Pair it with simple outfits like jeans and a tee or a solid dress to let your coat be the standout piece in your wardrobe.
FAQ – Peacock Coat – Crochet Tutorial
Is the Peacock Coat pattern suitable for beginners?
The pattern is best for confident beginners or intermediate crocheters. It requires reading pattern instructions, changing colors, and constructing sleeves and panels.
How much yarn do I need to make a Peacock Coat?
It depends on the size and length, but most versions require between 1,200 to 2,000 yards of yarn in total, especially if using multiple colors.
Can I use only one color for the coat?
Yes, but the multi-colored version is what gives the “peacock” effect. A single-color coat can still be beautiful—just more subtle.
Is the coat heavy when worn?
That depends on the yarn weight. Using lightweight or fingering yarn will result in a softer, lighter coat. Heavier yarns will give it more warmth and structure.
Can I wash the coat in the machine?
Check your yarn label. Many are hand-wash only. If your yarn is machine-safe, wash on a delicate cycle and lay flat to dry.
Can I modify the shape or fit of the coat?
Absolutely! You can adjust the sleeve length, add darts, or change the flare of the hem for a more tailored or relaxed fit.
Conclusion
The Peacock Coat – Crochet Tutorial is a stunning way to combine skill, color, and creativity into one show-stopping garment. From its iconic mandala center to the flowing sleeves and layered textures, this coat offers crocheters a wearable piece of art unlike anything else. It’s not just about fashion—it’s about making something truly your own.
We’d love to hear from you! If you’ve tried the Peacock Coat – Crochet Tutorial, let us know what colors you chose, how you styled it, and any tips you discovered along the way. Share your thoughts, suggestions, or questions—we’re here to grow together in creativity. 💙🧶🦚

