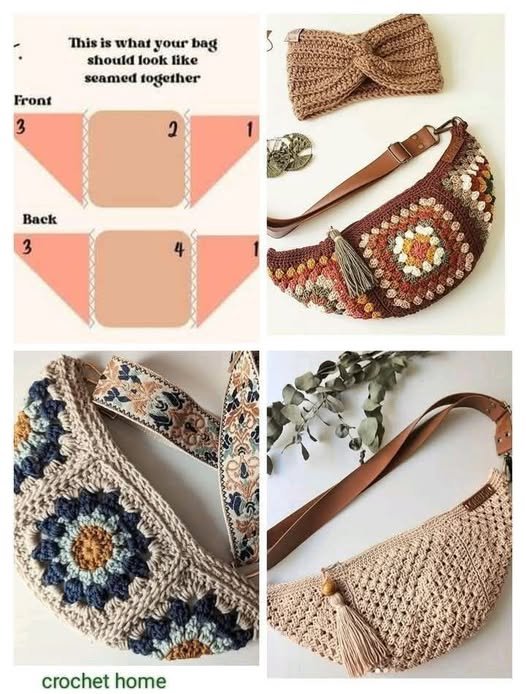
The Square Fanny Pack – Tutorial is a fun and practical project for crochet lovers who enjoy creating accessories that are both stylish and useful. Fanny packs have made a big comeback in recent years, and with this pattern, you can design a unique, handmade piece that perfectly reflects your personal style. Whether you want something casual for everyday wear or a colorful accessory for special outings, this tutorial will guide you through the entire process.
One of the best things about the Square Fanny Pack – Tutorial is how customizable it is. By changing yarn colors, textures, and sizes, you can create a bag that suits any occasion. From neutral tones for a minimalist look to bright and bold combinations for a playful style, the options are endless. This project is also an excellent way to practice crochet stitches while producing something truly functional.
In this article, we’ll explore everything you need to make your square fanny pack: the materials required, the step-by-step construction, ideas for personalization, and essential tips to ensure your bag is durable and stylish. By the end, you’ll feel confident about crocheting a fanny pack that’s both trendy and practical.
1. Materials Needed for the Square Fanny Pack – Tutorial
When starting the Square Fanny Pack – Tutorial, gathering the right materials will set you up for success.
DISCOVER MORE FREE PATTERNS HERE!
Yarn choice is very important for this project. A sturdy cotton yarn works best because it provides structure and durability. Cotton also gives the finished piece a clean and polished look.
For the hook size, it’s usually recommended to use a hook slightly smaller than what the yarn label suggests. This ensures tight stitches, which prevent the bag from stretching too much over time.
You’ll also need a zipper that matches the size of your square pouch. The zipper adds functionality and secures your belongings safely.
A fabric lining can be added inside the fanny pack for extra strength and a professional finish. It also helps the bag hold its shape better.
Don’t forget a sturdy strap or belt material. You can crochet one yourself, or use webbing, which is widely available in craft stores.
Lastly, a tapestry needle and scissors will be necessary for weaving in ends and finishing your project neatly.
2. How to Crochet the Square Fanny Pack
The Square Fanny Pack – Tutorial is built step by step, starting with the basic square panels.
Begin by crocheting two identical squares, which will serve as the front and back of your fanny pack. These are usually made with simple stitches like single crochet or half-double crochet for a dense fabric.
Once the two squares are complete, you’ll join them together, leaving an opening for the zipper. Seam them tightly to create a strong base.
Adding the zipper is the next step. Carefully stitch it into the opening, making sure it aligns properly for smooth functionality.
After the zipper is attached, consider adding a fabric lining if desired. Sew it neatly to the inside of the pouch.
The last part is attaching the straps. You can crochet adjustable straps or use pre-made ones, depending on your preference. This transforms the square pouch into a wearable fanny pack.
With the assembly complete, you’ll have a beautiful handmade accessory ready to use.
3. Customizing Your Square Fanny Pack – Tutorial
One of the most enjoyable aspects of the Square Fanny Pack – Tutorial is customization.
You can experiment with different stitch patterns when creating the squares. For example, textured stitches like the waffle stitch or granny squares add personality to the design.
Color changes also make a big impact. Try stripes, color blocking, or even multicolored yarn to give your bag a vibrant appearance.
Adding embellishments like tassels, buttons, or appliqué can give your fanny pack extra flair and uniqueness.
You can also experiment with strap styles. A crocheted strap adds a handmade feel, while leather or fabric straps create a more modern look.
Lining fabrics are another way to personalize the pack. Choose a patterned fabric for a fun interior surprise.
With these creative touches, each square fanny pack becomes one-of-a-kind.
4. Tips for Success with the Square Fanny Pack – Tutorial
To ensure your Square Fanny Pack – Tutorial project is durable and stylish, keep these tips in mind.
Work with tight and consistent tension so your squares are firm and hold their shape well.
Double-check the alignment of your zipper before sewing. This small step prevents frustration later.
If you plan to carry heavier items, reinforce the seams and consider adding a stronger lining.
Choose high-quality yarn to avoid pilling or stretching over time. Investing in good yarn pays off in the long run.
Take your time finishing details like weaving in ends and attaching straps securely. Small touches make the difference between amateur and professional results.
Lastly, don’t be afraid to experiment. This project is about creativity, so let your style shine through.
FAQ About the Square Fanny Pack – Tutorial
Can beginners make the square fanny pack?
Yes! The pattern is beginner-friendly since it mainly uses basic stitches like single crochet or half-double crochet.
How long does it take to complete a square fanny pack?
It depends on your speed, but most people can finish the project in a few evenings.
Do I need to add a zipper?
While not mandatory, a zipper is highly recommended for practicality and keeping items secure.
What type of yarn is best?
Cotton yarn is preferred for durability and structure, but any sturdy yarn can be used.
Can I adjust the size of the fanny pack?
Absolutely. By making larger or smaller squares, you can easily change the size of the bag.
Do I need a lining for the bag?
A lining is optional but recommended for added strength and a neat interior finish.
Conclusion
The Square Fanny Pack – Tutorial is the perfect crochet project for anyone looking to create a fashionable yet functional accessory. With just two squares, a zipper, and a strap, you can build a handmade fanny pack that suits your style and daily needs. From material choices to creative customizations, this project offers endless possibilities.
PATTERN VIDEO:
Now it’s your turn to try this tutorial and make your own unique square fanny pack. Don’t forget to share your thoughts, opinions, and suggestions—we’d love to hear how your project turned out and what creative touches you added!

