If you’re looking for a crochet project that combines artistry and craftsmanship, a stained glass afghan crochet is the perfect choice.
This afghan design mimics the appearance of vibrant stained glass windows, creating a visually stunning piece for your home. Whether you’re an experienced crocheter or a beginner looking for a challenge, this project offers a unique blend of color, texture, and pattern.
In this blog post, we’ll provide a detailed tutorial on how to create your own stained glass afghan from start to finish.

Choosing Your Materials for the Stained Glass Afghan
To start your crochet stained glass afghan, you’ll need to gather the right materials. Choosing high-quality yarn in a range of colors will allow you to replicate the look of stained glass. Here’s what you’ll need:
- Yarn Selection: Choose multiple colors for the glass effect. Typically, vibrant, jewel-tone colors work best for the “glass panes,” while a dark color like black is used for the borders to create the appearance of lead cames in stained glass. A worsted-weight yarn (medium 4) is ideal for this project, as it’s easy to work with and gives your afghan a good structure.
- Crochet Hook: A 5.0mm (H-8) crochet hook is a good match for worsted-weight yarn. This size provides a balance between tightness of the stitches and flexibility, allowing for a smooth finish on your afghan.
- Other Supplies: Don’t forget your tapestry needle for weaving in ends, a pair of sharp scissors for cutting yarn, and blocking materials (such as blocking mats and pins) to help shape your finished afghan.
Selecting the right materials will ensure that your stained glass afghan looks crisp and professional. It’s important to remember that the dark yarn used for the borders plays a crucial role in achieving the stained glass effect.
Understanding the Essential Crochet Stitches
Before we dive into the pattern, it’s essential to review the crochet stitches you’ll use throughout this project. Even though the stained glass afghan looks complex, it primarily uses basic stitches that are perfect for both intermediate and beginner crocheters.
- Single Crochet (SC): This is one of the most basic and versatile stitches. It creates a dense fabric, which is ideal for the border of each square. The SC stitch is crucial in achieving a clean, sharp edge that resembles the leaded borders in stained glass windows.
- Double Crochet (DC): The DC stitch forms the basis of the colorful glass panes. It’s a taller stitch than SC, allowing you to work more quickly while creating an open, breathable fabric.
- Slip Stitch (SL ST): The SL ST is used to join pieces together. In this project, you’ll use it to connect your individual squares without adding bulk to the seams. This helps maintain the sleek and seamless appearance of the afghan.
Mastering these three stitches will make the stained glass afghan crochet project much more manageable. Practice these stitches before starting if you’re not already familiar with them.
Step-by-Step: Crocheting the Stained Glass Afghan Squares
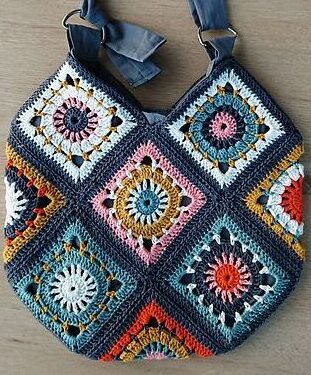
The stained glass afghan is composed of multiple squares that resemble small stained glass panels. Each square is bordered in a dark color, with vibrant colors filling the interior. Here’s a step-by-step guide to making one stained glass square:
- Step 1: Start the Center: Using black or your chosen dark yarn, chain 4 stitches and join with a SL ST to form a ring. Chain 3 (this counts as your first DC), and then work 11 more DC into the ring. You should have 12 DC at the end of this round. Join with a SL ST to the top of the chain 3.
- Step 2: Add Color: Switch to your colored yarn for the glass effect. Attach the yarn to any DC stitch from the previous round. Chain 3 (counts as your first DC), then DC in the same stitch. Continue working 2 DC in each stitch around, for a total of 24 DC. Join with a SL ST.
- Step 3: Create the Border: To outline your stained glass pane, switch back to black or your dark-colored yarn. Chain 1, and SC in each stitch around the square. This step forms the contrast that gives the design its stained glass appearance.
Repeat these steps to create as many squares as needed for your afghan. The number of squares you make will depend on the size of the afghan you want to create. Typically, you’ll aim for a minimum of 5×7 squares for a standard-sized throw.
Joining the Squares for Your Stained Glass Afghan
After creating the individual squares, it’s time to join them into one cohesive piece. The way you join your squares is important for maintaining the stained glass effect. For this project, we recommend using the slip stitch join technique, which creates a seamless and clean look.
- Step 1: Arrange Your Squares: Lay out your squares in the desired arrangement before joining them. This allows you to visualize how the colors will look together. Consider alternating your colored squares to create a balanced and eye-catching design.
- Step 2: Joining the Squares with Slip Stitch: Hold two squares wrong sides together. Insert your hook into the corner stitch of both squares and use your dark-colored yarn to slip stitch through the back loops of each stitch. This technique creates a nearly invisible join that won’t distract from the stained glass design.
- Step 3: Repeat for All Squares: Continue joining your squares row by row. Once all the rows are complete, join the rows together in the same manner. The slip stitch method keeps the focus on the vibrant colors of the squares while providing a sturdy, long-lasting join.
This method will give your afghan a professional finish, with clean edges and minimal bulk. Plus, the dark yarn used in the joining process enhances the stained glass effect by creating clear borders between each square.
Adding a Border to Your Stained Glass Afghan
After joining all the squares, it’s time to add a border to complete the stained glass afghan. The border will frame the entire piece, giving it a polished and finished appearance.
- Step 1: First Round of Single Crochet: With your dark-colored yarn, work a round of SC stitches all around the afghan. Make sure to work one SC in each stitch and 3 SC in each corner to keep the border from curling.
- Step 2: Double Crochet Round: After completing the SC round, switch to DC stitches to add width to the border. This will give the afghan a solid frame, further enhancing the stained glass window effect.
- Step 3: Add Decorative Edging (Optional): If you want to add an extra touch of detail, you can finish the border with a decorative stitch like the shell stitch or picot edging. This will give your afghan a unique and personalized finish.
A well-done border not only frames the entire afghan but also helps stabilize the edges, preventing any warping or curling over time.
Customizing Your Stained Glass Afghan
One of the best things about crochet is that it allows for endless customization. The stained glass afghan crochet pattern is no exception. You can adjust the design to suit your personal taste or match your home décor.
- Experiment with Different Color Schemes: While jewel tones are classic for stained glass designs, you can experiment with pastels, neutrals, or even a monochromatic color scheme for a more modern look. The key is to maintain contrast between the panes and the dark borders.
- Change the Size of the Squares: If you want a larger or smaller afghan, you can adjust the size of the squares by adding or subtracting rounds of double crochet. Larger squares will cover more space faster, while smaller squares give a more intricate look.
- Use Textured Stitches: For added texture, consider incorporating popcorn or bobble stitches into the colorful sections of your squares. This will give the afghan a three-dimensional feel, further mimicking the look of real stained glass.
Customizing your stained glass afghan is an opportunity to make the project uniquely yours. Whether you want to change the color palette or experiment with new stitches, the possibilities are endless.
DISCOVER MORE FREE PATTERNS HERE!
Conclusion
Creating a stained glass afghan crochet is not only a rewarding crochet project but also a true work of art. By using vibrant colors for the glass panes and dark yarn for the borders, you can mimic the appearance of a stained glass window in your very own afghan. This tutorial has guided you through the entire process—from choosing materials, mastering basic stitches, creating squares, joining them, and adding the finishing touches.
With practice and patience, you’ll have a beautiful afghan that’s sure to impress. Whether you’re making this for yourself or as a gift, a stained glass afghan is a striking addition to any home. Grab your hook and start creating this stunning crochet masterpiece today!


