The Sunflower Wall Organizer – TUTORIAL is the perfect crochet project for makers who love combining beauty and functionality. Bright, cheerful, and practical, this wall organizer transforms simple yarn into a decorative storage solution that adds warmth and personality to any space.
Whether you want to organize craft supplies, store mail in your entryway, keep small toys tidy, or decorate a nursery, the Sunflower Wall Organizer – TUTORIAL brings sunshine indoors all year long. With bold petals, a textured center, and a functional pocket, this project is both eye-catching and useful.
In this guide, you’ll learn how to choose the right yarn, build the sunflower base, construct sturdy storage pockets, and add hanging support for a secure and polished finish.
1. Understanding the Structure of the Sunflower Wall Organizer
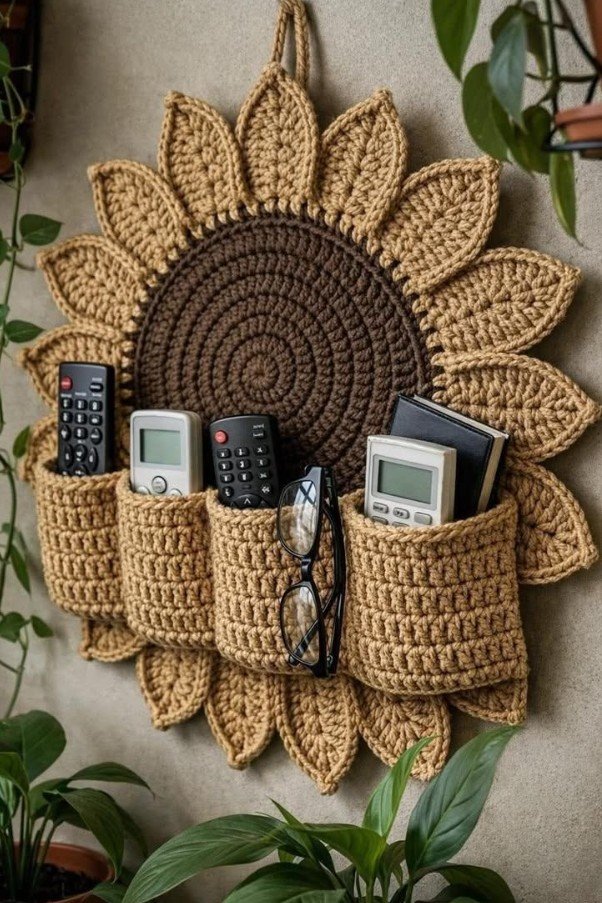
At its core, the Sunflower Wall Organizer – TUTORIAL combines decorative crochet elements with practical design. The organizer typically includes:
DISCOVER MORE FREE PATTERNS HERE!
A large circular sunflower base
Textured center (the “seeds”)
Petal round in bright yellow or gold
Attached pocket section
Hanging loop or rod casing
Most versions are worked in the round, starting from the center and expanding outward. The pocket is often crocheted separately and sewn onto the lower portion of the sunflower.
Common stitches used:
Single crochet for firm structure
Half double crochet for smooth coverage
Double crochet for petal shaping
Puff or bobble stitches for textured center
Because this is a wall organizer and not a garment, tight tension is important. Dense stitches help the piece maintain its shape when holding items.
You can customize the pocket size depending on what you plan to store — smaller compartments for mail or larger sections for yarn, hooks, or children’s items.
2. Choosing Yarn and Materials for Stability
Since the organizer will hang vertically and hold weight, durability is key. The Sunflower Wall Organizer – TUTORIAL works best with yarn that provides structure and minimal stretch.
Recommended yarn types:
Cotton yarn (best for firmness)
Cotton-blend yarn
Macramé cord for extra strength
T-shirt yarn for a modern chunky look
Cotton is especially popular because it maintains shape and resists sagging.
Materials you’ll need:
Crochet hook suitable for your yarn
Stitch markers
Tapestry needle
Scissors
Wooden dowel or metal rod (optional for hanging support)
Color Suggestions:
Dark brown for the sunflower center
Golden yellow for petals
Green for leaf accents
Neutral tones for the pocket
For added strength, consider:
Using a slightly smaller hook than recommended
Adding a fabric lining inside the pocket
Crocheting with two strands held together
If the organizer will hold heavier items, reinforcing the top edge and hanging loops is essential.
3. Step-by-Step Construction Overview
The Sunflower Wall Organizer – TUTORIAL can be completed in manageable stages.
Step 1: Crochet the Center
Begin with a magic ring and work in continuous rounds. Use puff or bobble stitches to create texture that resembles sunflower seeds.
Step 2: Build the Petal Round
Switch to yellow yarn and crochet elongated stitches or chain spaces to form petals. Even spacing ensures a symmetrical look.
Step 3: Reinforce the Base
Add a round of tight single crochet stitches around the entire sunflower to stabilize the shape.
Step 4: Create the Pocket
Crochet a rectangle or semi-circle that matches the lower half width of the sunflower. Use dense stitches to prevent sagging.
Step 5: Attach the Pocket
Sew the pocket securely onto the sunflower base. Reinforce corners and bottom edges with extra stitches.
Step 6: Add Hanging Support
Create a sturdy chain loop at the top or crochet a casing for a wooden dowel. Ensure the hanging mechanism is centered and balanced.
Step 7: Final Touches
Weave in all ends securely. Lightly steam block if needed to smooth edges and define petals.
Take your time aligning the pocket. Even placement keeps the organizer balanced when hanging.
4. Creative Variations and Customization Ideas
One of the most exciting aspects of the Sunflower Wall Organizer – TUTORIAL is its creative flexibility.
Customization ideas include:
Adding crochet leaves behind the sunflower
Creating multiple pockets in layered tiers
Using pastel colors for a nursery theme
Adding embroidered labels
Incorporating textured borders
Advanced variations:
Adding wooden beads to the hanging cord
Using tapestry crochet to create patterns in the pocket
Creating a set of matching wall organizers
Designing seasonal color versions
You can also adjust the size of the sunflower to make a statement wall piece or a compact entryway organizer.
This project makes a thoughtful handmade gift for:
Housewarmings
Teachers
Craft lovers
Garden enthusiasts
Because it combines décor with storage, it is both beautiful and practical.
Frequently Asked Questions (FAQ)
Is this project beginner-friendly?
Yes, if you are comfortable working in the round and sewing pieces together.
How do I prevent the pocket from sagging?
Use tight stitches, sturdy yarn, and reinforce the corners when attaching.
Can I wash the organizer?
If made with cotton yarn, yes. Follow yarn care instructions and reshape while drying.
How much yarn does it require?
It depends on the size, but typically a few skeins are enough for a medium organizer.
Can I make it larger?
Absolutely. Continue increasing the center rounds and expand the pocket accordingly.
Conclusion
The Sunflower Wall Organizer – TUTORIAL is a cheerful and functional crochet project that brings organization and beauty together. With its textured center, vibrant petals, and practical pocket, it adds personality to any space while keeping essentials neatly stored.
Whether you’re creating it for your own home or as a handmade gift, this project offers endless customization possibilities and satisfying results.
Have you tried crocheting decorative storage pieces before? Share your ideas and experiences in the comments — your creativity might inspire another crocheter to bring a little sunshine into their space today.

