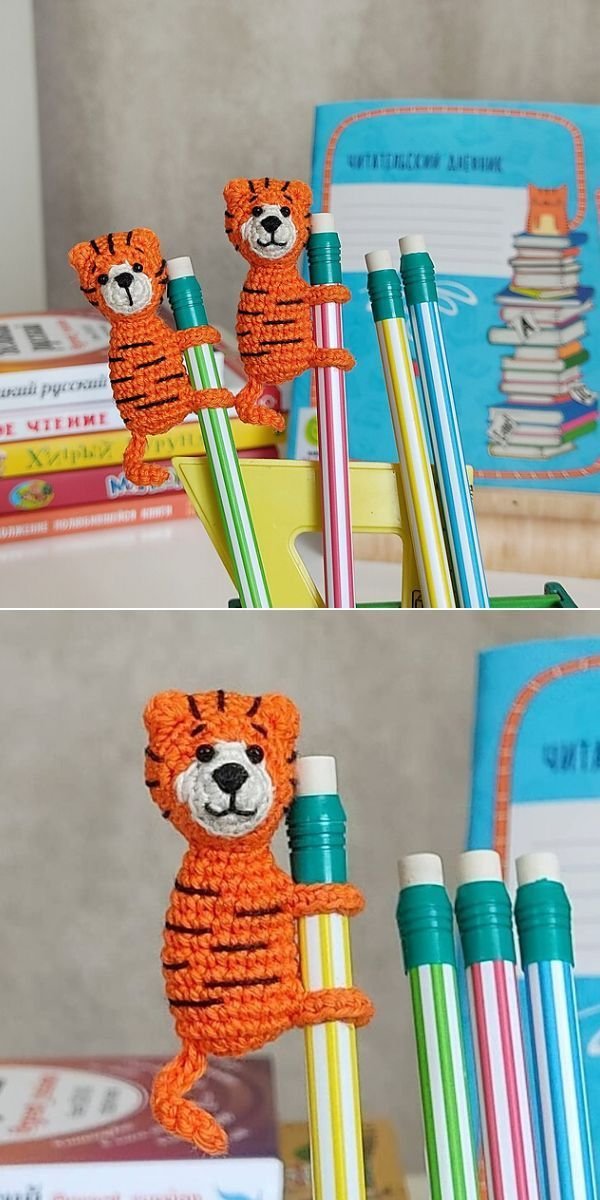
Looking for a fun, creative, and beginner-friendly crochet project? The Tiny Tiger Pencil Topper – Tutorial is the perfect way to bring charm and joy to your everyday stationery. Whether you’re making it for kids, teachers, or just for fun, this adorable little tiger is a delightful addition to your crochet pattern collection. In this article, we’ll guide you through the process of making this cute topper, share essential techniques, and answer the most common questions from crafters online. Get your yarn and hook ready — this is a project you’ll love from start to finish!
The Tiny Tiger Pencil Topper – Tutorial is more than just a pattern — it’s a great opportunity to practice your amigurumi skills on a small scale. It’s ideal for using up leftover yarn and perfect for quick gifts or craft fair items. Plus, kids absolutely adore them!
As you follow along, we’ll highlight helpful tips, material suggestions, and ways to personalize your tiger. This pattern is simple, engaging, and totally doable for beginners with a basic understanding of crochet. By the end of this The Tiny Tiger Pencil Topper – Tutorial, you’ll have a pocket-sized friend who’s always ready to cheer up your desk or pencil case.
1. Materials Needed for the Tiny Tiger Pencil Topper
To begin this The Tiny Tiger Pencil Topper – Tutorial, you’ll want to gather all your supplies before starting the project.
DISCOVER MORE FREE PATTERNS HERE!
You’ll need worsted weight yarn in orange, white, and black. These classic tiger colors create a recognizable and adorable finished piece, though you can personalize the colors to suit your taste.
Use a 3.5mm or 4mm crochet hook for this project. The goal is to keep the stitches tight so that the stuffing doesn’t show through, which is especially important for small amigurumi.
You’ll also need polyester fiberfill for stuffing the head. Since it’s a pencil topper, only a small amount is required.
Black embroidery thread or fine yarn works well for stitching the tiger’s facial details. You can also use safety eyes if the topper isn’t intended for small children.
Scissors, a yarn needle, and stitch markers will be your best friends throughout this project, helping keep your work neat and organized.
Finally, don’t forget your pencil or pen to test the fit of the finished topper. Ensuring a snug fit is essential for practical use.
2. Step-by-Step Instructions for Creating the Tiger Head
The head of the tiger is the main focal point in The Tiny Tiger Pencil Topper – Tutorial, so let’s get started on the core of the project.
Begin with a magic ring and work in continuous rounds using single crochet stitches. This method ensures a clean, round shape with no visible seams.
Gradually increase your stitches for the first few rounds to form the rounded base of the head. You’ll likely reach around 24 stitches in total at the widest point.
Once you’ve increased, maintain the stitch count for several rounds. This forms the bulk of the tiger’s head and gives space for the facial features.
After the middle section is complete, start decreasing stitches in each round to close the head shape. Remember to insert the stuffing before the opening becomes too tight.
Use your stitch markers to track your rounds and decreases. This small step can save a lot of guesswork and ensure symmetry.
When the head is closed, use a yarn needle to weave in the end securely. The structure should be firm but soft, ready for the next steps.
3. Adding Details: Ears, Stripes, and Face
Now that the head is formed, it’s time to bring your tiger to life! This section of The Tiny Tiger Pencil Topper – Tutorial is where the magic happens.
Crochet two small half-circle ears using orange yarn. You can add a small patch of white inside each ear if desired. Sew them symmetrically to the top sides of the head.
To make the stripes, crochet or embroider three short black lines on the back and sides of the head. These help identify the character as a tiger.
For the face, use black thread or fine yarn to stitch two sleepy or smiling eyes. Small black safety eyes can also be used if age-appropriate.
Stitch a tiny triangle in black or dark brown yarn for the nose, placed in the center of the face just above the mouth area.
Add a small smile below the nose using backstitch embroidery. Keep it subtle but expressive — a cheerful look goes a long way!
Optional: You can attach tiny white cheeks or a snout area if you want to give it more dimension. This is your chance to make your tiger unique!
4. Making and Attaching the Pencil Sleeve
The final part of The Tiny Tiger Pencil Topper – Tutorial focuses on the pencil sleeve, which keeps your topper securely attached to your writing tool.
Using the same hook and yarn, crochet a simple tube that fits snugly around a pencil. A starting chain of 8–10 stitches usually works well.
Work the sleeve in continuous rounds or rows, joining at the end of each round if you prefer a cleaner seam.
Keep testing the fit with your actual pencil to ensure it holds securely. You want it snug, not loose, so it doesn’t slip during use.
Once the sleeve is the correct length (about 1.5 to 2 inches), finish off and leave a long tail for sewing.
Use the tail and yarn needle to attach the head to the top of the sleeve. Stitch around evenly so it’s centered and sturdy.
Weave in all ends neatly. Your Tiny Tiger Pencil Topper is now complete and ready to use or gift!
FAQ – The Tiny Tiger Pencil Topper – Tutorial
What skill level is required to make the Tiny Tiger Pencil Topper?
This project is beginner-friendly. You only need to know basic stitches like single crochet, increases, and decreases.
Can I use different yarn types or weights?
Yes, but stick to similar weight yarns for all components. Switching to thinner or thicker yarn may change the size significantly.
Are safety eyes safe for all ages?
No. If the topper is for a small child, it’s better to embroider the eyes instead of using safety eyes.
Can I make other animals using this base pattern?
Absolutely! The head and sleeve structure can be adapted to create different animals like cats, bears, or dogs.
How do I keep the topper from slipping off the pencil?
Ensure the sleeve is crocheted tightly. Using elastic yarn or adding a few stitches around the opening can help it grip better.
Can I sell toppers made from this pattern?
Yes, most free patterns allow selling finished items as long as you credit the designer and don’t resell the pattern itself.
Conclusion
In this complete The Tiny Tiger Pencil Topper – Tutorial, we’ve walked through every step of creating a charming crochet tiger to sit atop your pencil. From forming the head to adding details and assembling the sleeve, this pattern is a rewarding and accessible project. It’s a perfect gift idea, a fun classroom accessory, or a simple way to brighten someone’s day.
If you enjoyed this tutorial, let us know! We’d love to hear your thoughts, see your finished projects, and take your suggestions for future patterns. Happy crocheting! 🧶🐯

