Welcome to this Tiny Cute Crochet Pumpkin tutorial, the perfect fall crochet project! With their adorable size and vibrant colors, these crochet pumpkins are ideal for adding a festive touch to your home.
Whether you’re an experienced crocheter or a beginner looking for a simple project, this crochet pattern is a great way to welcome the season.
Let’s dive into the step-by-step tutorial and learn how to make these tiny pumpkins!

Why Make Tiny Crochet Pumpkins?
Creating these tiny crochet pumpkins brings fun and charm to any crochet collection. They’re quick to make, customizable, and versatile in decorating. Plus, this crochet pattern requires minimal supplies and can be completed in under an hour.
DISCOVER MORE FREE PATTERNS HERE!
Adding Seasonal Decor
Tiny crochet pumpkins are a wonderful way to bring fall decor into your home. Scatter them around your living room, line them up on a mantel, or place them in a decorative bowl for a warm autumnal vibe. The small size also makes them ideal for decorating office spaces or crafting into seasonal gifts.
Perfect for All Skill Levels
With this crochet pattern, even beginners can jump in and create something adorable. The steps are simple, focusing mainly on single crochet (sc) stitches and basic shaping techniques. If you’re new to crochet, it’s a rewarding and manageable project that’s not overwhelming.
A Creative Gift Idea
These tiny pumpkins make charming handmade gifts, whether as a set or individually. They’re perfect for Thanksgiving hostess gifts or as a sweet, autumn-themed addition to any gift package. Customize each one with different shades of orange, green, or even white to create unique pumpkins.
Materials Needed for the Tiny Crochet Pumpkin Pattern
Gathering your materials is quick and easy with this crochet pattern. Here’s everything you need to create these tiny pumpkins, from yarn to stuffing.
Yarn Selection and Colors
Select worsted-weight yarn for the pumpkin body in shades of orange, green, or even mustard for a unique look. For the stem, choose brown or green yarn in a similar weight. You’ll only need a small amount of yarn, making this project great for using up leftover yarn scraps.
Essential Tools for the Project
For this project, you’ll need a crochet hook (usually size G/4mm), a tapestry needle, and scissors. If you want your pumpkin to have a more structured shape, gather some stuffing material like polyester fiberfill. The tapestry needle will help you with stitching the pumpkin closed and adding the stem.
Optional Embellishments
Feel free to get creative with embellishments! Small beads, leaves, or even a touch of glitter can add personality to your tiny crochet pumpkins. Adding a little embroidery on the surface can also give a unique touch, especially if you want to personalize them as gifts.
Step-by-Step Instructions for the Tiny Crochet Pumpkin
This crochet pattern uses single crochet stitches and simple rounds to create the pumpkin’s shape. Follow the steps below to complete your tiny crochet pumpkin.
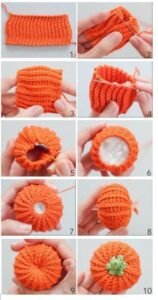
Step 1: Starting the Pumpkin with a Magic Ring
To begin, create a magic ring and make 6 single crochets (sc) into the ring. Pull the ring tight to close. This forms the base of your pumpkin and will be the starting point for your rounds. The magic ring is perfect for creating a tight, rounded base, which is key to achieving the pumpkin shape.
Step 2: Building Up the Rounds
In the next round, increase by making 2 single crochets in each stitch around, ending with 12 stitches. Continue to increase for a few more rounds until your pumpkin reaches a width of approximately 2 inches. This process creates the rounded, compact body of the pumpkin and prepares it for shaping.
Step 3: Shaping the Pumpkin Body
Once your base is established, crochet several rounds without increasing to build the body. This step gives your pumpkin its distinct roundness. When you’re happy with the height, begin to decrease by crocheting two stitches together (sc2tog) around until you’re left with a small opening.
Adding the Stem to Your Crochet Pumpkin
Now that you have the pumpkin body complete, it’s time to add the tiny stem. This part is simple and adds that final touch to make it truly look like a pumpkin.
Step 1: Attaching the Brown Yarn
Switch to brown or green yarn by joining it to one of the stitches around the opening of your pumpkin. This color change marks the start of the stem. Use slip stitches to make the transition seamless, giving it a natural look.
Step 2: Creating the Stem’s Length
For the stem, make a few rounds of single crochet stitches in a tight spiral, about 1/2 inch in height. If you want a thicker stem, you can add an additional round or two. Keep the stitches tight to create a sturdy, defined stem that won’t flop over.
Step 3: Closing Off the Stem
Finish off the stem by weaving the end of your yarn through the final stitches, pulling it down through the center. Cut any excess yarn, leaving a neat and tidy finish. This step is essential for creating a realistic look and ensuring the stem stays in place.
Adding the Final Touches: Stuffing and Shaping Your Pumpkin
The final step is to stuff your pumpkin and shape it to achieve the perfect look. Stuffing will give it that rounded appearance, making it look full and plump.
Step 1: Stuffing the Pumpkin
Before closing up the bottom, fill your pumpkin with polyester fiberfill or other stuffing material. Add just enough to keep it soft but not overly stuffed. A little goes a long way in giving it a natural shape without overstretching the stitches.
Step 2: Shaping for Realism
Use your tapestry needle to create lines from top to bottom, sectioning the pumpkin into segments. This is done by pulling the needle through the center and looping the yarn tightly around each side, creating the classic pumpkin ridges. This technique brings depth and realism to the final look.
Step 3: Final Adjustments
Once shaped, take a final look at your pumpkin and make any small adjustments. This may involve fluffing the stuffing or tightening certain sections. When you’re satisfied, snip any extra threads and ensure all ends are woven in securely.
Creative Ways to Use Your Tiny Crochet Pumpkins
Now that your crochet pumpkin is complete, you can use it in a variety of ways around the house, or as part of your holiday gifts. Here are some ideas for making the most of your finished piece.
Seasonal Table Decor
Display these pumpkins as part of your seasonal table decor. They work beautifully as placeholders or combined with other fall decorations like pinecones and leaves. Their small size also makes them ideal for use as part of a Thanksgiving tablescape.
Festive Gifting Options
Add a tiny crochet pumpkin to a fall gift basket or include it as part of a handmade gift for friends and family. These pumpkins add a touch of warmth and charm, perfect for expressing your creativity and thoughtfulness.
Making a Garland
For a fun twist, crochet several pumpkins in varying shades and string them together as a garland. This makes a wonderful addition to mantels, doorways, or even as a playful seasonal banner. You can experiment with different sizes to create an eye-catching display.
Tips for Customizing Your Crochet Pumpkin
Once you’ve mastered the basic crochet pattern, try experimenting with different styles to create a personalized pumpkin collection. Here are some fun customization ideas.
Using Different Yarn Textures
For an extra cozy feel, try using a velvet or chenille yarn for your pumpkin. These yarns add a plush texture and make the pumpkin feel softer and more luxurious, perfect for adding warmth to your decor.
Adding Embroidery or Beading
Embellish your pumpkin with embroidery or small beads to create a unique design. You can add simple stitches like vines or leaves along the surface to make it more festive, or use beads for a bit of sparkle.
Experimenting with Pumpkin Sizes
If you want a varied look, experiment with different hook sizes or yarn weights to create a set of pumpkins in various sizes. A smaller hook with fine yarn will make a tiny pumpkin, while a larger hook with chunky yarn will result in a larger pumpkin. This adds variety to your decor and showcases the versatility of this crochet pattern.
With this Tiny Cute Crochet Pumpkin tutorial, you now have all the steps and tips you need to create beautiful fall decor with just a crochet hook and some yarn. Enjoy the process of crafting these pumpkins, whether you’re making a single pumpkin or an entire patch for your seasonal decorations. Happy crocheting!


