3D Quilt Block – Tutorial is a wonderful way to bring extra texture, depth, and dimension to your quilting projects. Unlike traditional quilt blocks that remain flat, a 3D quilt block gives the illusion of movement and layers, turning your quilt into a piece of textile art. Quilters of all levels love experimenting with this block because it allows for creativity, color play, and unique fabric combinations that stand out in both small projects and large quilts.
The charm of the 3D quilt block lies in its versatility. You can use this block to create intricate quilt tops, decorative pillow covers, wall hangings, or even table runners that immediately catch the eye. With the right mix of colors and fabrics, the three-dimensional effect can range from subtle elegance to bold, striking designs. This tutorial will guide you step by step through understanding and creating your very own 3D quilt blocks, even if you are new to quilting.
Whether you are a beginner looking for a new challenge or an experienced quilter searching for innovative ideas, this 3D Quilt Block – Tutorial will inspire your creativity. The combination of fabric folding, precise cutting, and strategic placement allows quilters to explore endless design possibilities while still following a structured method. Let’s dive into the details and see how you can master this fascinating quilting technique.
1. Understanding the Basics of a 3D Quilt Block
When we talk about a 3D quilt block, we are referring to a block design that uses fabric manipulation to create a raised, dimensional look. This effect can be achieved in many ways, including folded fabric units, layered triangles, or fabric inserts that “pop” out from the surface.
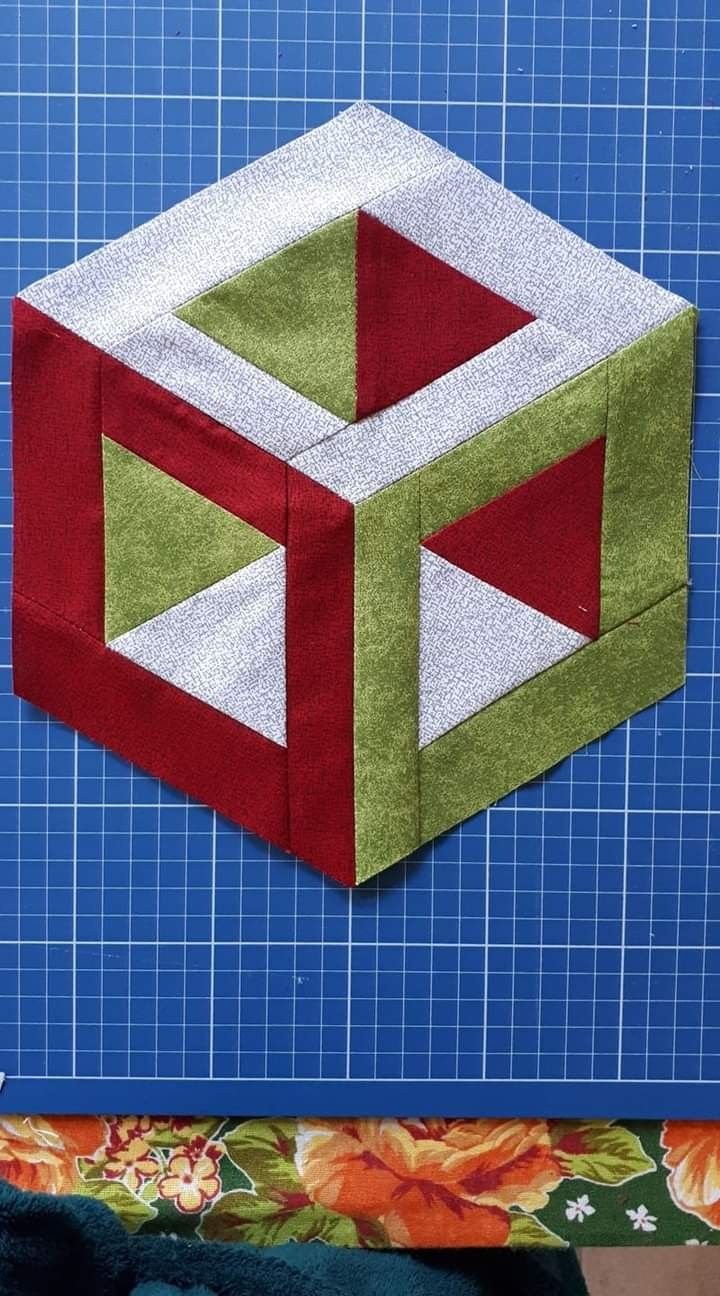
SEE OTHER FACE PATTERNS HERE!
The first key element to understand is fabric choice. Bold prints, contrasting colors, and textured fabrics work best for highlighting the 3D illusion. Light and dark fabric placement plays a huge role in how the block appears, as shadows and highlights emphasize the depth.
Another important factor is cutting accuracy. Quilting relies heavily on precise cutting, but with 3D blocks, this becomes even more essential because uneven pieces can affect how the fabric folds and lays. Accuracy ensures the block maintains a clean, sharp look.
Stitching is also different in a 3D quilt block compared to flat blocks. Instead of simply sewing together flat fabric units, you will often fold fabric into shapes such as triangles or squares and then sew them into place. These folded units remain loose at the edges, creating the dimensional effect.
Ironing and pressing are equally crucial. When making 3D units, pressing seams carefully will help lock in the folds and maintain the desired shapes. A steam iron can be helpful, but pressing with precision is even more important.
Lastly, think about project size. While you can use a single 3D quilt block for small items like a mug rug or potholder, you can also repeat the design to create a full quilt. The adaptability of the block makes it a favorite among quilters who enjoy experimenting with both modern and traditional styles.
2. Materials and Tools You Will Need
Creating a 3D quilt block does not require any specialized equipment beyond what most quilters already own, but having the right tools will make the process smoother and more enjoyable.
The most important material is, of course, fabric. Choose a variety of cotton fabrics in complementary or contrasting colors to highlight the three-dimensional look. For beginners, working with solid colors or small prints is recommended because they make the folds and shapes more visible.
A rotary cutter, quilting ruler, and cutting mat are essential for achieving clean and accurate cuts. These tools allow you to cut multiple pieces at once while ensuring all the pieces match perfectly in size.
Pins or fabric clips are also necessary to hold folded units in place before sewing. Since the folded edges may shift during stitching, secure them carefully to avoid misalignment.
For stitching, a sewing machine with a quarter-inch presser foot is highly recommended. This ensures consistent seam allowances, which are key for precision in quilting. Some quilters prefer hand-sewing parts of the block, but machine stitching is faster and more durable.
An iron and ironing board will be your best friends during the process. Pressing after every step locks the folds in place and gives your block a polished look.
Lastly, you may want to use a design wall or flat working surface to arrange your blocks before sewing them together. Seeing how the blocks look side by side helps in planning color placement and balancing the 3D effect across the quilt.
3. Step-by-Step Guide to Making a 3D Quilt Block
Now that you have your materials ready, let’s walk through the process of creating a 3D quilt block.
Step one is cutting your base fabric squares. These will serve as the foundation for your block. Decide on the finished block size before cutting, and remember to account for seam allowances.
Next, cut additional fabric squares for the 3D effect. These pieces are typically folded into triangles or other shapes before being stitched onto the base. For example, fold a square diagonally to create a triangle, and then place it on top of a base square, aligning the raw edges.
Pin or clip the folded unit to the base square. This is where precision matters: make sure the folded edge stays straight and does not shift out of place. The fold will remain loose and give the 3D block its dimensional appearance.
Sew the folded unit onto the base using a consistent seam allowance. Once stitched, open the block and press carefully to ensure the fold stays sharp. Repeat this process with additional folded units depending on the design.
After attaching all the folded units, assemble the block by sewing together the squares into rows, and then join the rows. Remember to press the seams as you go, alternating directions for easier assembly.
Finally, square up the finished block to the correct size. This ensures that your block fits seamlessly with other blocks when creating a larger quilt. At this stage, you’ll clearly see the raised, dimensional effect of your 3D quilt block.
4. Creative Uses for the 3D Quilt Block
One of the most exciting aspects of the 3D quilt block is how versatile it can be in different projects. Whether you are making a full quilt, a smaller craft, or an accent piece, this block adds personality and charm.
For a small project, consider using a single 3D block as a decorative pillow cover. The dimensional effect makes it a striking centerpiece on a sofa or bed. Choose fabrics that complement your home decor for a cohesive look.
Another option is to create a series of 3D quilt blocks for a table runner or wall hanging. The blocks can be arranged in repeating patterns or combined with flat blocks for variety. This type of project allows you to experiment with different layouts without committing to a large quilt.
For quilters who enjoy making bed quilts, incorporating 3D blocks creates a stunning effect. Imagine a quilt where certain blocks seem to rise above the surface, catching light and shadow. This kind of design instantly transforms a quilt into a showpiece.
You can also use 3D blocks in tote bags, purses, or other quilted accessories. A pop of dimension on a bag flap or pocket adds a playful and artistic touch.
Finally, don’t be afraid to mix and match. Combine the 3D quilt block with traditional blocks like log cabin, nine-patch, or flying geese for a quilt that blends classic design with modern flair. The possibilities are endless and limited only by your imagination.
FAQ About 3D Quilt Block – Tutorial
What makes a 3D quilt block different from a regular block?
A 3D quilt block includes folded or layered fabric pieces that create a raised, dimensional effect, unlike flat traditional blocks.
Do I need special tools to make a 3D quilt block?
No, standard quilting tools such as a rotary cutter, ruler, cutting mat, pins, and a sewing machine are all you need.
Can beginners try this 3D quilt block tutorial?
Yes, beginners can absolutely make a 3D quilt block. Start with simple folded triangle designs before moving on to more complex layouts.
What fabrics work best for 3D quilt blocks?
Cotton fabrics in solid colors or small prints are ideal. High-contrast fabrics highlight the 3D effect most effectively.
How do I keep the folds from shifting while sewing?
Use pins or fabric clips to secure the folds before stitching, and sew slowly with a consistent seam allowance.
Can 3D quilt blocks be washed like regular quilts?
Yes, but always press carefully after washing to maintain the dimensional effect. Using cotton fabrics ensures durability.
Conclusion
The 3D Quilt Block – Tutorial is an inspiring way to add depth, creativity, and uniqueness to your quilting projects. From pillows and wall hangings to full-sized quilts, this block opens up endless design possibilities while still being achievable for quilters of all skill levels. With careful cutting, folding, and stitching, you can create blocks that truly stand out.
We hope this article has given you the knowledge and confidence to try your hand at making 3D quilt blocks. Have you ever experimented with 3D quilting techniques before? Share your honest opinions, experiences, and suggestions in the comments—we would love to hear from you and continue growing our quilting community together.

